Dynamic Content: Internal Collections
Internal Collections are spreadsheets saved and managed in the Content Library of a site. They can be used to create Dynamic Pages (see Dynamic Content: Dynamic Pages . and regular pages, similar to how Connected Data is used with the site's Business Info (see Collections for Dynamic Content: Collections for Regular Pages .
For more information on Connected Data with Business Info, see Dynamic Content: Business Info, Text, and Images
NOTE
Slashes ("/") are not supported in the collection's name.
Limitations and Specifications per Collection Type
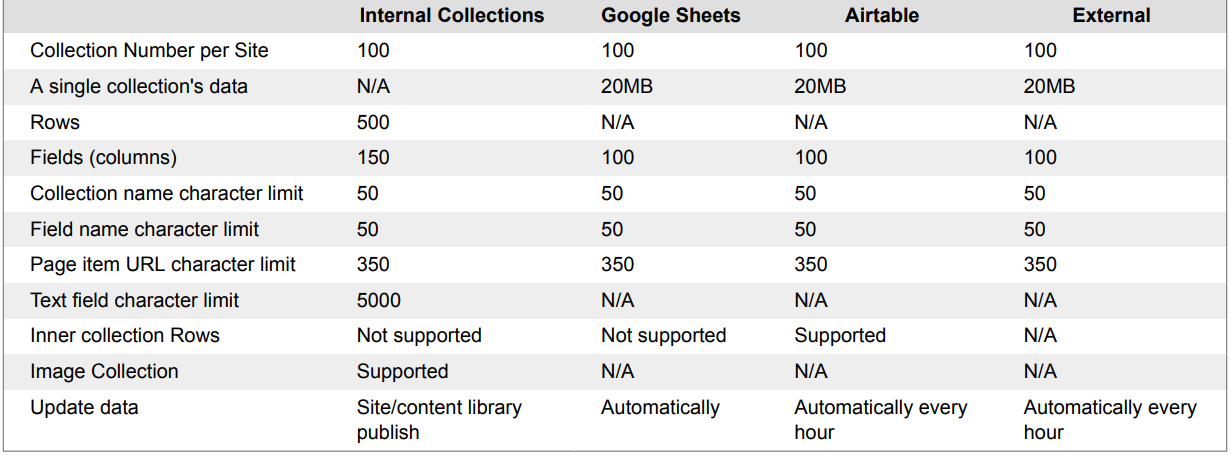
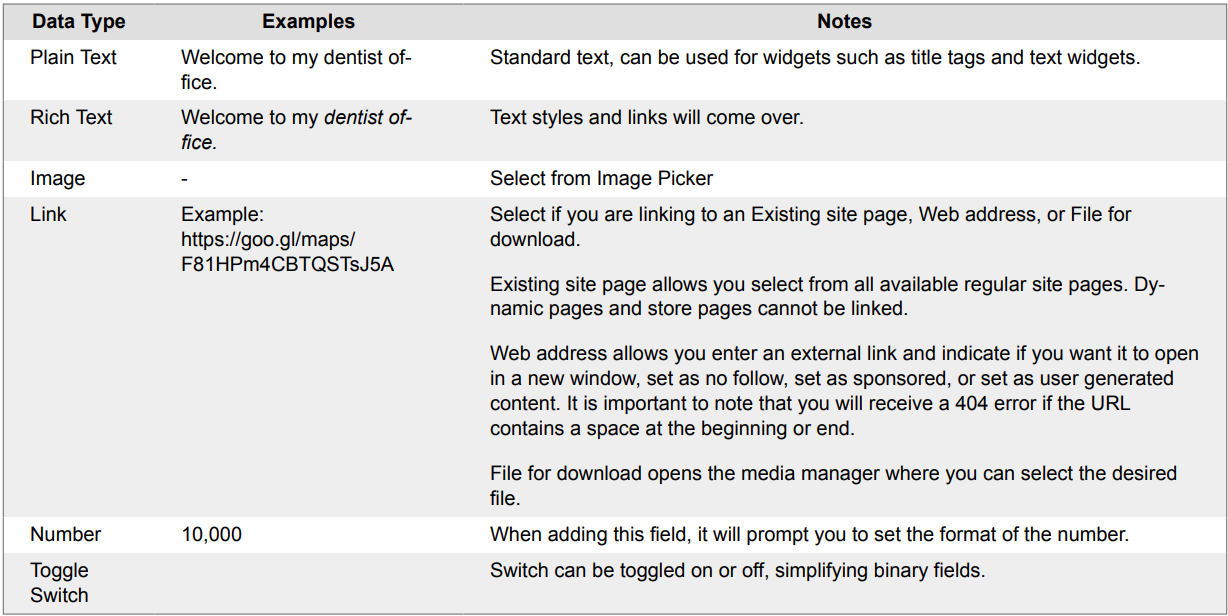
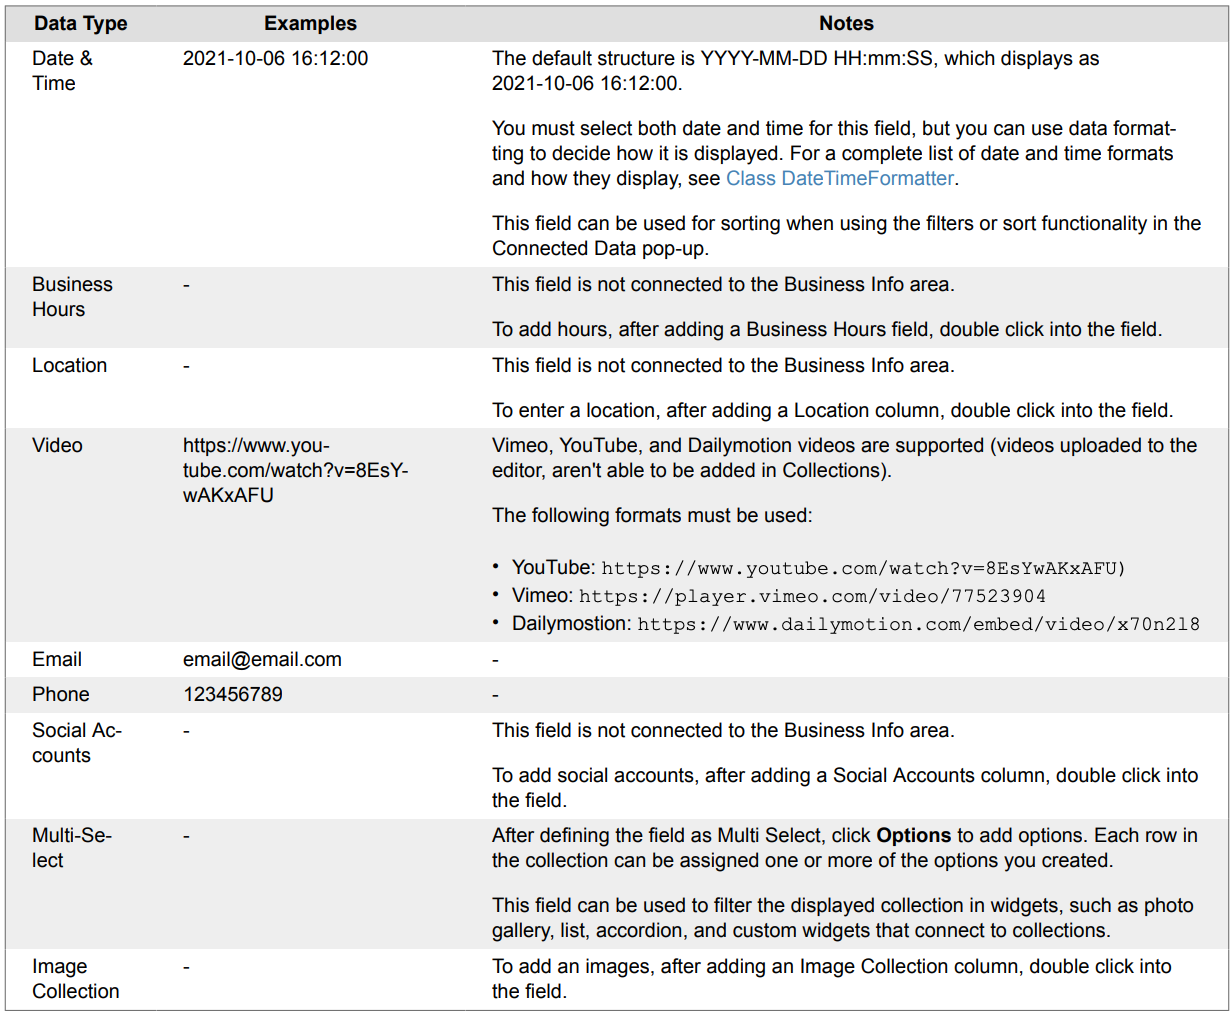
Available Fields
Below is a table with the data types that are available and notes and examples
Add Internal Collections
You can create dynamic pages with internal collections by adding one of the ready-to-use dynamic pages in the Pages panel that is automatically connected to an internal collection or by creating a new collection.
NOTE
You can also upload a CSV to import records to a blank internal collection, or update an existing collection by replacing current records or adding new ones. To learn how, see Import Records from CSV
Use a Pre-Built Dynamic Page with Configured Internal Collection
To use a ready-to-use dynamic page and internal collection:
- In the side panel, click Pages.
- Click +Add Page.
- Click Dynamic Pages, then select any of the options (all options, by default, have an internal collection that can be used).
- Type a Page Name, and click + Add Page.
- Click Go to Collection to update the content in the internal collection.
- (Optional) Edit the collection.
NOTE
• Keep the field names as they are so they stay connected to the widgets.
• The first column, labeled Item, is a mandatory field and each row must have a unique value. The column name is not editable and can not be reordered.
• Use special characters with caution in the Item column as they can cause issues with dynamic pages or widgets connected to the collection.
• When connected to Dynamic pages, the values in the Item field will be the URL of the generated pages.
- In the top tool bar, click Done.
Create New Internal Collections
To create a new internal collection:
- In the side panel, click Content.
- Click Collections.
- Click +New Collection, and select Internal Collection.
NOTE
• The first column, labeled Item, is a mandatory field and each row must have a unique value. The column name is not editable and can not be reordered.
• When connected to Dynamic pages, the values in the Item field will be the URL of the generated pages.
• For detailed information on configuring the Item field for use on regular pages.
• Use special characters with caution in the Item column as they can cause issues with dynamic pages or widgets connected to the collection.
• The content of internal collections will be available on the live site when the site is published or republished.
• Slashes ("/") are not supported in the collection's name.
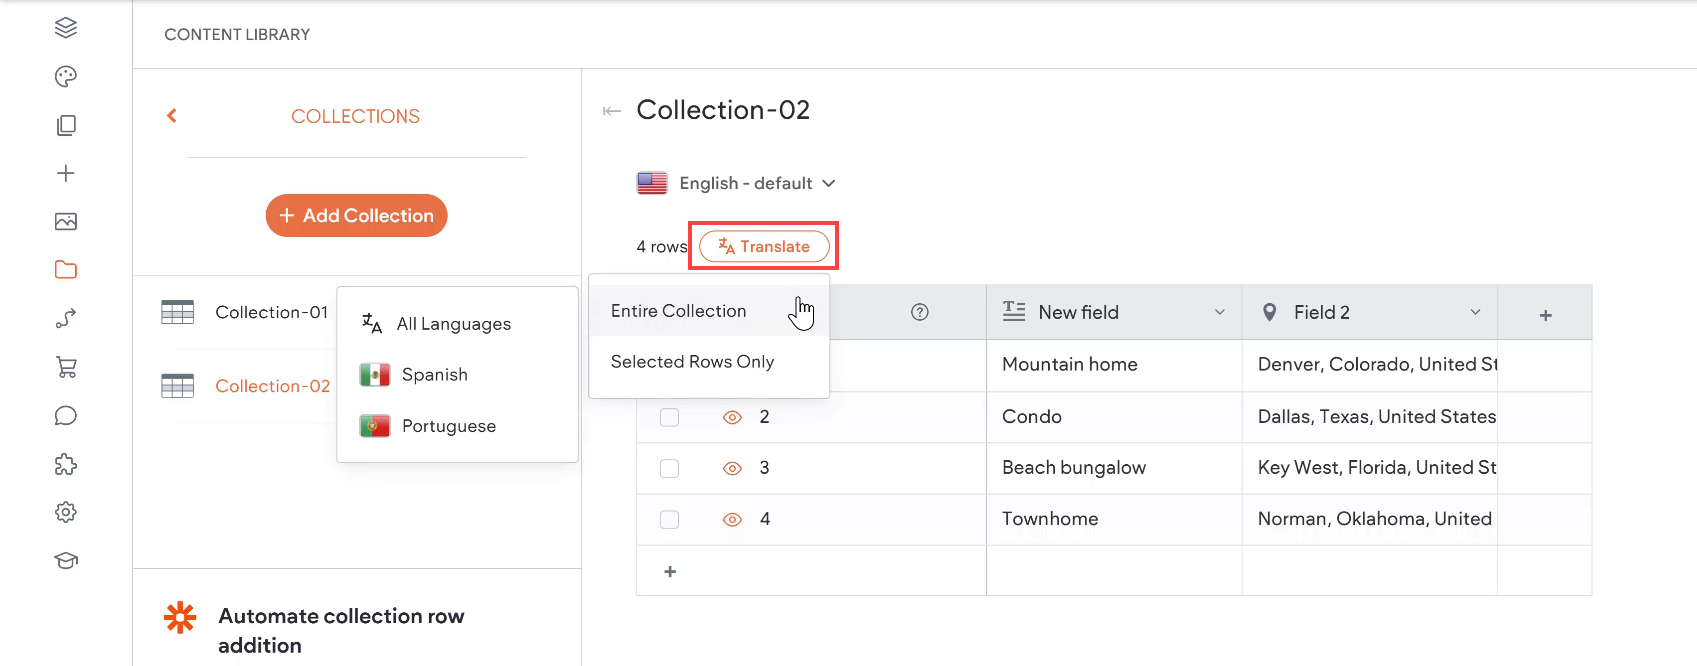
Translate Internal Collection
Easily translate specific rows or an entire internal collection by syncing your translations from the default language or managing them manually. It is important to note that you must have multi language enabled for your site before you can translate internal collections.
Current Limitations
• API integration is not supported. The API will only return results in the default language.
• This feature is only available for sites created after July 28, 2025.
To translate an internal collection:
- If you have not already, enable multi language for you site by following the instructions in Add and Manage Multiple Languages
- In the side panel, click Content.
- Click Collections.
- Open the desired internal collection.
- If the collection has not been translated previously, click Translate. The entire collection will be translated and a success message displays after.
- If the collection has been translated previously, click Translate then select to translate the Entire Collection or Only Selected Rows. Next, select to translate into all enabled languages or a specific language.
If the Translate button is not clickable, you need to use the dropdown menu to select the default language. Translations can only be completed from the default language.
Duplicate an Internal Collection
To duplicate a collection:
- In the side panel, click Content.
- Click Collections.
- Click the three horizontal dots for the collection you would like to duplicate.
- Click Duplicate Collection.
- Click on the copied collection to open and edit it.
Edit Internal Collections
Internal collections can be edited from either the Content Area or from the Dynamic page it's connected to.
Edit in the Content Area
The following are available actions and options:
• To rename the collection, click the collection name and type a new name.
• Click + Add Row at the top or the plus (+) icon located below the last row to add a row (in the Item column, enter what you would like the item's URL to be).
• To add a new field/column, click the plus icon (+) located next to the existing fields/columns. This will insert a new field in the Internal Collection.
• Double-click in a field to add information.
• Click the eye icon to hide the row, this will make it inaccessible from any dynamic pages or widgets connected to the collection.
• To reorder the columns, click-and-drag the desired column to the right or left.
• To edit the content of a full row, hover on the row and click the arrows to open the row in a separate dialog. Alternatively, right-click the row, and then select Edit Row.
• To edit the field types, click the arrow next to the field, and select Edit Field.
• Click the check box for one or multiple rows/records to:
• Set Visibility. Hide or show selected elements (same action as clicking the eye icon to hide the row).
• Duplicate. Duplicate the selected rows.
• Delete. Delete the selected rows.
NOTE
• The first column, labeled Item, is a mandatory field and each row must have a unique value. The column name is not editable and can not be reordered.
• Use special characters with caution in the Item column as they can cause issues with dynamic pages or widgets connected to the collection.
• For detailed information on configuring the Item field for use on regular pages, Dynamic Content: Collections for Regular Pages
Edit from the Dynamic Page
To edit a row in an internal collection from a dynamic page:
- Open the Dynamic Page connected to the collection to edit the page in Dynamic Mode.
- In the top toolbar, click the Edit Row button.
- Edit any fields and at the top of the page, click Done.
NOTE
Edits made to internal collections will be available on the live site when the site is published or republished.
Convert Collection Fields
You can convert field types between the following fields (even if the fields already contain data):
• Plain text
• Rich text.
• Number
NOTE
• Converting from rich text to plain text removes all markup from the field.
• Converting from rich text or plain text to number fields is possible if the data in the field only contains numbers.
To convert collection field types:
- In the side panel, click Content.
- Click Collections.
- Open the collection containing the field you want to convert.
- Click the name of the field you want to convert, and click Edit Field.
- Select a new field type from the drop-down list.
- Click Convert.
To undo the change, click the field name, and then click Revert Field Change.
Export Internal Collection to CSV
To export an internal collection to CSV:
- In the side panel, click Content.
- Click Collections.
- Click the three horizontal dots icon ( ) next to the desired internal collection.
- Select Export to CSV.
Internal Collections: Import Records from a CSV
Import record to blank internal collection, or update an existing collection by replacing current records or adding new ones with a CSV file.
Notes and Requirements:
• Currently supported fields: plain text, rich text, location, links, and images (with links only, images in the CSV won’t be uploaded).
• The first row’s text/labels in the CSV must exactly match those in the internal collection (while columns can be missing from the CSV, additional ones are not able to be added and will result in an error).
• Records are not able to be deleted with the import tool.
To import records from a CSV:
- Navigate to an existing internal collection or create a new one (to create a new one, in the side panel, click Content, and then click Collections > click +New Collection, and select Internal Collection. When creating a new collection, make sure to set up the columns in the internal editor before proceeding to step 4, where you'll download the template. The columns you add to the collection will be included in the template.
- Click the three horizontal dots for the desired collection.
- Click Import from CSV.
- Click Download CSV template or if the CSV is ready, click Drop files or click to upload.
- Once the file is selected, click Import Collection.
- If all records imported, a confirmation message will display. If only some records imported, it will provide the number along with an option to download the error report.
For more information on internal collections, see Internal Collections
Updated 3 months ago