Installing Google Analytics 4 via Google Tag Manager
Manage all your marketing tags with Google’s tag management (GTM) system
Introduction
Google Tag Manager (GTM) is a free tag management system that allows users to manage and deploy various types of tracking tags on their websites or mobile apps without the need for manual code implementation.
On July 1, 2023, standard Universal Analytics properties will stop processing data. We strongly encourage you to make the switch to Google Tag Manager.
With Google Tag Manager, you can add, edit, and manage all of your website tags from a single interface, without directly modifying the website's underlying code. Instead of manually placing tags in the source code of each page, users install a single GTM container snippet on a website or app. The container snippet is a small JavaScript code that enables the GTM system to load and manage all the tags.
Examples of tags that can be added through GTM:
- Google Analytics 4 / Google Analytics UA
- Social media pixels like Meta Pixel
- Live chat applications
- And much more
How to connect Google Tag Manager to Uplisting
Before you connect GTM to Uplisting you first need to create a Google Tag Manager account. If you don’t have a GTM account you can create one here.
- Go to the Connect screen and select Google Analytics

- Enter your Google Tag Manager Container ID and save. You can find your Google Tag Container in the top right of your GTM Workspace, it should be in this format “GTM-XXXXXX”
It may take a few minutes for your Google Tag Manager Container ID to be included on your direct booking website.
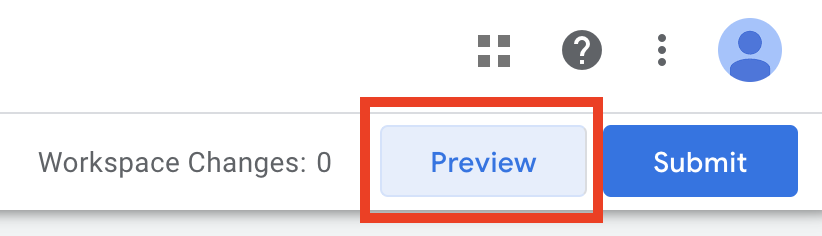
Once you’ve added the GTM container ID you can preview that it’s active on your direct booking website by selecting Preview through the GTM user interface. If you need further help follow these instructions.
Setting up Google Analytics 4 (GA4) Through GTM
To set up GA4 through GTM you can follow these instructions from Google or we’ve outlined the process below for you to easily follow.
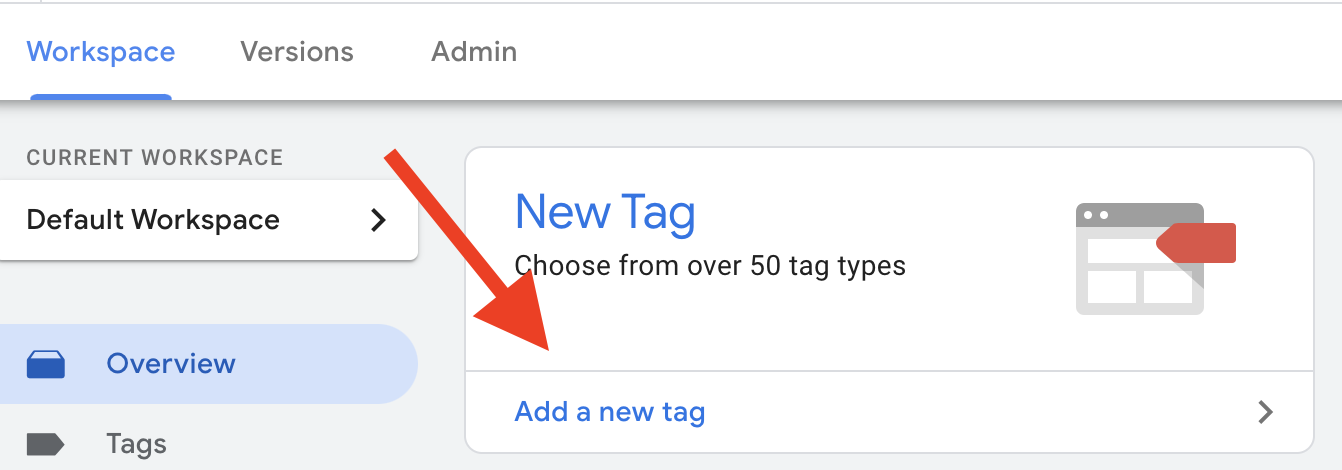
Step 1:
From the GTM Workspace click Add a new Tag as shown below
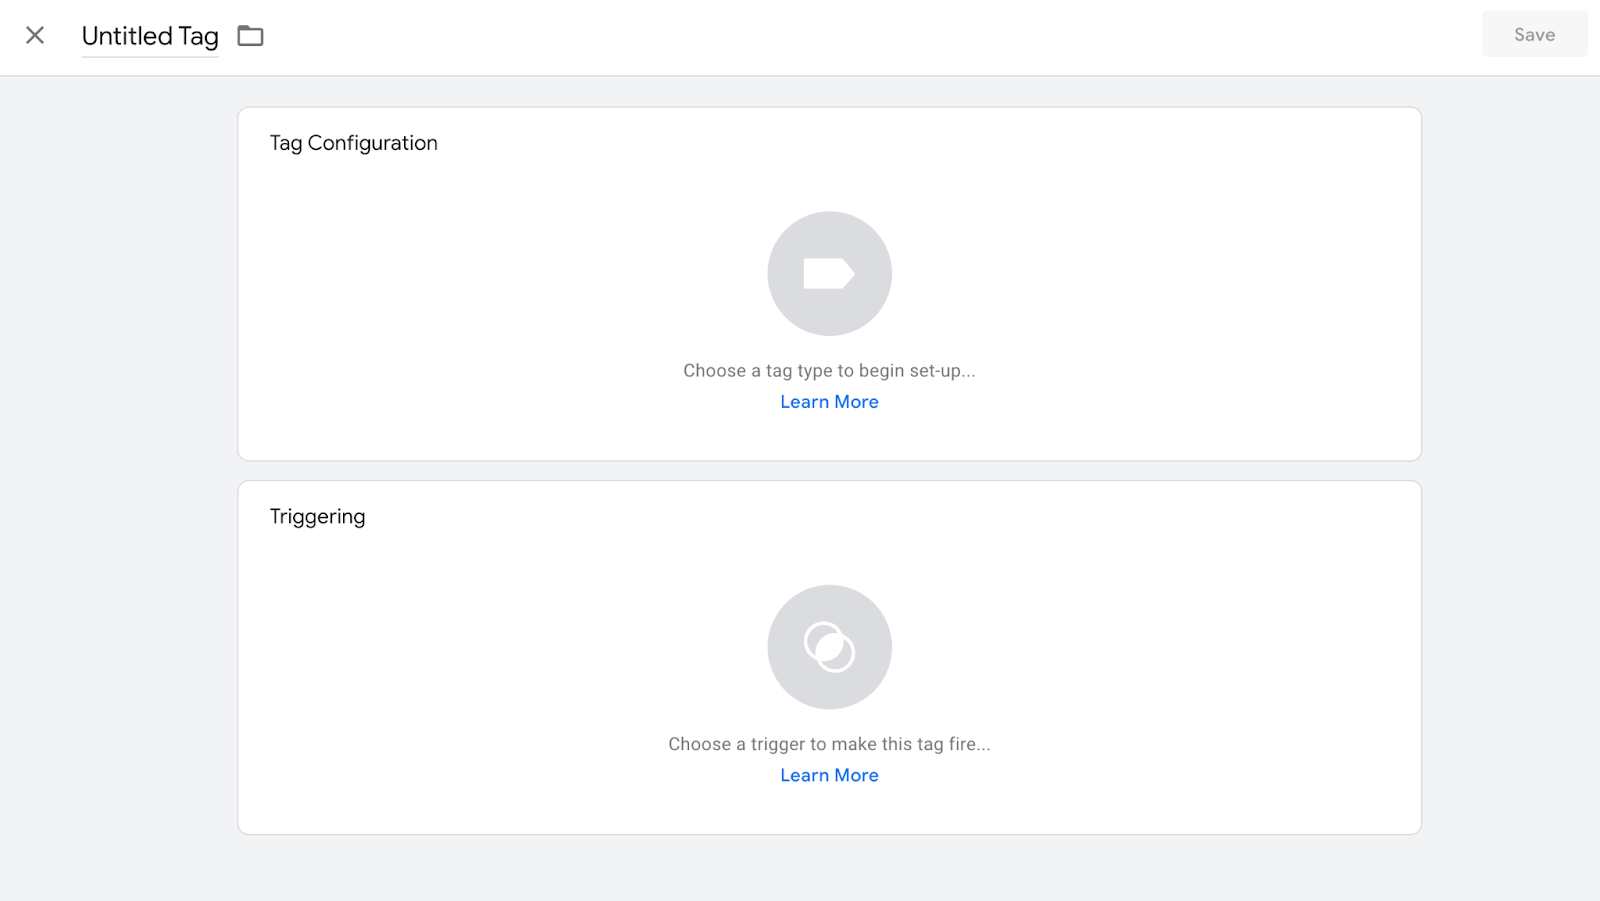
Step 2:
You will then see a screen to add a new tag like this:
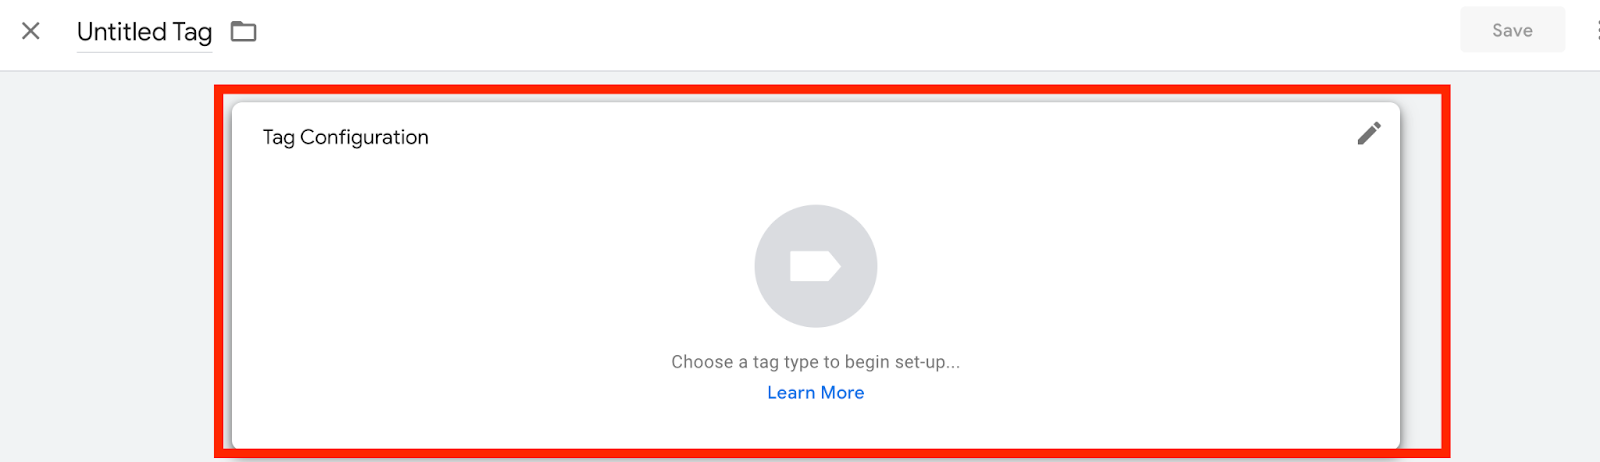
Step 3:
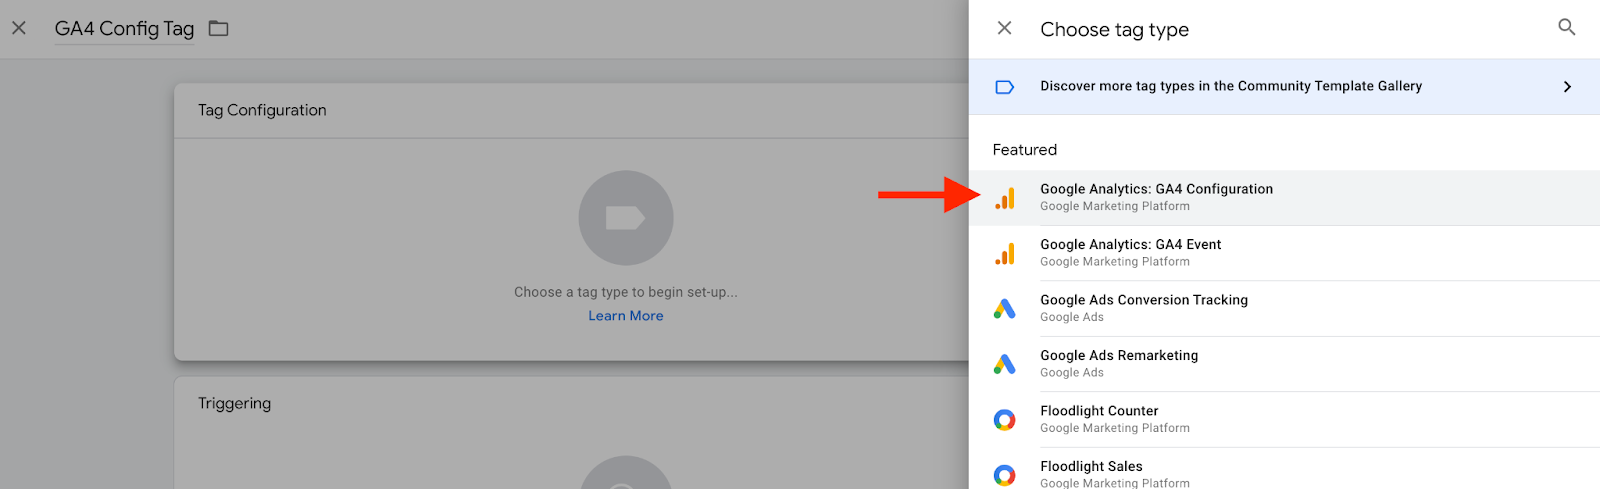
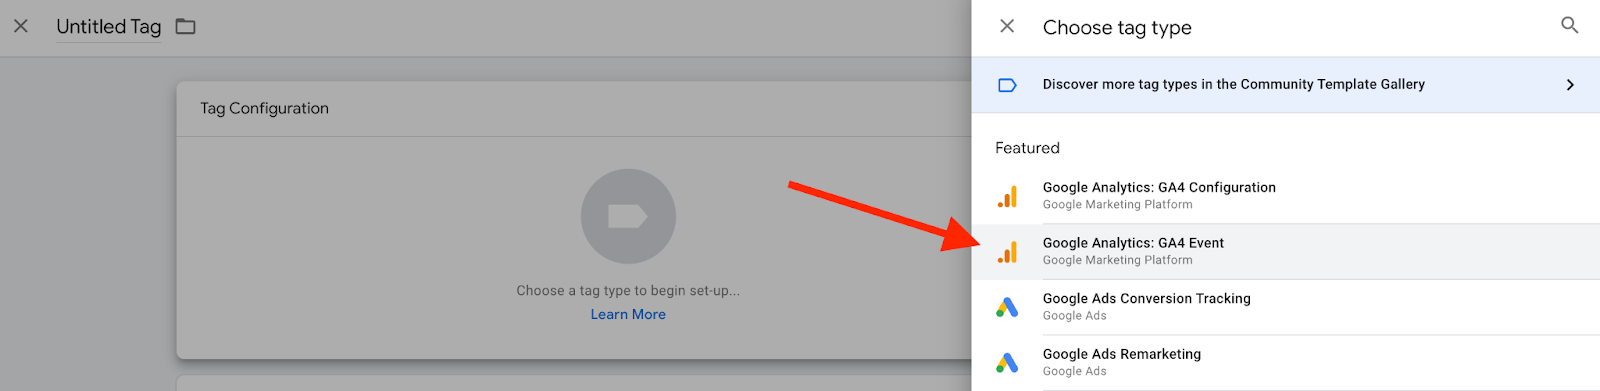
From here you can click “Tag Configuration”.
Once you’ve clicked this a popup will appear. You should then select Google Analytics: GA4 Configuration.
Step 4:
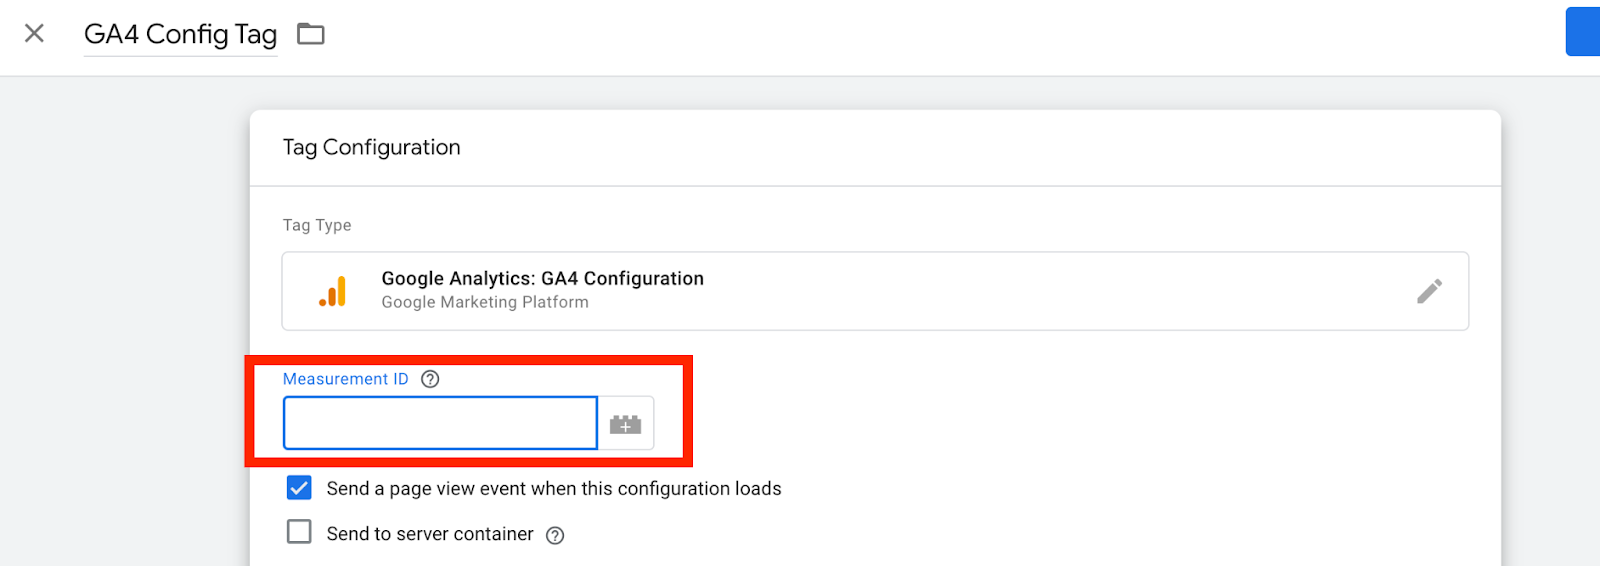
This will take you back to the tag configuration page where you can add your GA4 Measurement ID in the box provided. You can find the GA4 Measurement ID in your GA4 account. In the top left corner, you should also name this tag, in this example, I’ve called it GA4 Config Tag as you can see below.
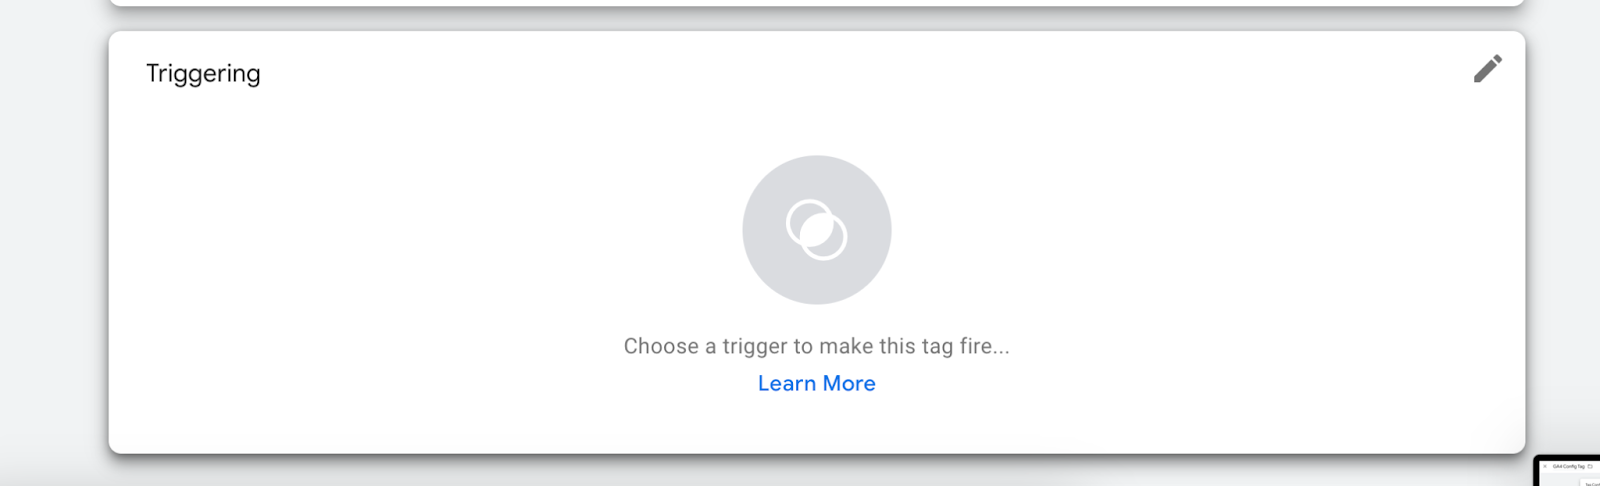
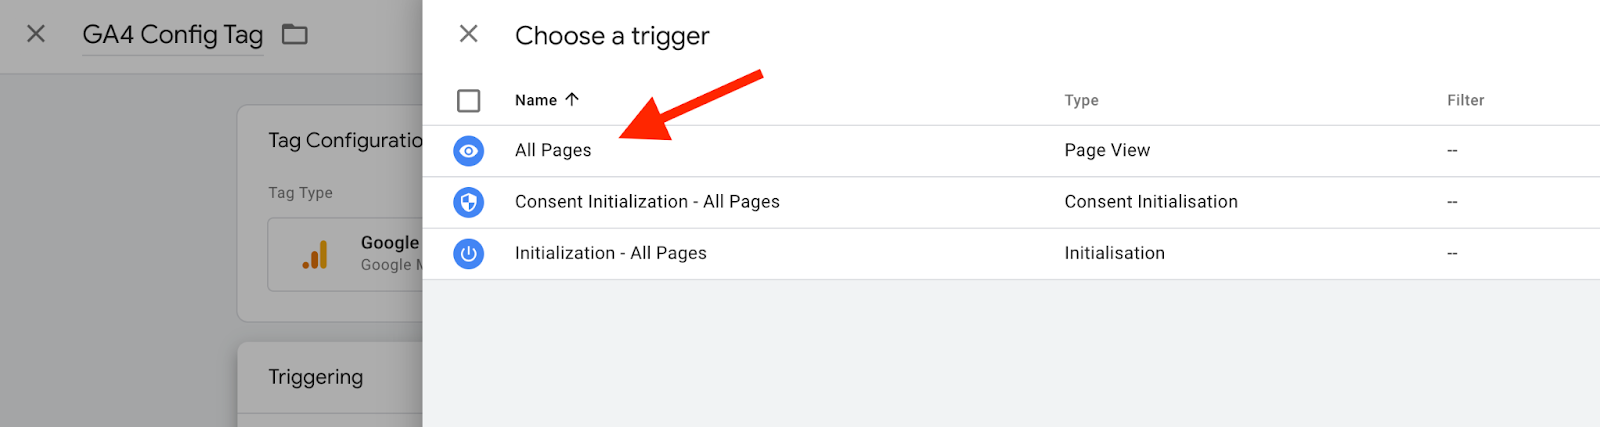
You also need to add a Trigger so that the Tag will fire on the correct pages. For GA4 we recommend setting this to “All Pages”
When your tag is set up it should look like this

The last step is to click Save in the top right corner.

To see if this is working you can Preview the tag again as mentioned above in the How to connect Google Tag Manager to Uplisting section.
How to set up an event in Google Tag Manager
Event tracking is an important part of understanding how your users interact with your website. Events can be set up for a range of different circumstances and below we will show you how to do this to track bookings that are made on your direct booking website. This event can then be sent to GA4, Google Ads, or any other third-party tracking pixel that you may need to track. For the purposes of the example, we will show you how to do this for GA4.
Step 1:
Follow Steps 1, 2, and 3 from Setting up Google Analytics 4 (GA4) Through GTM. instead of selecting Google Analytics: GA4 Configuration for event tracking in GA4 select Google Analytics: GA4 Event instead.
Step 2:
From here we will configure the GA4 event. Once you’ve selected the GA4 Event tag you will see a screen that looks like this:

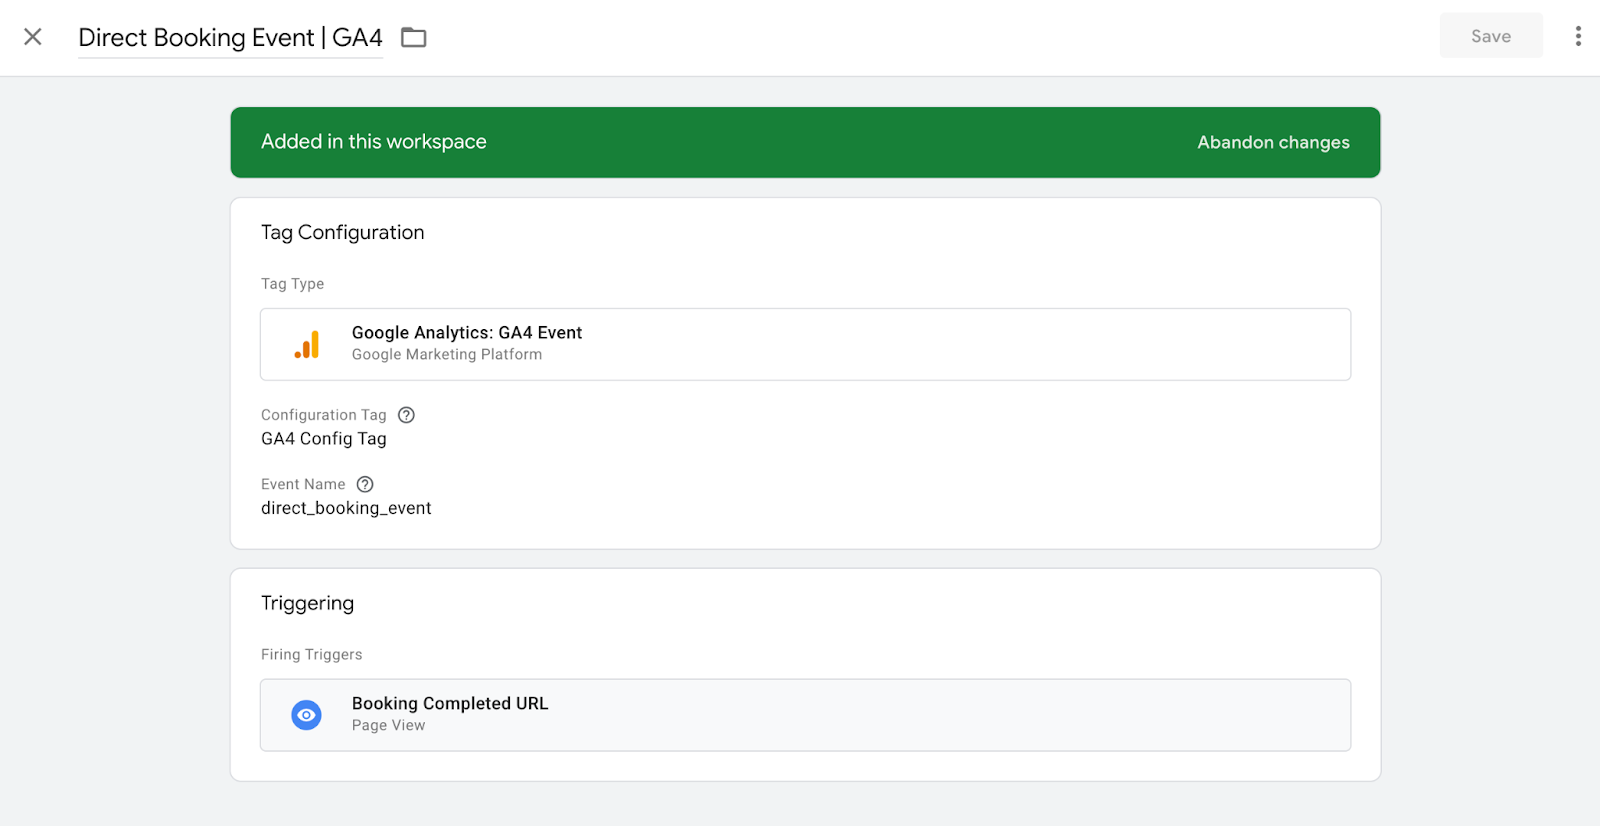
First, click the Select Configuration Tag dropdown and select the GA4 Configuration Tag you set up previously. In my screenshot below, I’ve called my GA4 tag GA4 Config Tag however you may have called it something else and you should see that in the dropdown menu.

Then you should also add a name for your event in the Event Name box. This can be any name you desire but it’s best to make it descriptive of the event you are tracking. Here I have given it the name direct_booking_event.
Step 3:
Once you’ve added those two bits of information we can then move on to the Trigger. Unlike the GA4 Configuration Tag, we only want this to trigger once a booking has been made. To do this we need to set up the Trigger.
Click this panel to open up the Choose a Trigger screen.

Here we need to create a new trigger based on the booking URL. First, we need to click the + button in the top right corner.

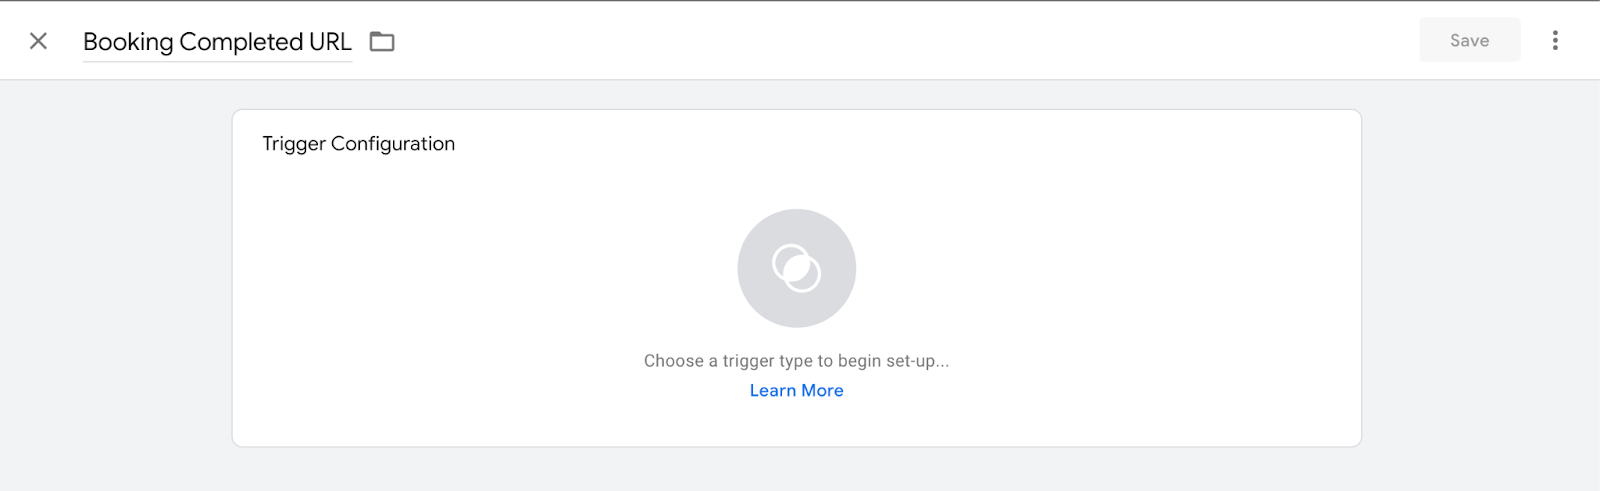
From here the Trigger Configuration page will show. I’ve named this trigger the Booking Completed URL but you can name this whatever you want.
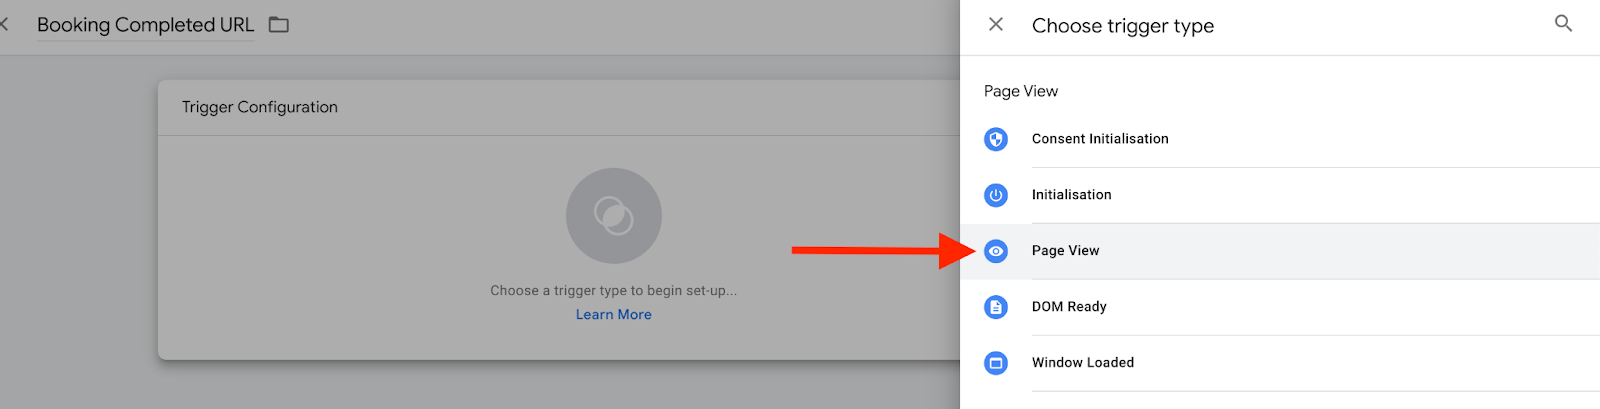
Click the Trigger Configuration panel to select the type of trigger we want. For this example, we will use the Page View trigger.
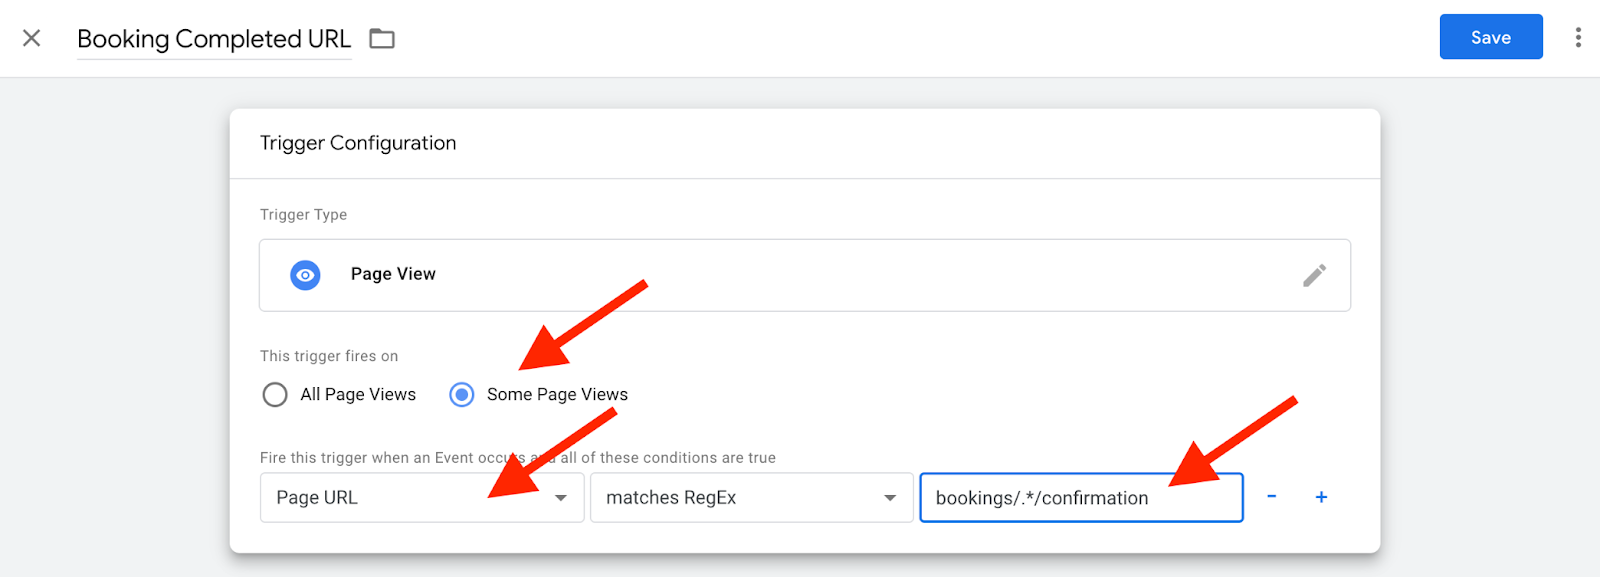
Selecting Page View will bring you back to the Trigger Configuration page from here we can select which pages this trigger will fire on. From here select the option Some Page Views, in the first dropdown select Page URL, in the second select matches RegEx, and in the next empty cell add the RegEx bookings/.*/confirmation as shown in the screenshot below. Once completed click Save in the right-hand corner.
The completed GA4 event should look like this:
Step 4:
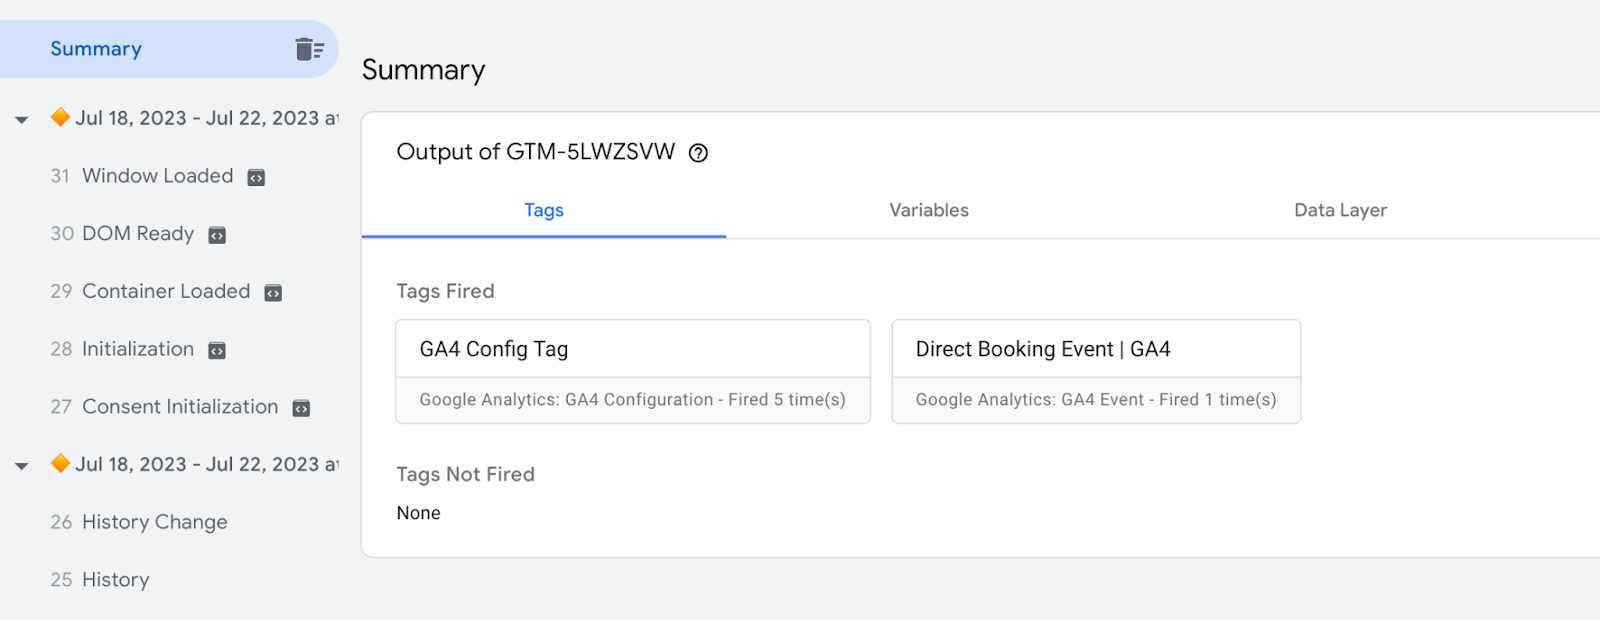
It’s recommended that you should then Preview your tags through GTM and submit a booking to test that the tag is firing correctly. Once you’ve made a booking the Preview tag assistant should look like this which means you have set up the conversion correctly:
Initially, it can take up to 48 hours for events to populate within GA4, make sure to check the event is counting after 48 hours.
Updated 7 months ago