Image Editor , Media Terms and Licensing
Image Editor
The Image Editor allows you to make quick edits to your site images. Transform (crop or rotate), add text, and more to the images in your site. The Image Editor can be accessed on the canvas from any location an image can be added (for example, a row or column background), image widgets, or widgets that can include an image (for example, the Tabs widget).
To open the Image Editor:
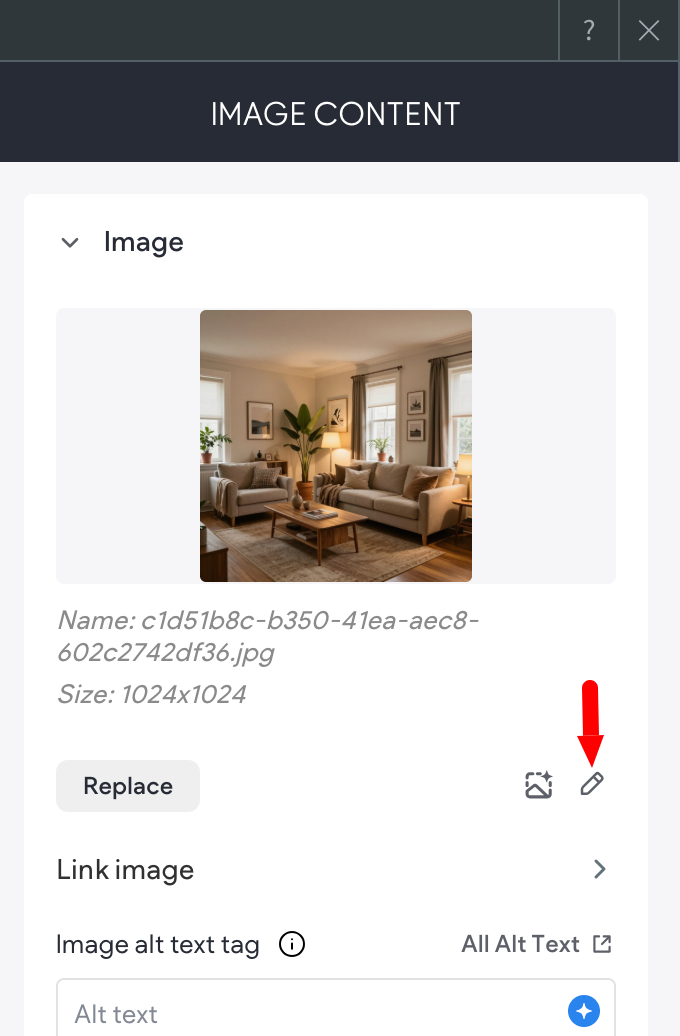
- Open the location or widget's settings.
- Navigate to the image's thumbnail (in the location or widget's settings).
- Click the pencil icon to open the image editor.
Edit Images
After opening the Image Editor, there are several options available, from cropping an image, adding a frame, making adjustments, and more. Edits can also be undone or canceled completely, as long as you click undo before saving the changes.
Following are the various areas of the image editor and what you can accomplish with the built-in tools.
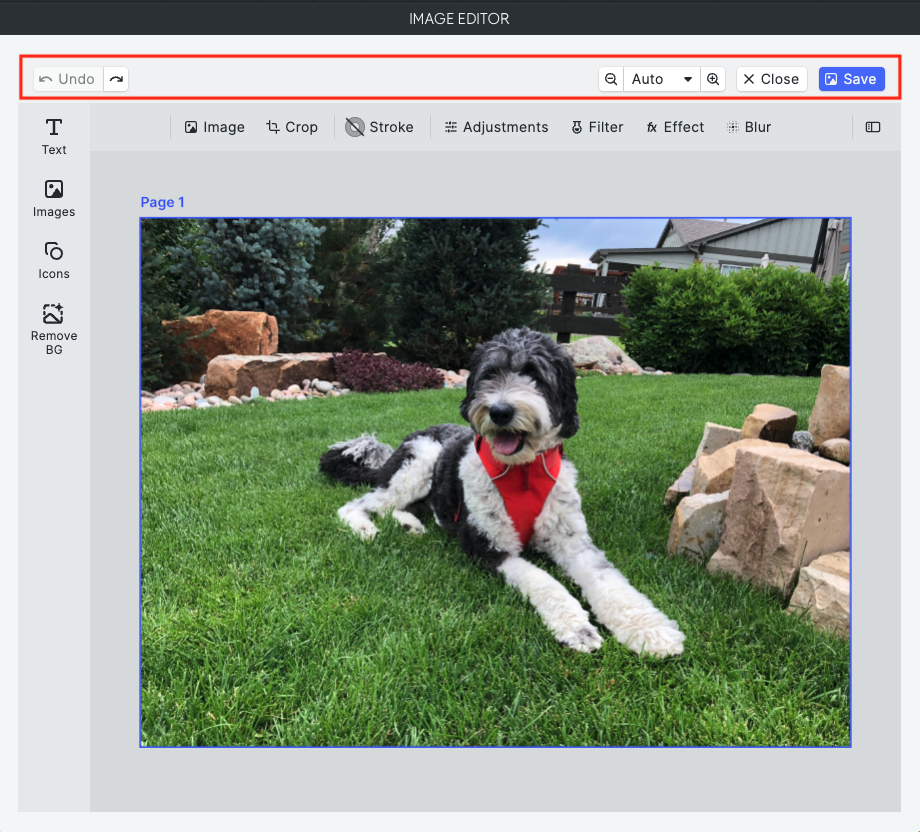
Top bar options:
-
Undo and redo. Click to undo or redo an action.
-
Zoom in and out. Adjust the zoom on your image or use the dropdown menu to select a pre-set zoom. This is only for viewing and editing in the image editor, the zoom settings will not alter the image.
-
Close. Closes the image editor. And edits that were not saved will be lost.
-
Save. Save image edits before exiting the image editor. The edited version of the image does not replace the original, instead the new image's name will be the same with an autogenerated alphanumeric number at the end, such as file-name-213f3kv.jpg
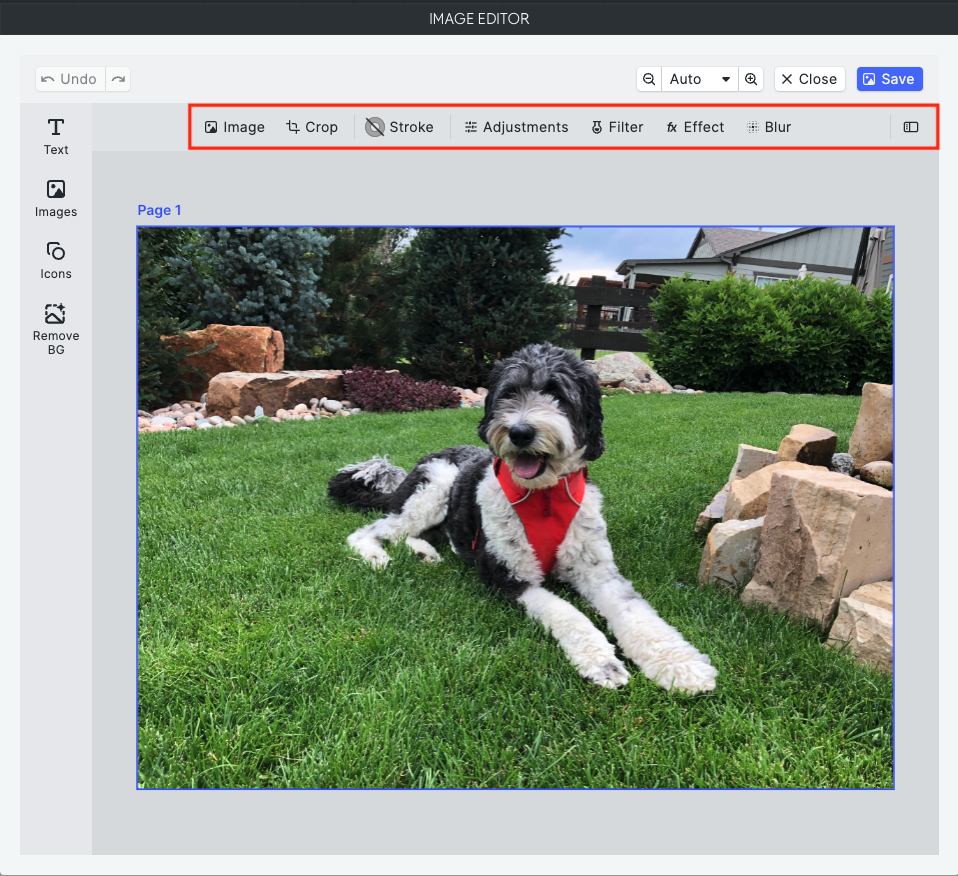
Main image editing options:
-
Image. If necessary, you can replace the image from here.
-
Crop. Manually crop your image, or select from pre-set aspect ratios.
-
Stroke. Set a color, width, border style, position, and join style for the image border.
-
Adjustments. Set the brightness, saturation, contrast, and more for the image.
-
Filter. Apply a filter and its intensity to the image.
-
Effect. Apply a special effect, such as pixelize, to the image.
-
Blur. Select a type of blur to apply to the image.
-
Inspector. Click to open the image details and view the various settings applied to the image.
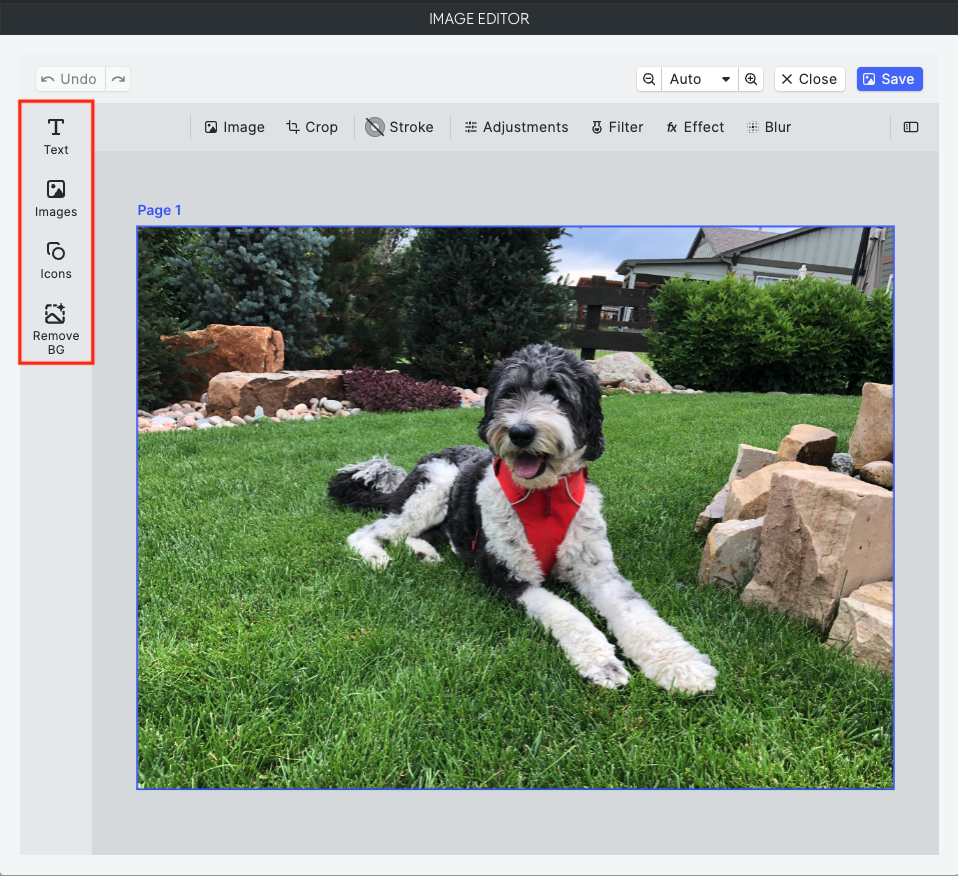
Left side bar options:
- Text. Add a title, headline, or text to your image. Various settings allow you to set the font, size, color, background, shadow, opacity and more for the text.
- Images. Select an image to add over the existing image. Various settings allow you to crop, adjust, filter, set opacity, add a filter, blur, shadow and more for the image.
- Icons. Add an icon to the image. Various settings allow you to set the icon shape, color, outline, and more.
- Remove background. Remove the background of your image with just one click.
Considerations and FAQs
- When you edit an image with the Image Editor, it is saved under Site Images in the Image Picker and Media Manager (images do not replace previous images when making edits, they create new versions). The file name of edited photos will be the same with an autogenerated alphanumeric number at the end, such as file-name-213f3kv.jpg
- The Image Editor is only available from a location on the canvas and not from the Image Picker or Media Manager.
- Images are able to be cropped, though not able to be resized.
FAQs
How can I resize an image?
The Image Editor is not able to resize image files, though images can be cropped.
Can I upload my own stickers?
Yes! After selecting the sticker option, there is a button to Upload Sticker.
Can I change the opacity of an image?
At this time no type of image file can have its opacity edited, though a filter or overlay can be added that could give a similar affect.
I'm changing the zoom option at the top, but it is not saving.
The zoom options at the top are for viewing only and don't edit the image.
Media Terms and Licensing
Media licensing can sometimes be difficult to understand. In the questions and answers below, we do our best to provide answers to common questions that have come up.
Website Builder works with multiple media providers, and it is important to know the source of the image you are considering using on your site as different images have different licensing terms. Once you select media in the Media Manager, Picker, or Library, you will see its source on the right side.
Some media might not have a defined source and will not show that information. In the questions and answers, make sure to refer to the answer that corresponds to the provider source of your media.
For the full terms related to the usage of the Website Builder platform, refer to our terms of service and privacy policy. In any conflict between what is written here and our terms of service, the terms of service prevail.
Licensing Terms
- Pexels: see the full Pexels terms: www.pexels.com/terms-of-service.
- Giphy: see the full Giphy terms: giphy.com/terms.
- Shutterstock: see the full Shutterstock terms: www.shutterstock.com/license.
- Noun Project (icons): See the full Noun Project terms: thenounproject.com/legal/terms-of-use/.
- No defined source: You are granted an individual, non-exclusive, non-transferable right, throughout the world, in perpetuity, to use such image, or any part thereof, an unlimited number of times, solely as incorporated into websites built using the Website Builder platform.
FAQs
Can I use the same media multiple times on a single site?
- Pexels: Yes
- Giphy: Yes
- Shutterstock: Yes
- Noun Project: Yes
- No defined source: Yes
Can I use the same media on more than one site?
- Pexels: Yes
- Giphy: Yes
- Shutterstock: No, an image can be used for a single site.
- Noun Project: Yes
- No defined source: Yes
Can I use the media on other digital or physical assets that are not my site?
- Pexels: Yes, as long as you adhere to the Pexels terms.
- Giphy: Yes, as long as you adhere to the Giphy terms.
- Shutterstock: No, an image can be used for a single site.
- Noun Project: Yes
- No defined source: No
Can I get a refund for purchased media?
- Pexels: Not relevant, Pexels media is free.
- Giphy: Not relevant, Giphy images are free.
- Shutterstock: No, we do not provide refunds for purchased images.
- Noun Project: Not relevant, the Noun Project icons are free.
- No defined source: Not relevant, these images are free.
Can I edit, change the media?
- Pexels: Yes, please see Pexels full terms.
- Giphy: No, this is not allowed according to the Giphy terms.
- Shutterstock: No.
- Noun Project: To edit a Noun Project icon, the icon will need to be purchased directly on their site. See their page Can I modify icons? for more information.
- No defined source: Yes.
Do I need to give attribution to the owner of the image?
- Pexels: Not required, but would be appreciated.
- Giphy: No
- Shutterstock: No.
- Noun Project: Not required, but would be appreciated.
- No defined source: No.
Updated 3 months ago