How to connect to Booking.com
You can now create Booking.com accounts and properties directly within Uplisting. You can also publish your existing Uplisting listings as new Booking.com properties, all within your Uplisting account.
From within Uplisting, you can now:
- Create a new Booking.com account
- Connect an existing Booking.com account
- Publish Uplisting listings directly to Booking.com as new Booking.com properties
- Connect existing Booking.com listings
Overview of the Connection Flow
There are two ways to connect your Uplisting account or listings to Booking.com, as well as connect your existing Booking.com account and properties to Uplisting:
- From the Connect page (recommended)
- From the listing's Booking Sites tab: Listing → Booking Sites → Booking.com → Publish
Both options will guide you through the same connection and publishing workflow.
Rate PlansUplisting only connects to 1 rate plan. All other rate plan setups, such as non-refundable, won’t sync the minimum length of stay, advance notice or closed for arrival/departure set in Uplisting by default. You will need to contact Booking.com to rectify this. Please see this guide for further details.
One Booking.com account per countryBooking.com requires a separate legal entity (and a separately signed contract) for each country where you list properties.
If you have listings in, for example, both Spain and Portugal, you will need two Booking.com accounts — one per country — and connect both to Uplisting. A single account/legal entity can only cover properties in the country it was created for.
Option 1 - Connect From the 'Connect' page (Recommended)
Connecting An Existing Booking.com Account
Before you begin, ensure pop-ups are enabled in your browser
This is because, when initiating the Booking.com connecting process within Uplisting, you’ll be redirected to Booking.com to authorize access.
If pop-ups are blocked, the authorization window may not open and the connection may remain stuck on the loading screen.
- To connect your existing Booking.com account, navigate to the Connect page here:
Settings → Connect → Booking.com
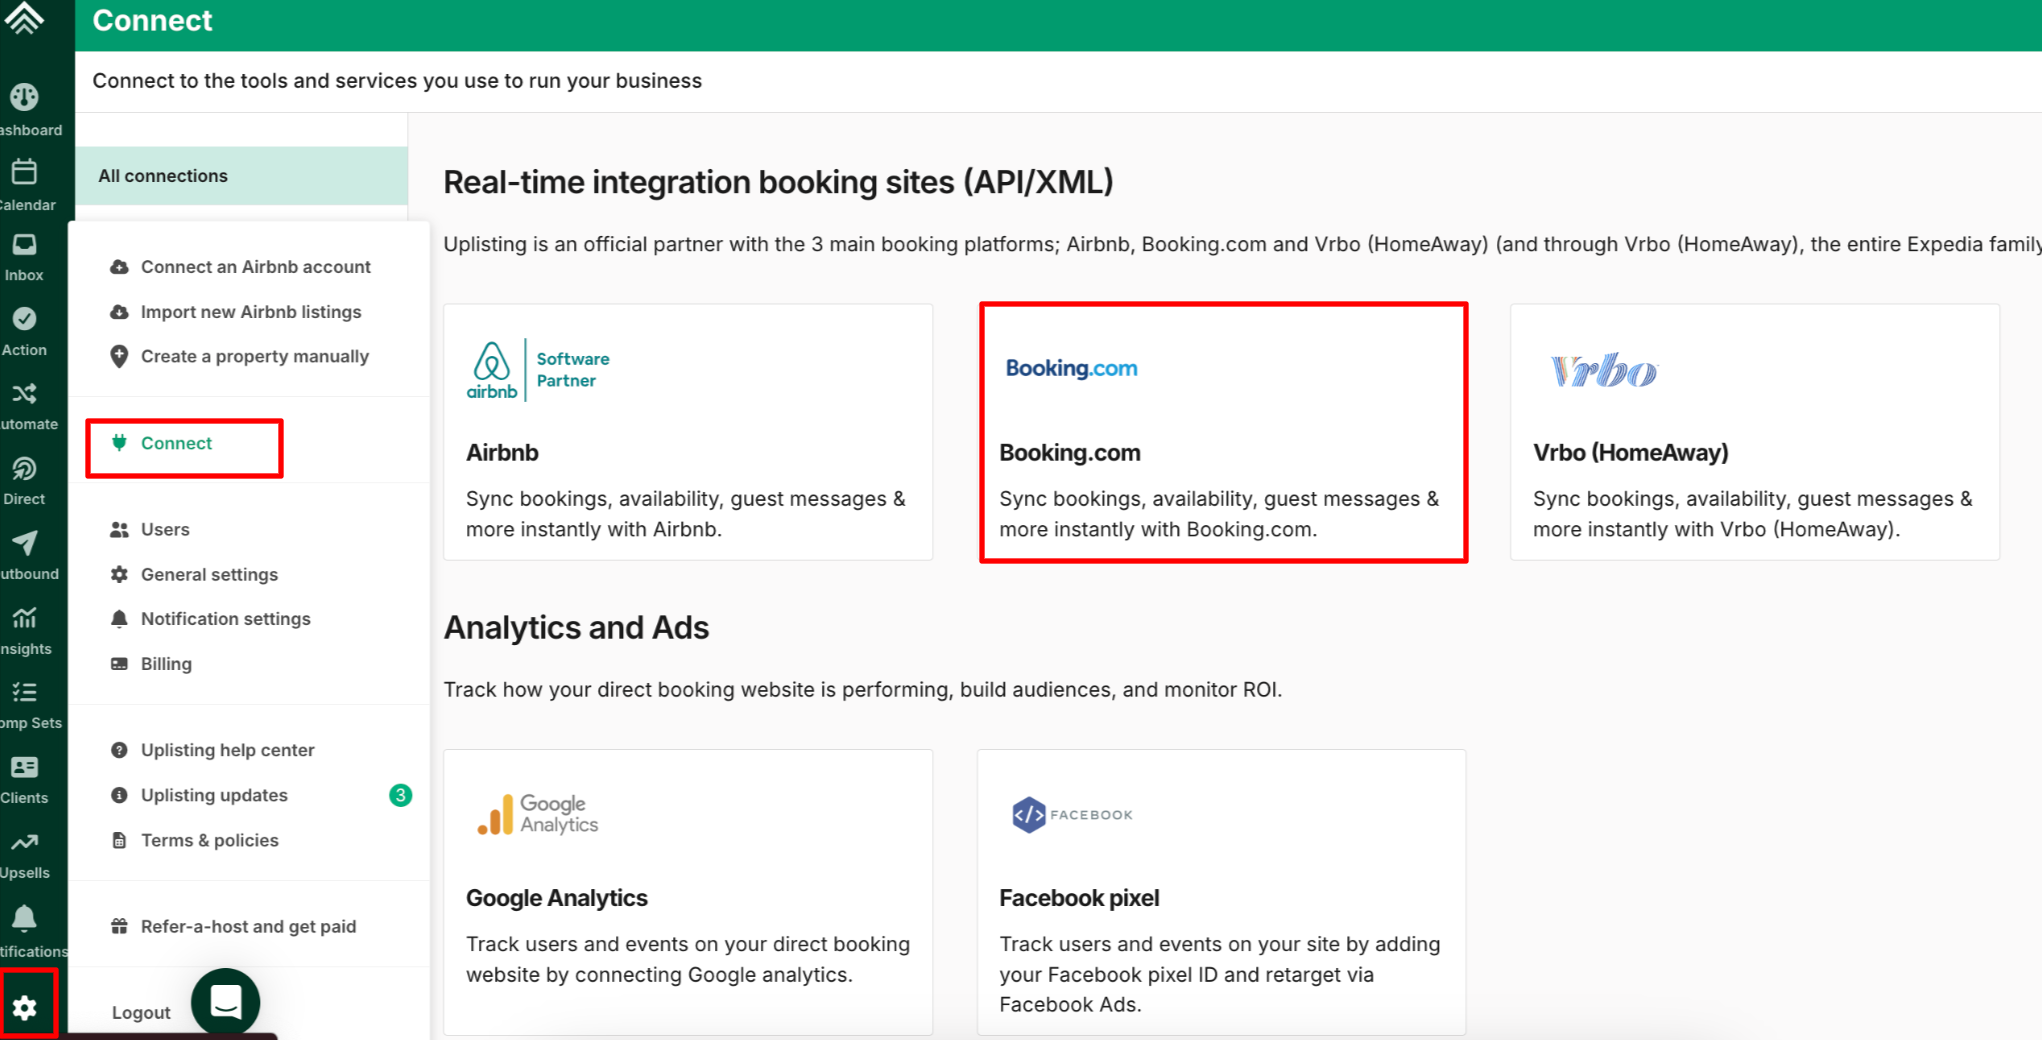
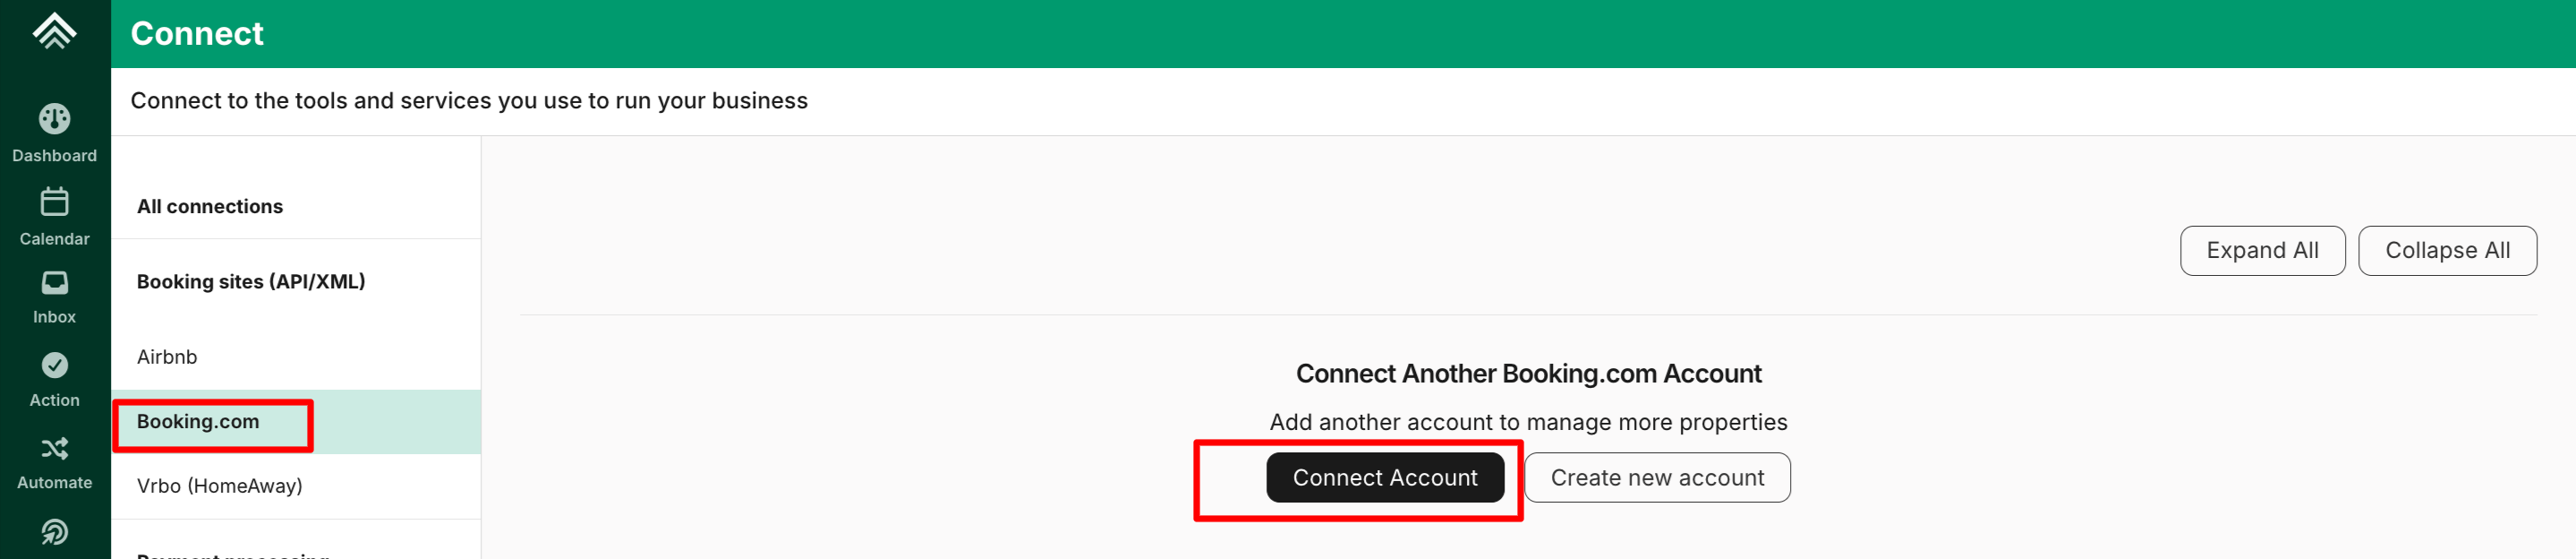
- Click the Connect Account button
- A Booking.com authorization window opens, prompting you to input your Booking.com account Legal Entity ID. This can be obtained directly from your Booking.com Extranet
Use the Legal Entity ID, not a property IDThe Legal Entity ID is found in the Booking.com Extranet under Account → Legal entity details.
It is not the same as a property ID (sometimes called a "hotel ID"). Entering a property ID here will cause the page to load indefinitely without connecting.
- Then select the 'Connect to Booking.com' button

- You'll be redirected to Booking.com to approve access for Uplisting. Once done, return to Uplisting's connect page here
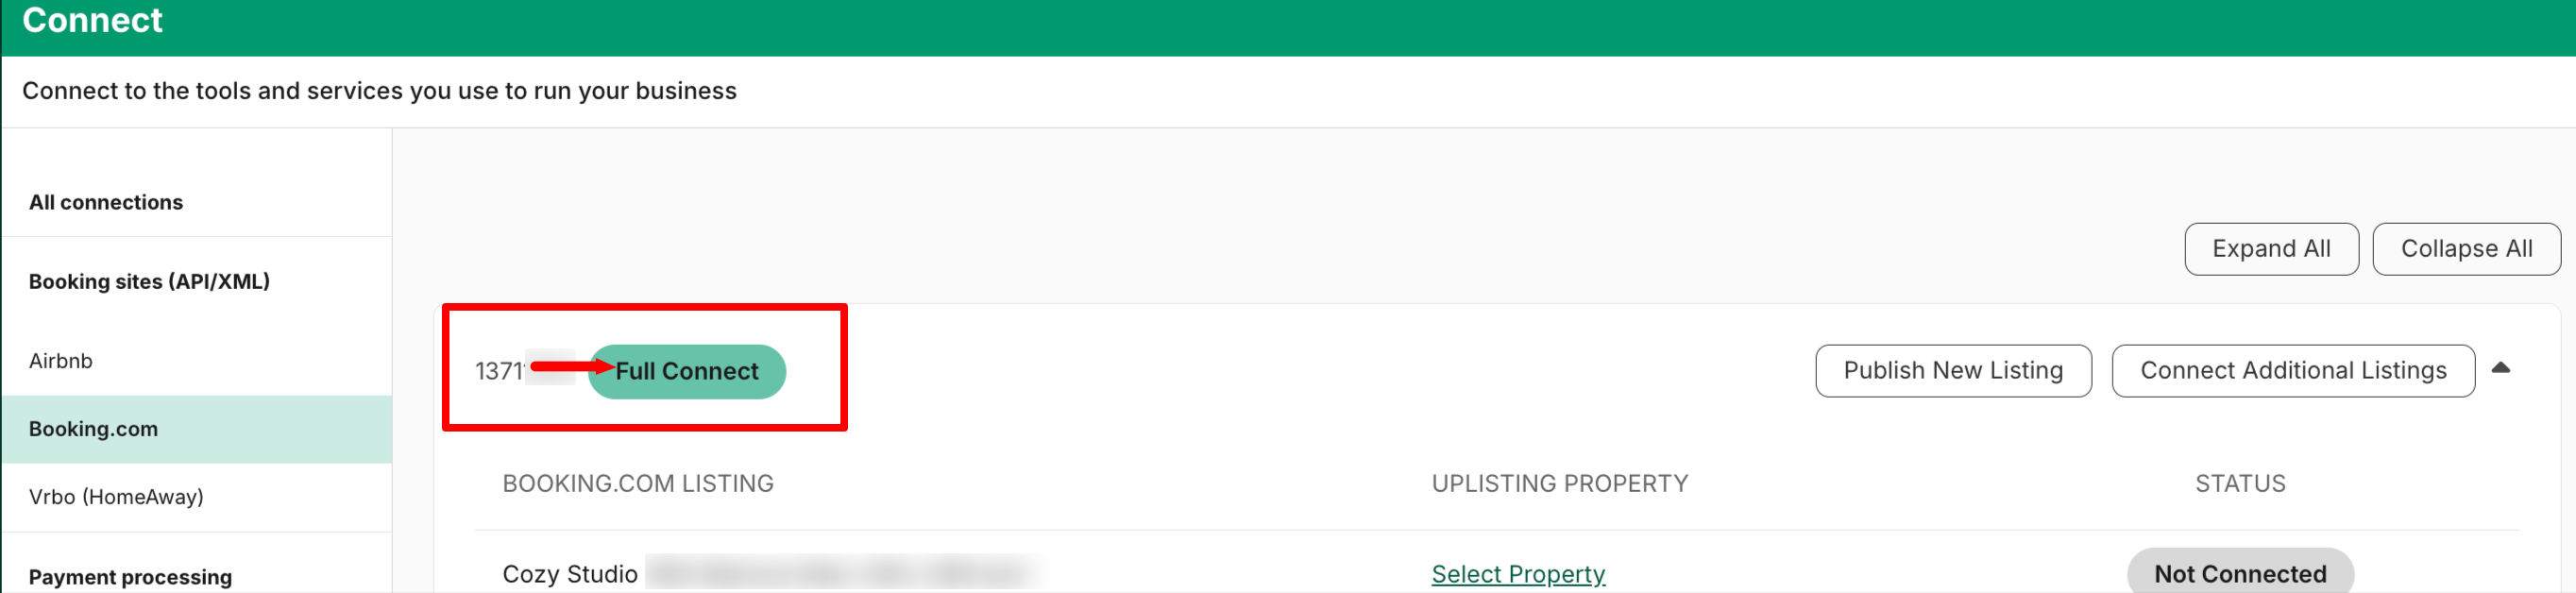
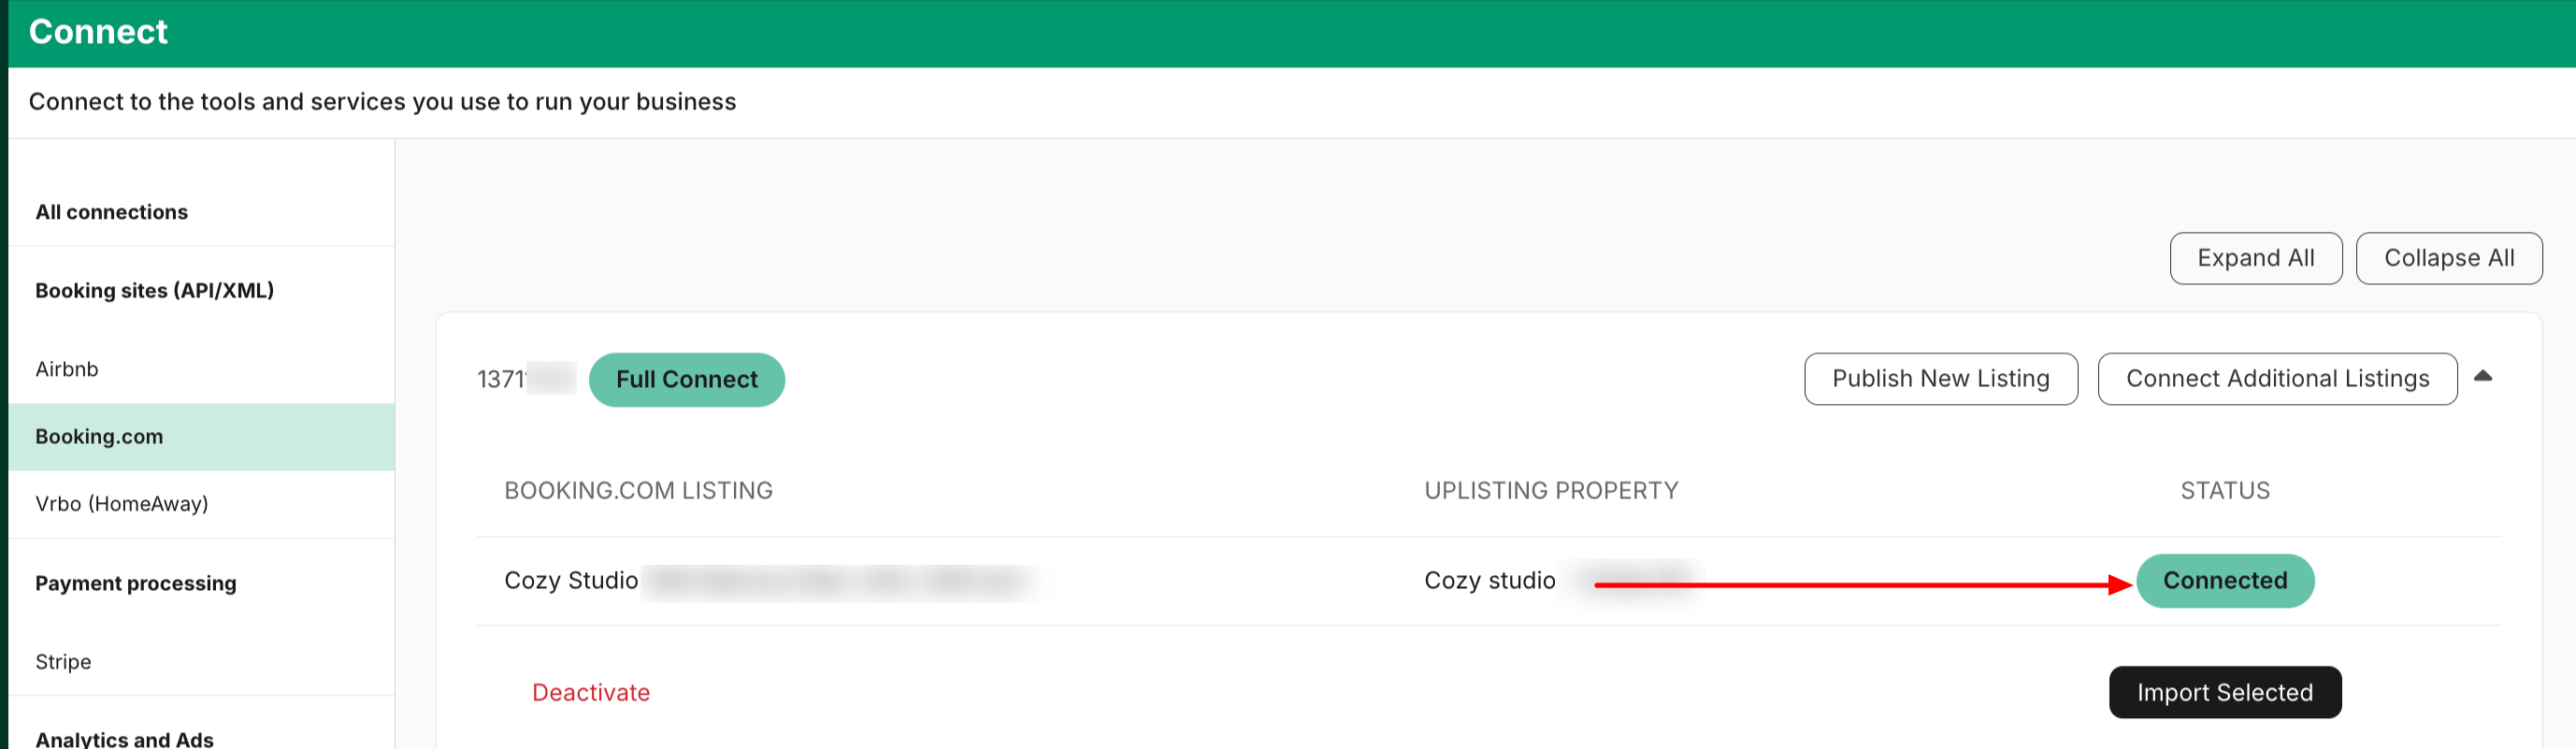
- Your Booking.com account will appear as fully connected, and the active Booking.com properties will be imported into Uplisting.
- Select the imported properties you want to manage on Uplisting, from the Uplisting property column, then click Import selected.
By default, Imported Booking.com properties will have a Not connected status , when initially imported.
You will need to select the ones you want to connect to Uplisting from the imported list
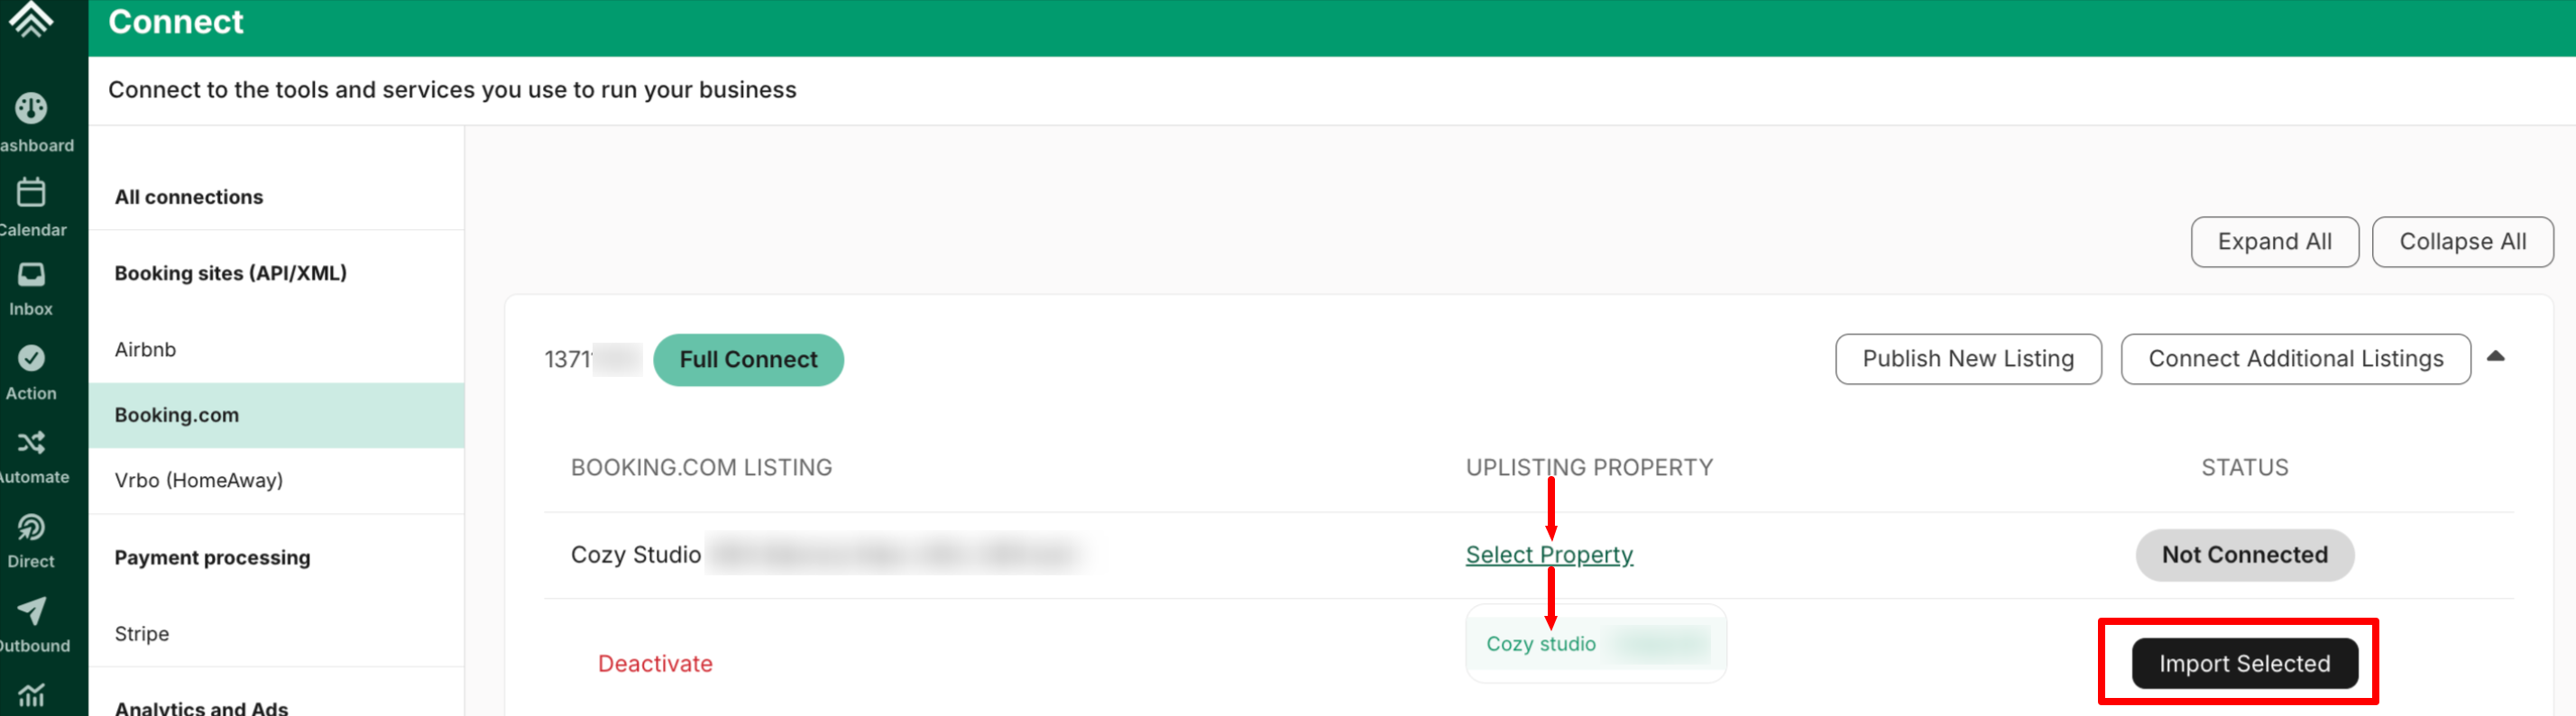
- The property status will change from Not connected to Connected.
Creating a new Booking.com account
If you do not already have a Booking.com account, you can create one directly inside Uplisting.
-
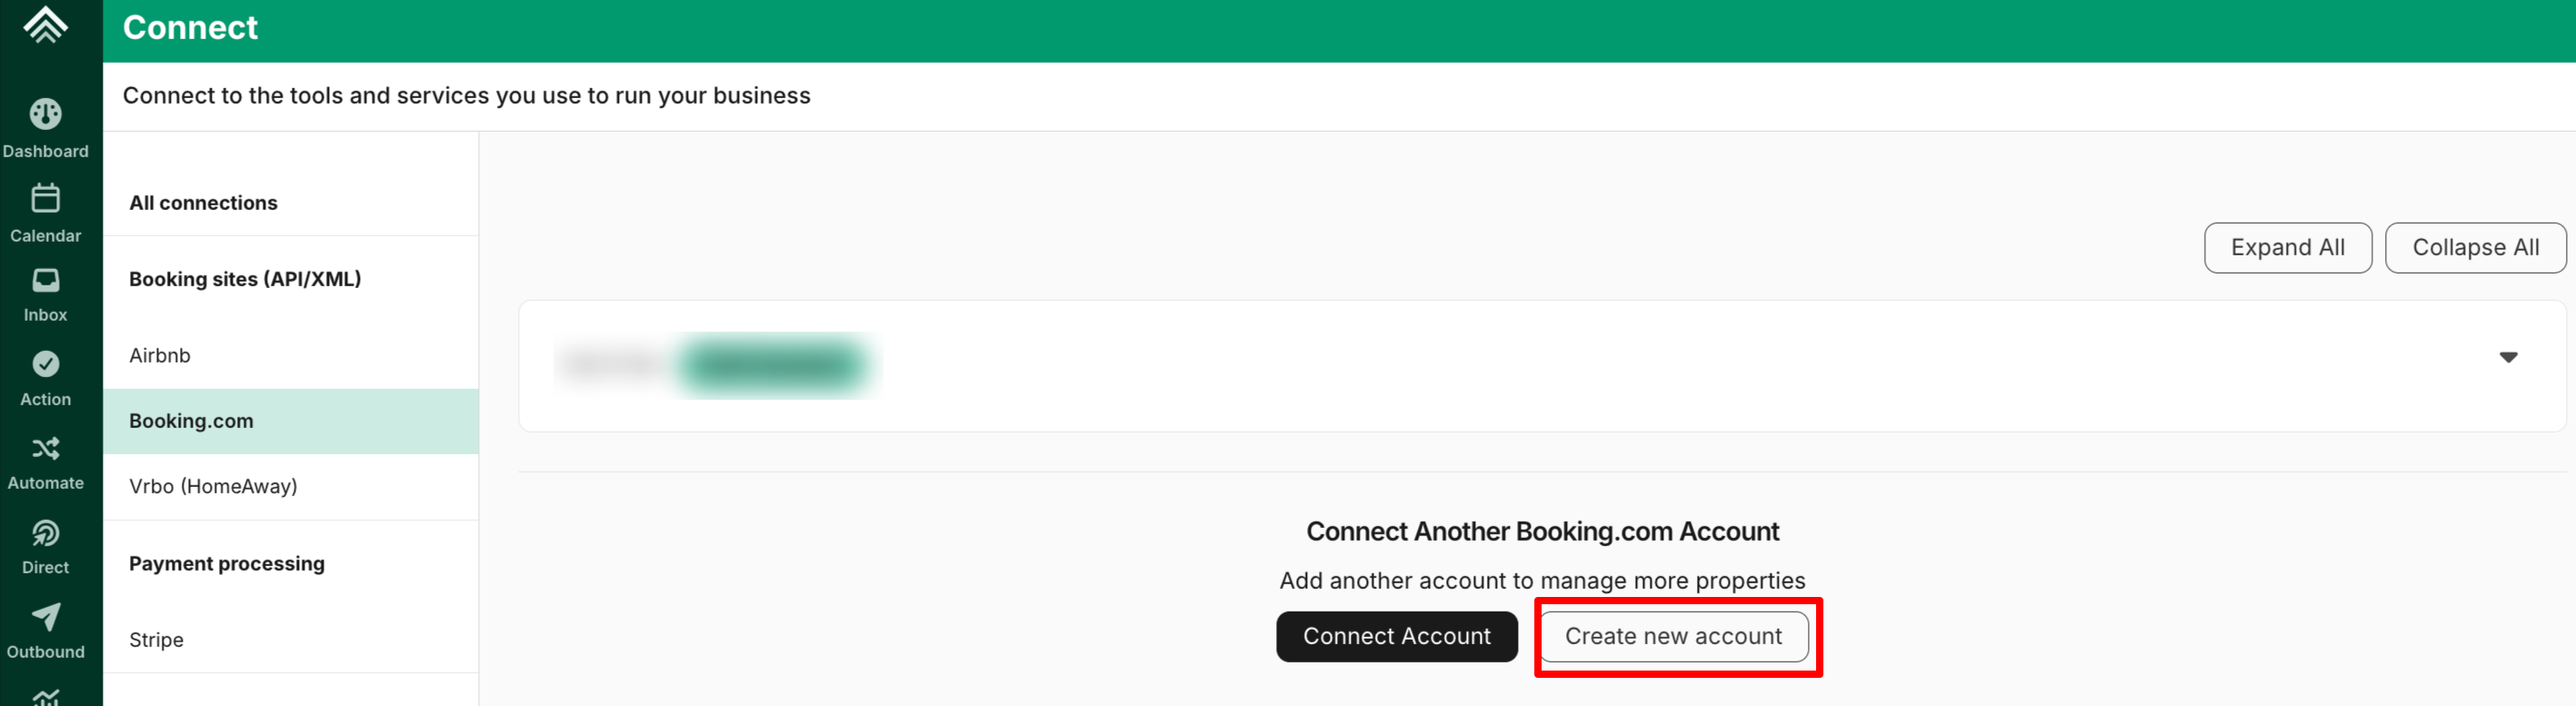
Navigate to the Connect page here
-
Click Create new account
- A guided setup form opens inside Uplisting. Fill in the required details:
- Legal company name
- Legal contact name and legal contact email — Booking.com will send the contract and all onboarding communication to this email
- **Phone number **
- Preferred language
- Country, city, street, zip code — the country here is the country your properties will be listed in (see the "one account per country" note above)
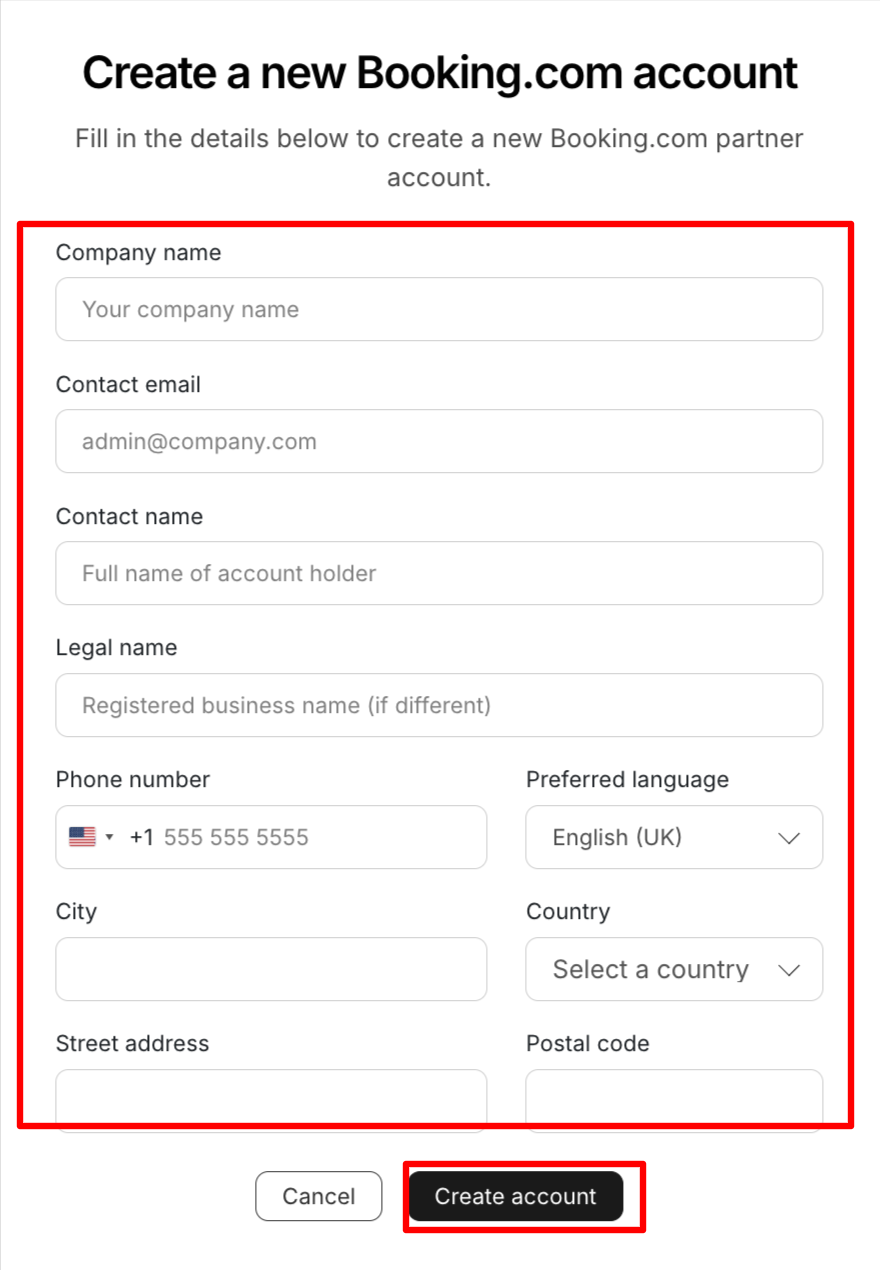
- Click Create account
Uplisting will automatically submit your information to Booking.com.
What Happens Next
- Booking.com creates your account and sends the legal contact email a message asking you to sign the partner contract.
- Open that email and sign the contract. Your account will show as pending contract on the Uplisting Connect page until Booking.com confirms the contract is signed.
- Uplisting checks the contract status automatically for the first 3 days after the account is created. Once Booking.com confirms signing, the account moves from pending to connected and you can publish listings.
- You can then begin publishing listings (see the next section).
Didn't receive the contract email?
- Double-check the legal contact email on the Booking.com account for typos. If it is incorrect,Booking.com will have sent the contract to the wrong address.
- Check spam/junk folders.
- If the email is confirmed correct and no email has arrived, contact Support — we may need to raise this with Booking.com directly.
First publish attempt may fail if the contract isn't signed yet
If you start publishing listings before the contract is fully processed on Booking.com's side, the first publish attempt can fail. Simply retry once the account shows as connected.
Publishing an existing Uplisting listing to Booking.com
Before publishing an existing Uplisting listing to Booking.com, you must first add your Booking.com account to Uplisting by either connecting an existing account or creating a new one.
See the sections in this guide on Connecting an Existing Booking.com Account or Creating a New Booking.com Account for more details.
- Navigate to the Connect page here
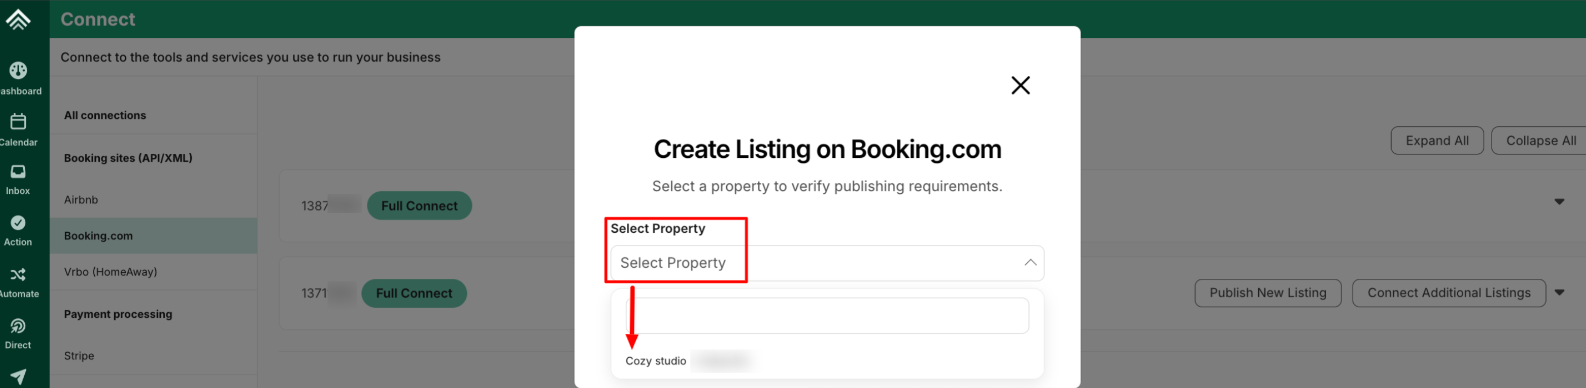
- Select the connected Booking.com account you want to publish the listing to and click 'Publish New Listing'

- Locate the listing you want to publish from the unpublished list
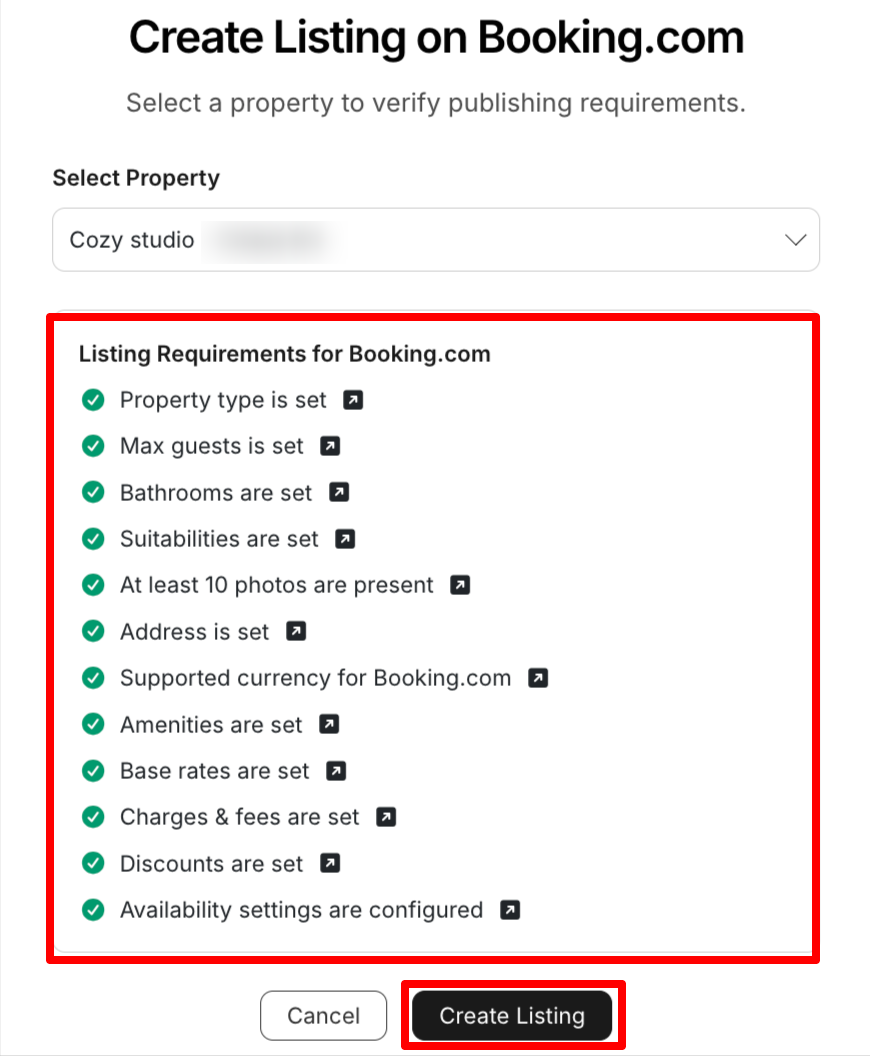
- Review the pre-publishing requirements checklist. The listing must satisfy all of the following before publishing can start:
- ✅ Property type is set
- ✅ Full address, including valid latitude and longitude (the map pin must be placed)
- ✅ Maximum number of guests is set
- ✅ Bathrooms are configured
- ✅ At least 10 photos uploaded
- ✅ Base rate is set
- ✅ Property currency is supported for the country (see "Currency" note below)
- ✅ Cancellation policy selectable
- ✅ Charges and fees, discounts, availability settings visible
Items with incomplete or missing information will be marked with an ❌, indicating that the required details must be provided
- Once all items show Green check marks, click Create listing
- The Publishing Wizard
Clicking Create listing launches a step-by-step wizard. You must complete the steps in order (they can't be skipped), but you can leave the wizard at any time and resume from the last completed step later.
The steps are:
-
Property settings — confirm property type, room/bed configuration, size, and occupancy.
• Max adults + max children must equal the total max guests set on the property. If they don't match, the step won't save.
• You can configure a living room without beds.
• Infants-allowed and the maximum number of infants can be set here.
-
Facilities & amenities — Uplisting pre-selects amenities based on your Uplisting settings; you can add or remove before publishing. For apartments, aparthotels and condos, kitchen is selected by default.
-
Pricing settings — pick a cancellation policy from Booking.com's list, review the auto-generated Standard rate plan, and confirm the charges/fees/taxes that will be synced.
-
Legal details — enter the contact person for the property, invoice/billing details, and any property registration / licence number required for your country. Required licence fields are fetched from Booking.com automatically based on the property's location.
-
Overview & Confirm — review everything that will be sent to Booking.com (property details, photos, amenities, house rules, cancellation policy, rate plan, charges, contact, invoice settings, licence). Click Publish to finalise.
After the wizard completes, Uplisting will:
• Create the listing on Booking.com
• Connect the property automatically
• Start syncing availability, rates, and reservations
What Uplisting syncs to Booking.com
- At publish time (one-way push): property details, photos, amenities, house rules, cancellation policy, rate plan, charges & taxes, licence, contact & invoice details.
- Continuously after publish: prices, availability, restrictions (minimum length of stay, advance notice, closed-for-arrival / -departure), cleaning fees and taxes.
- Not synced back from Booking.com: property descriptions, photos, amenities, or house rules edited directly on the Extranet won't flow back into Uplisting. To keep Uplisting and Booking.com aligned, make property-level edits in Uplisting where possible.
Currency
Booking.com restricts which currencies can be used per country. Uplisting validates this before publishing — if the property's currency isn't supported, publishing is blocked with an error.
This matters especially in countries that have changed currency recently (e.g. Bulgaria's BGN → EUR transition); if Uplisting still shows the old currency, rates will be off when published. Update the property currency before retrying.
Payments: what you'll need to do on Booking.com
By default, new Booking.com listings created via Uplisting are set to payment at the property (guests pay on arrival). To take card payments you have two options:
- Charge via Stripe (via Uplisting). Uplisting sets Visa and Mastercard as accepted payment methods on the Booking.com listing. If the Uplisting property is connected to Stripe, card details sent with the reservation will be charged by Stripe as normal.
- Use Payments by Booking.com (PbB / Virtual Credit Card). Payments by Booking.com currently can not be enabled via the Booking.com API, which means Uplisting cannot switch it on for you. After publishing, go to the Booking.com Extranet and enable Payments by Booking.com on the listing. Booking.com have told us API support for this is planned.
Post-publish verifications from Booking.com
Booking.com may require additional verification steps after the listing is created. These are controlled entirely by Booking.com — Uplisting cannot bypass or complete them on the user's behalf:
- Location verification. For some properties Booking.com sends a postcard with a verification code to the property address. The postcard can take 30+ days to arrive and Booking.com asks you to wait that long before requesting a new one.
- Auto-closed" availability. Newly published listings in certain countries may be set to Auto-closed by Booking.com until the account completes identity / KYC verification in the Extranet. Users should complete any outstanding tasks in the Extranet Inbox and Account sections. If a user is stuck on any of these, complete the step in the Booking.com Extranet — Uplisting cannot resolve these.
Connecting additional listings from your Booking.com account
To connect existing Booking.com properties to Uplisting:
-
Navigate to the Connect page here
-
Select the connected Booking.com account you want to import the properties from and click Connect Additional Litings
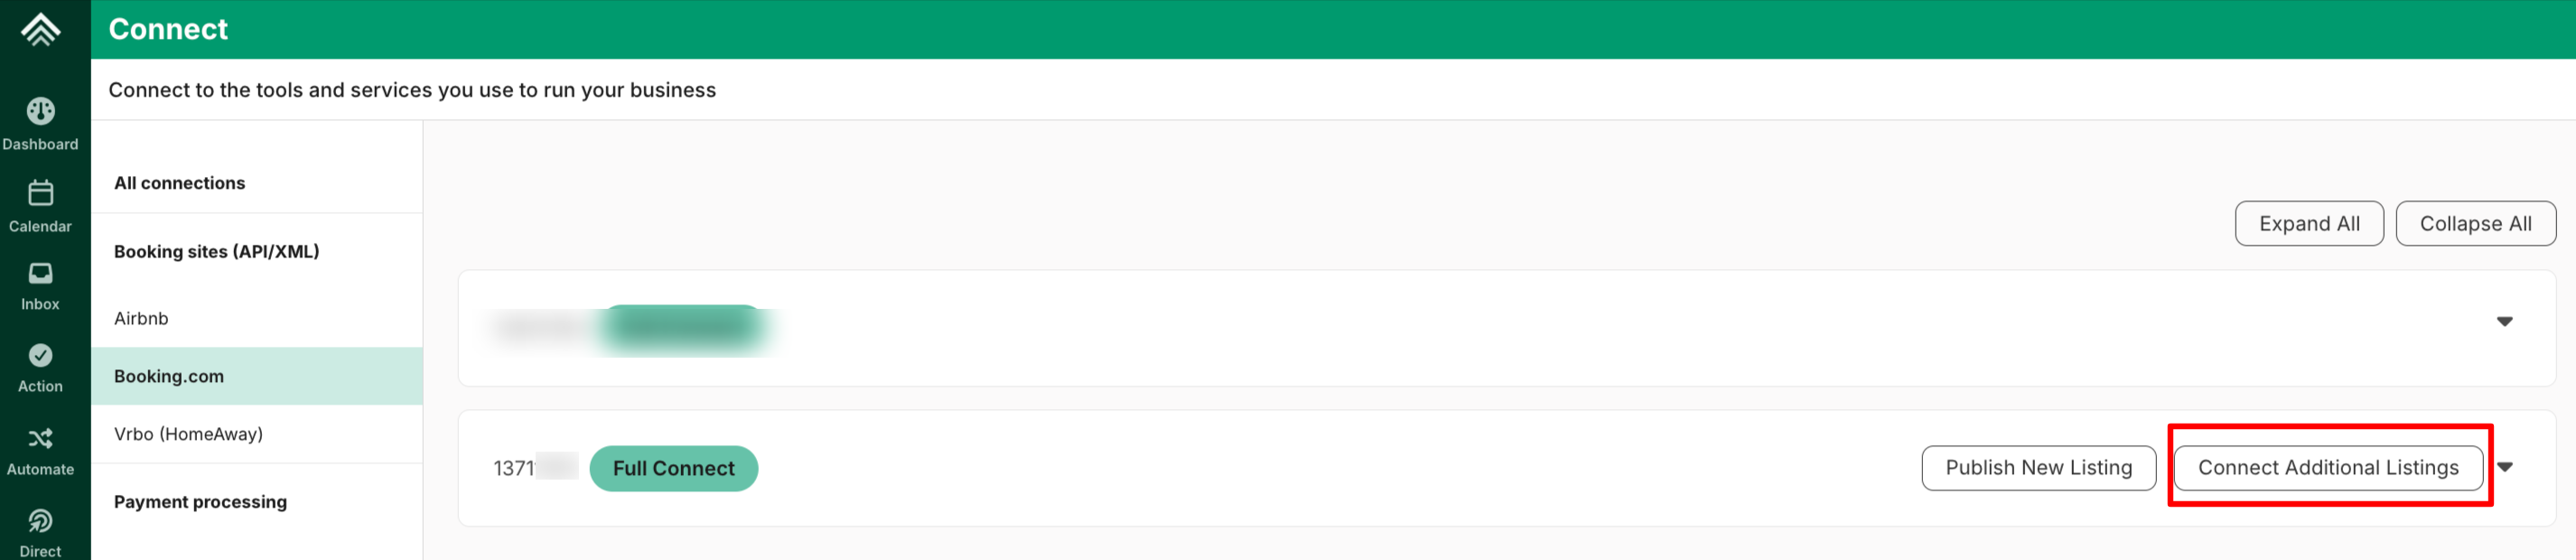
- Follow the prompts to connect the additional listings from your Booking.com account
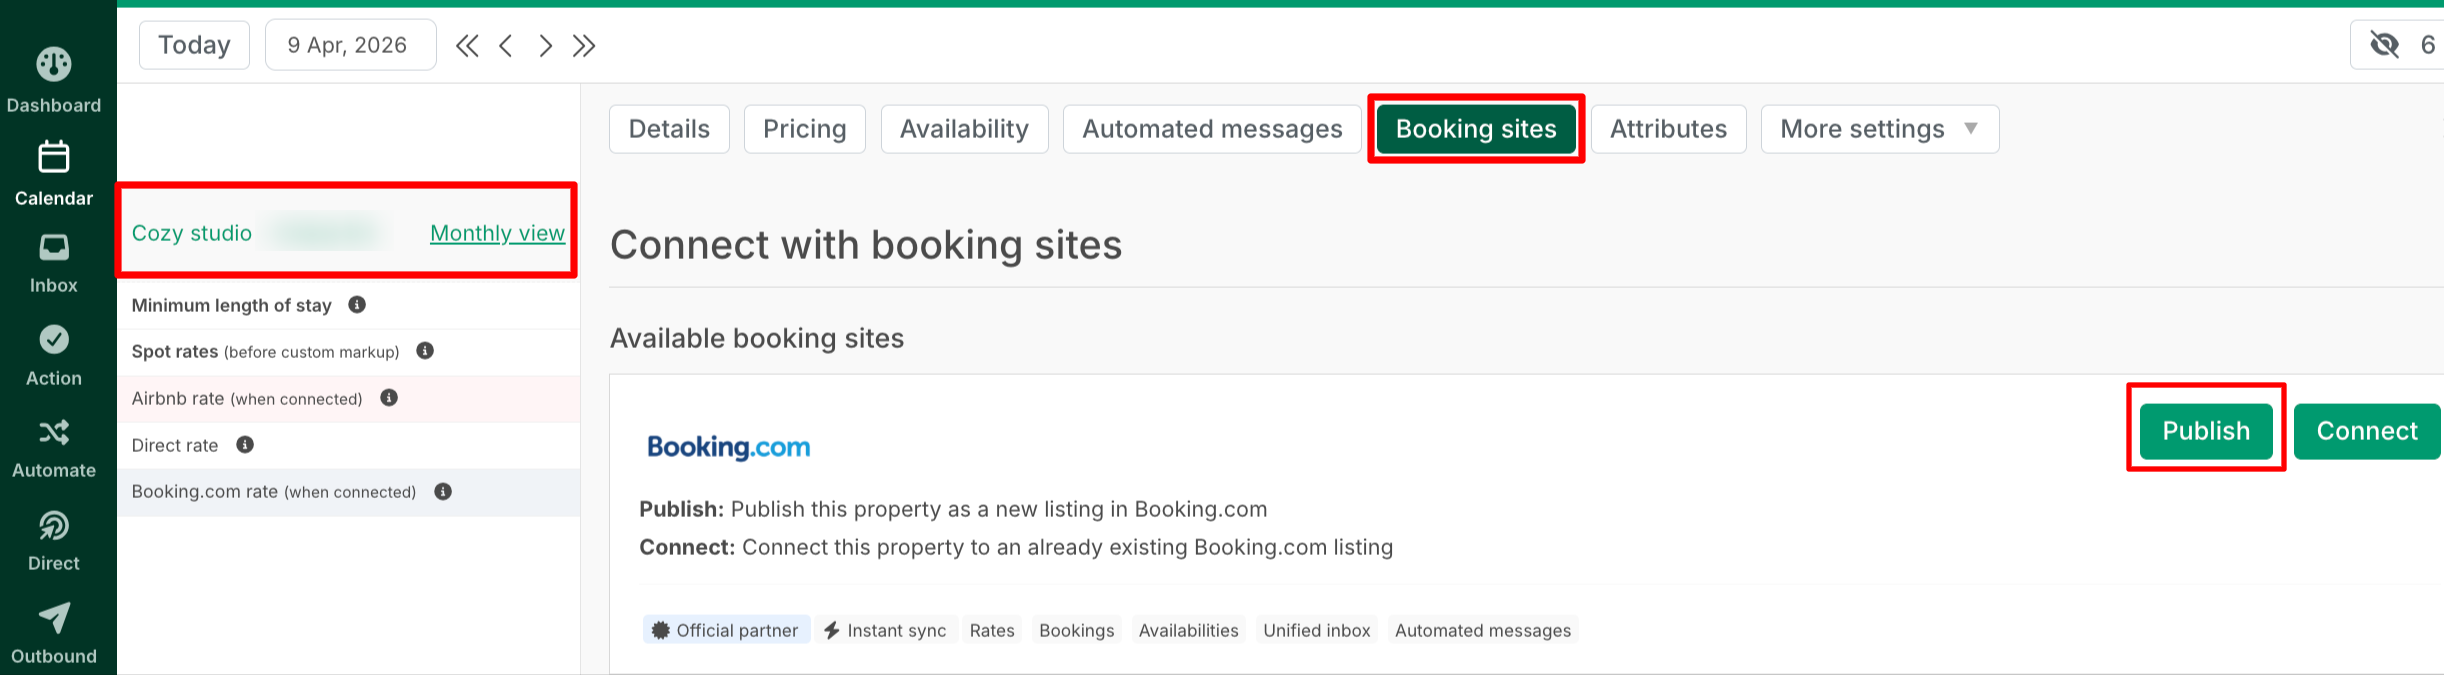
Option 2 - Connect From the Listing's 'Booking Sites' Tab
You can also begin the connection and publishing process of an individual listing via the Booking Sites tab. You can use this option to:
- Connect an existing Uplisting listing to an existing Booking.com account or property
- Publish an existing Uplisting listing as a new Booking.com listing
Step-by-step
- Navigate to your Uplisting Calendar
- Select the listing you want to connect to Booking.com
- Click Booking sites > Booking.com
- Click the Publish button, which will redirect you to the Connect page here, to complete the connection or publishing process.
Supported Regions
Publishing via Uplisting is currently not supported for properties located in:
- France
- Japan
- Brazil
- Quebec (Canada)
Listings in these regions must be created directly in Booking.com and then connected to Uplisting using the existing-listing flow
Multi-unit Properties
If a Booking.com listing needs to represent a hotel-style property with multiple room types (e.g. a Deluxe Double and a Family Suite under the same property), the publishing wizard only creates a single room type on the Booking.com side. Additional room types must be added afterwards in the Booking.com Extranet.
Uplisting's own multi-unit properties (multiple inventories of the same property type) are fully supported — the number of units is pushed to Booking.com as part of the publish.
Things to note
- After connecting Uplisting and Booking.com, the Booking.com calendar will appear as blocked while the initial sync takes place. This is expected behaviour – Booking.com do this to ensure no erroneous bookings happen during the initial sync. This can take up to 24 hours to complete, after which the calendar will automatically re-open.
- In order for the connection to be completed, you must have a valid rate plan set up on Booking.com for Uplisting to link to.
- Only Booking.com bookings made from the date you connected with Uplisting will sync to Uplisting.
- You won’t have a record of past bookings.
- Those bookings that are synced/ booked prior to joining Uplisting but have check-in dates in the future will not have cleaning fees or commission amounts shown in the price breakdown tab of a booking.
- Where possible, edit property-level settings in Uplisting, not on the Extranet. Uplisting pushes content one way at publish time and continuously syncs pricing, availability and restrictions afterwards — editing the same fields on both sides can introduce mismatches (extra-guest-charges in particular are a common source of sync errors).
Need more help?If you run into any difficulty just reach out to our Support Team and we will guide you through the process. They can be reached via the contact bubble shown in your Uplisting account or by email at [email protected]
Updated about 1 month ago