Color Picker and Element Backgrounds
Color Picker
Color Picker is the function of your editor that lets you manage color scheme of text, background, overlays and more. You can choose a color from the color palette, input a HEX or RGB value or even create a custom gradient. Recent colors feature will help you keep your color scheme consistent and maintain a professional look and feel on your site.
Color style
Before you pick the color scheme, you need to choose where you want to use single color or a gradient.
If you are using single color option, you can pick a color from Recent colors tab or jump to Choose another color.
Gradient background will be an available option for row, column and widget backgrounds and image overlays. To apply a gradient, with the color picker open, click the drop down above the color palette (it may say Color), select Gradient, then make sure to:
- Pick 2 colors of the gradient stops
- You can reverse the colors to adjust the stops positioning
- Choose gradient direction
- Center option will generate radial gradient
- Side options will create linear gradient
NOTE
Gradients are not able to be saved in Theme Colors
Theme Colors
Theme colors allow you to define a color palette and link the individual colors to any or all widget with color settings. The color of any element that is linked to the theme colors will automatically be updated when the linked color is changed in the theme colors settings. This allows you to quickly make color changes, which helps reduce design time and ensures your site's style is consistent across pages.
To learn how to configure theme colors, see Theme Colors
Saved Colors
Save colors that are frequently used across your site by adding them to the Saved Colors list in the color picker.
To add a color to the saved colors, click the Saved Colors tab on the color picker and click the + icon.
To remove a color from the Saved Colors list, right-click the color and select Remove.
You can save up to 48 colors and gradients in the Saved Colors list.
Recent Colors
When picking a color, the recent colors menu shows a sample of colors that were recently used in your site. This allows you to quickly pick colors that are already on your site.
Choose Another Color
Select a color's hue using the color palette on the right or the color panel. Alternatively, you can enter the HEX or RGB value of the color you want in text box below the vertical color gradient.
To match a color perfectly from anywhere on your site (images, texts, and so on), click the eyedropper tool and select the color from your site you want to use. No need to spend any time trying to figure out a color’s exact name or value.
Opacity
The opacity slider determines the transparency of an element. Keep in mind that as you reduce an element's opacity, whatever is behind it (background image or color) will begin to blend with that element.
Contrast Checker for Text Colors
The contrast checker for text colors helps improve the accessibility of sites by indicating if the contrast between the text and the background meets the AA or AAA standard*. The contrast checker appears in the color picker whenever the color picker is being used for text.
Following is the criteria that determines if the AA or AAA standard is met:
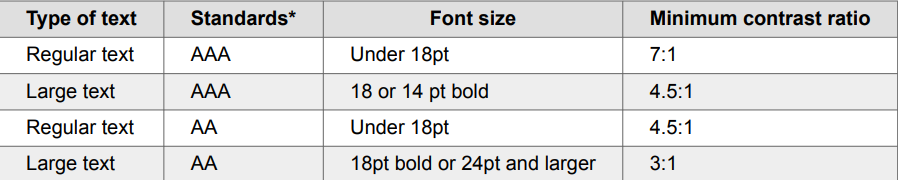
In accessibility standards, "AA" and "AAA" represent different levels of color contrast requirements. AA level means your colors have enough contrast to be readable, but might still present problems for some users. AAA level means you have high contrast that should be readable for the vast majority of your users.
The contrast checker will be disabled in the following circumstances:
• If the selected text has multiple colors. For example, if several words in the text are blue and several others are pink.
• If the text is on a gradient background.
• If the text is on an image background.
Color Picker Considerations
• Gradient is not available for text elements, so you will not see it in a Color Picker for text elements in widgets design editor of Theme tab.
• When working with backgrounds, switching between Color and Image will set the settings on the previous option to null. For example, if you were using a color and changed the setting to Image, any color or gradient settings will be removed.
• Gradients override individual button backgrounds. To change them back, reselect the background for individual buttons.
Element Backgrounds
Customize the background of elements to match the theme of your business with eye-catching and creative designs. Choose from custom background images in the photo gallery, upload your own images, use video backgrounds, or apply colors and gradients to add a unique touch to your site.
NOTE
For page backgrounds, see Theme Background
Any file (text, image, video, or audio) uploaded to the system is publicly available. No personal and/or confidential information should be uploaded. To remove the file completely, delete the file from the Media Manager.
All YouTube background videos display the video title and uploader before the video starts on load. There is no way to remove these items without manually changing the CSS. Due to this change, YouTube videos are not recommended for background video
To edit the background of elements:
- To access the design editor, right-click the element, and click Edit Design. Or if you are in flex mode or Editor 2.0, select Edit Design from the floating menu to open the design panel. Click the element to open the floating menu, then click the option to edit design.
- Navigate to the Background section.
- Depending on the element, select Color, Image, or Video and select the desired background. • Some elements also have the option for image sliders. To create an image slider, select multiple images then click Done. For detailed information on background sliders, see Background Image Sliders. • For details on color options, see Color Picker in this article
- (Optional) When selecting an image for a background, click the Do not optimize this image toggle to prevent optimization if a single image is used (this setting will appear after an image has been selected).
Background Image Sliders
Some containers offer the option to add a background image slider.
To create a background slider:
- To access the design editor, select Edit Design from the floating menu to open the design panel. Click the element to open the floating menu, then click the option to edit design.
- Navigate to the Background section.
- Click Image.
- Click on the + sign and select multiple images rather than a single image from the image picker.
- Click Done.
- (Optional) Once the slider is created, you can set slide settings such as slide transition style and slide speed from the row design menu.
- (Optional) Any of the other background image options such as Background Overlay, Positioning, and display style can be applied to the slider.
Background Image Configuration
Once an image or image slider has been setup, additional configuration options will become available. While the options can vary, the two most common ones are:
-
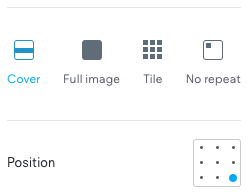
Image Display Styles: these are the various ways you can control how the image or images are displayed within the container. These options allow you to adjust how an image fits, repeats, or stretches to cover the area. There are four options:
- Cover: Stretches the image to cover the entire area without losing its aspect ratio (since it's covering the area of the container, parts of the image may be cutoff).
- Full image: Displays the full image. While the image won't be cutoff, there may be bars that show up on either side or above and below the image, depending on the size of the container.
- Tile: Repeats the full image at its original size in a tile pattern to fill the area. If the image is larger than the container, it will not repeat.
- No repeat: Displays the full image at its original size without repeating it. If the image is larger than the container, it will be cut off. If it's smaller than the container, there will be space around the image.
-
Image Position Type: Select from Default, Static, or Parallax. Note that Static position will not work on iOS devices.
-
Position: This setting determines where the image is placed, such as at the center, top, bottom, left, or right of the container. The position setting works in conjunction with image display options to control how the image is displayed. Background image position is set per screen size in Editor 2.0 and flex mode.
Video Backgrounds
Use Video Backgrounds to quickly add a video from YouTube, Vimeo or Dailymotion. Video backgrounds can catch a visitor's eye with moving content and add a stylish modern look to any site.
NOTE
All YouTube background videos display the video title and uploader before the video starts on load. There is no way to remove these items without manually changing the CSS. Due to this change, YouTube videos are not recommended for background video.
To add a video background to a container:
- Have a video ready to upload or a video's shareable URL that is uploaded on YouTube, Vimeo or Dailymotion.
- Right-click the element you would like to add this background to, then click Edit Design.
- Navigate to the Background section.
- Click the Video tab. You have the following options: • Click Upload Video and select the video you want to upload. You can upload up to 200MB in all formats. You can upload video from your device, Facebook, Instagram, Dropbox, Google Drive or record a video using your webcam. • Paste the URL of the video you would like to use into the YouTube, Vimeo or Dailymotion URL textbox.
NOTE
YouTube videos are not supported on mobile as they do not auto-play on iOS devices.
Considerations
- YouTube videos are not supported on mobile as they do not auto-play on iOS devices.
- iPhones with a battery on low power mode will not auto-play videos on a site, and instead will show a play button.
- Background videos will not play sound.
- Videos can take time and bandwidth to load, and can distract users from important links or text on your page, so use videos sparingly.
- Consider adding an overlay with a higher opacity of the video background to make the effect more subtle.
- When adding a Dailymotion video that is part of a playlist, make sure to only add the direct link to the video (and omit the playlist parameter, which looks something like this:?playlist=x1x2f3). If your video’s URL has this parameter, just remove it. For example: https://www.dailymotion.com/video/x60ktex?playlist=x5x6f2 would be https://www.dailymotion.com/video/x60ktex
Change Section Background Color on Scroll
Set a background color that smoothly transitions as users scroll through the section, creating a dynamic visual cue that enhances engagement and highlights content changes.
To change a section background color on scroll:
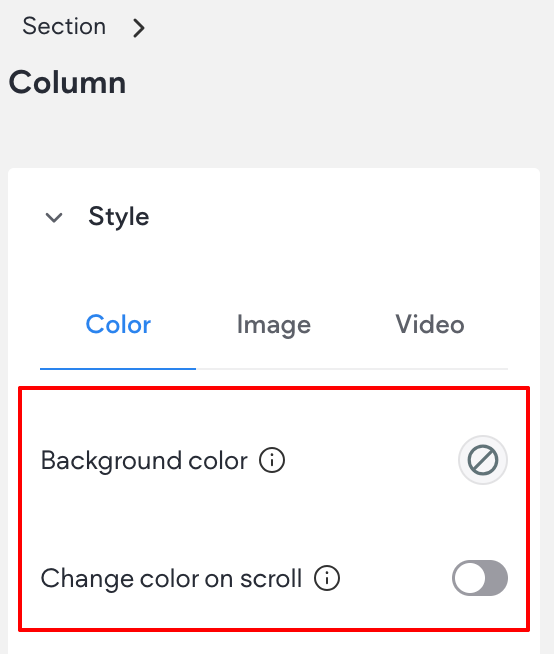
- Click the desired section to open the floating menu and click Design.
- Expand the Style section of the design panel.
- Select a Background color. This will be the first color users see as they scroll down to the section.
- Enable the Change color on scroll toggle.
- Select a Background color on scroll. This is the color your section transitions to as the user scrolls down.
Troubleshooting and FAQs
The video is not auto playing on mobile
If you are using an iPhone, the issue could be caused by low power mode. Turning off low power mode might resolve it.
Another possibility is browser settings.
The video has no sound
Background videos, by default, do not have sound. If your video requires sound, consider using the video widget instead.
Part of my video or image is cut off
This is due to the aspect ratio of the image or video being different than the container.
Depending on your goal, this can be challenging to address. If the image or video needs to fit a container that changes based on screen size, there is no perfect solution for preventing it from being cut off. The visible portion of the image or video will vary depending on the screen size.
If the image does not need to cover the full area, the Full Image option in the image display options can be used (see the section in this article, Background Image Configuration )
Video backgrounds don't currently have a full video option. Adjusting the original video's aspect ratio may fix it.
For more information on aspect ratio, see Aspect Ratio vs Resolution
The video is not showing up
If the video is added via a link, the issue could be related to the video’s privacy settings. To check this, try using a different video link. If the new video works, it suggests that the original video's privacy settings are preventing it from displaying on the site.
The solution will depend on the platform hosting the video, and their support team may be able to assist.
Updated 3 months ago