Client Statements
Report your Management Fees, Customized payout details, Expenses and Taxes quickly and easily with Client Statements.
Overview
Save valuable time with the automated client statements from Uplisting. Automatically provide professional-looking monthly statements and invoices to your clients.
Here's a brief rundown of what Uplisting client statements can offer:
- Automatic client statement creation: On the 1st of each month, you'll find a statement for each client-connected property in your account, ready and waiting. It covers the current month - no fuss, no hassle.
- Booking integration: All your bookings that have checked out in the current month? They're on the statement. Automatically. No manual entry is needed.
- Expense tracking: You can now directly add expenses to each statement. It's all in one place, easy to see, easy to manage.
- Easy access and downloadable statements: Your statements are readily available online in your client portal. Need a hard copy? Just download it as a PDF.
- Automatic management fee calculation: We've automated the calculation of your management fee. It's added to each booking and statement without any extra effort on your part.
- Custom management fee formulas: Yes, you read that right! You can set up custom management fee formulas tailored to your needs.
Video walkthrough
What's New?
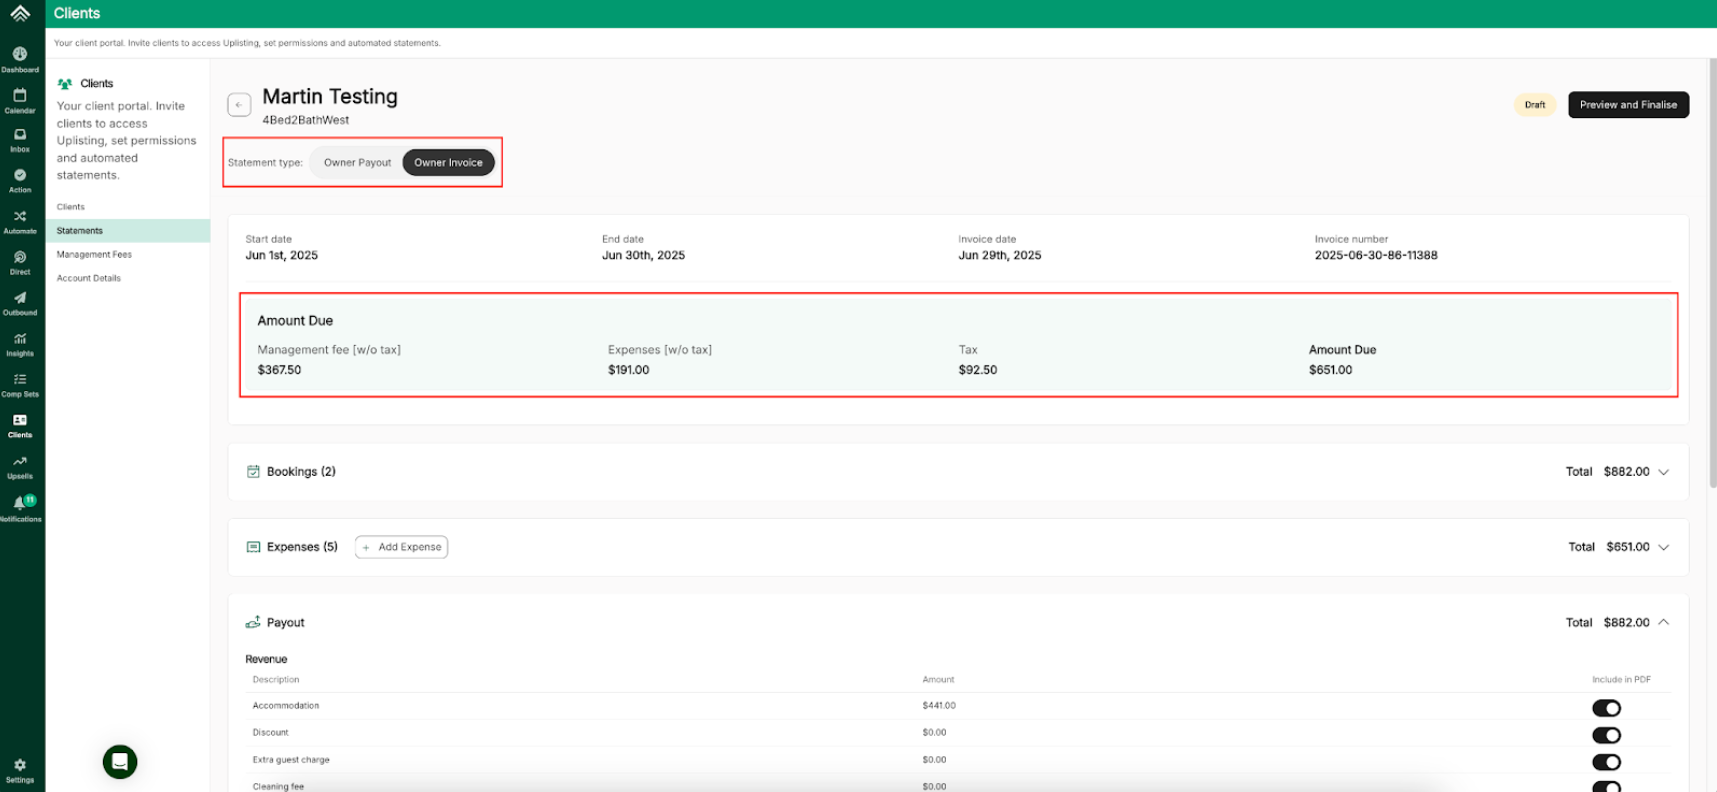
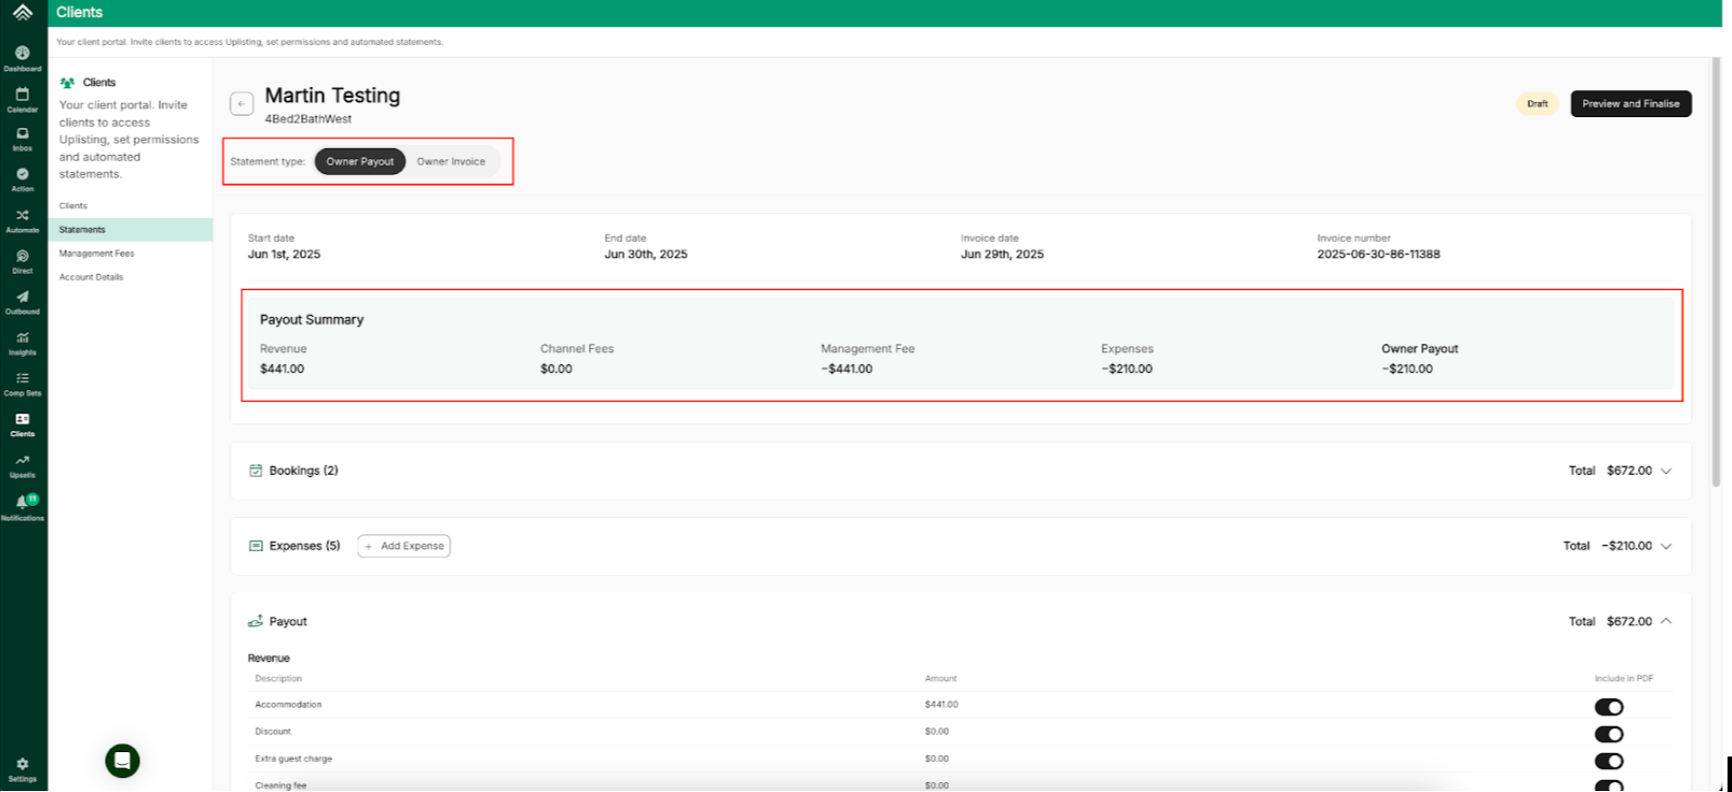
- Choose Between Invoice and Payout Modes:
Invoice Mode:Highlights only the expenses and management fees charged to the property owner (most useful when the OTA pays the owner directly, and the PM is invoicing for services).(NEW) Payout Mode:Provides a complete financial picture - showing all income, expenses, and fees, ending with the final payout amount to the owner (most useful when the PM collects everything from the OTA and pays the owner).
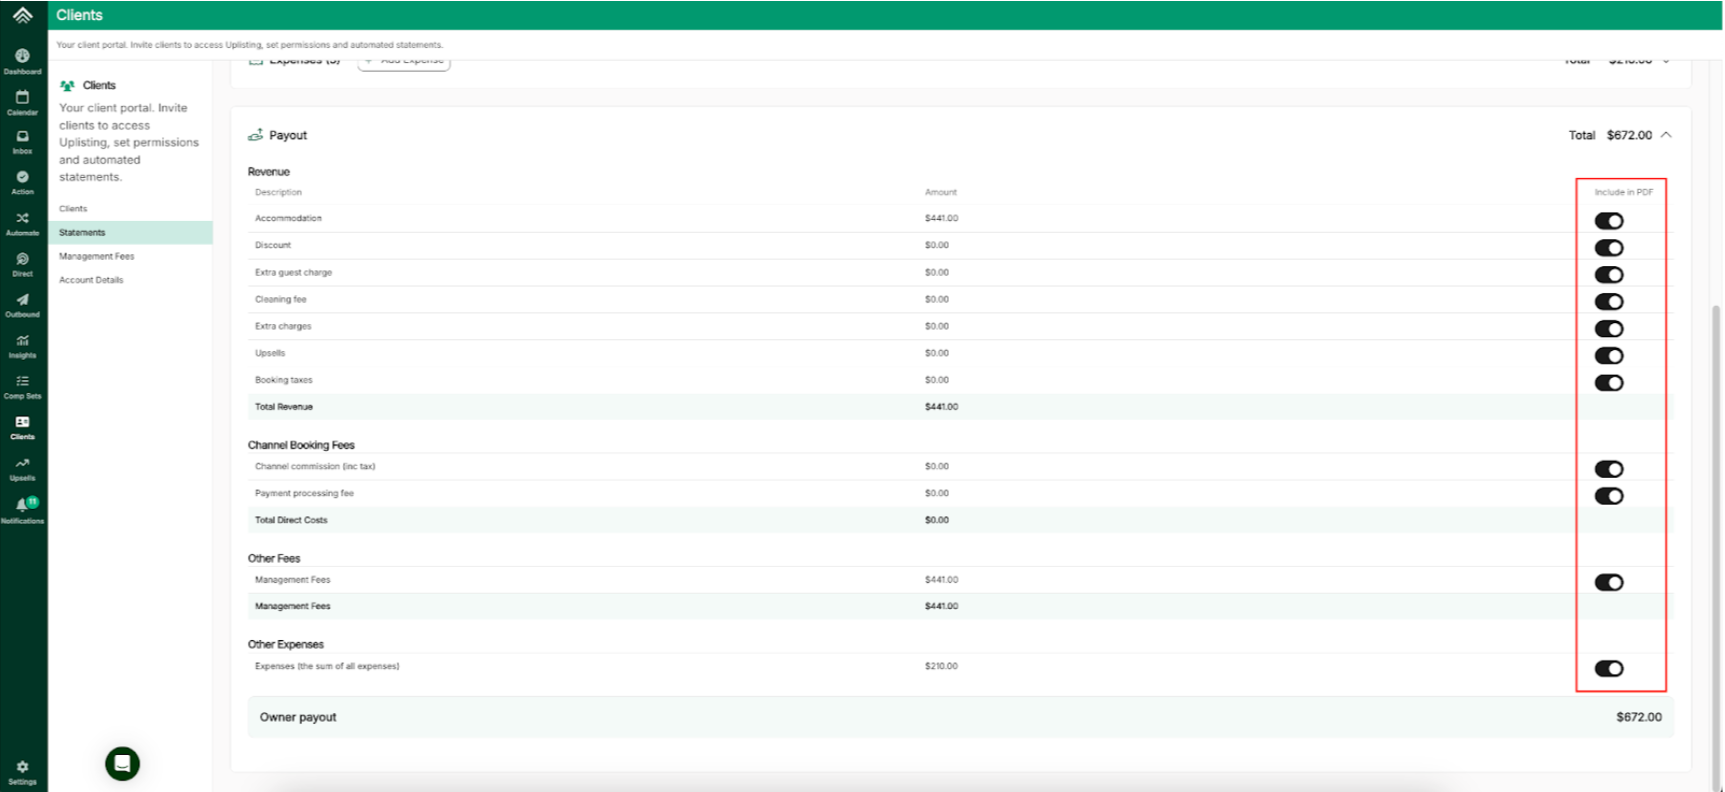
- Revenue and Expense Visibility Controls: You can now toggle line items on/off for revenue sources, fees, and expenses to customize what’s included in the payout calculation and what’s shown in the final client PDF statement.
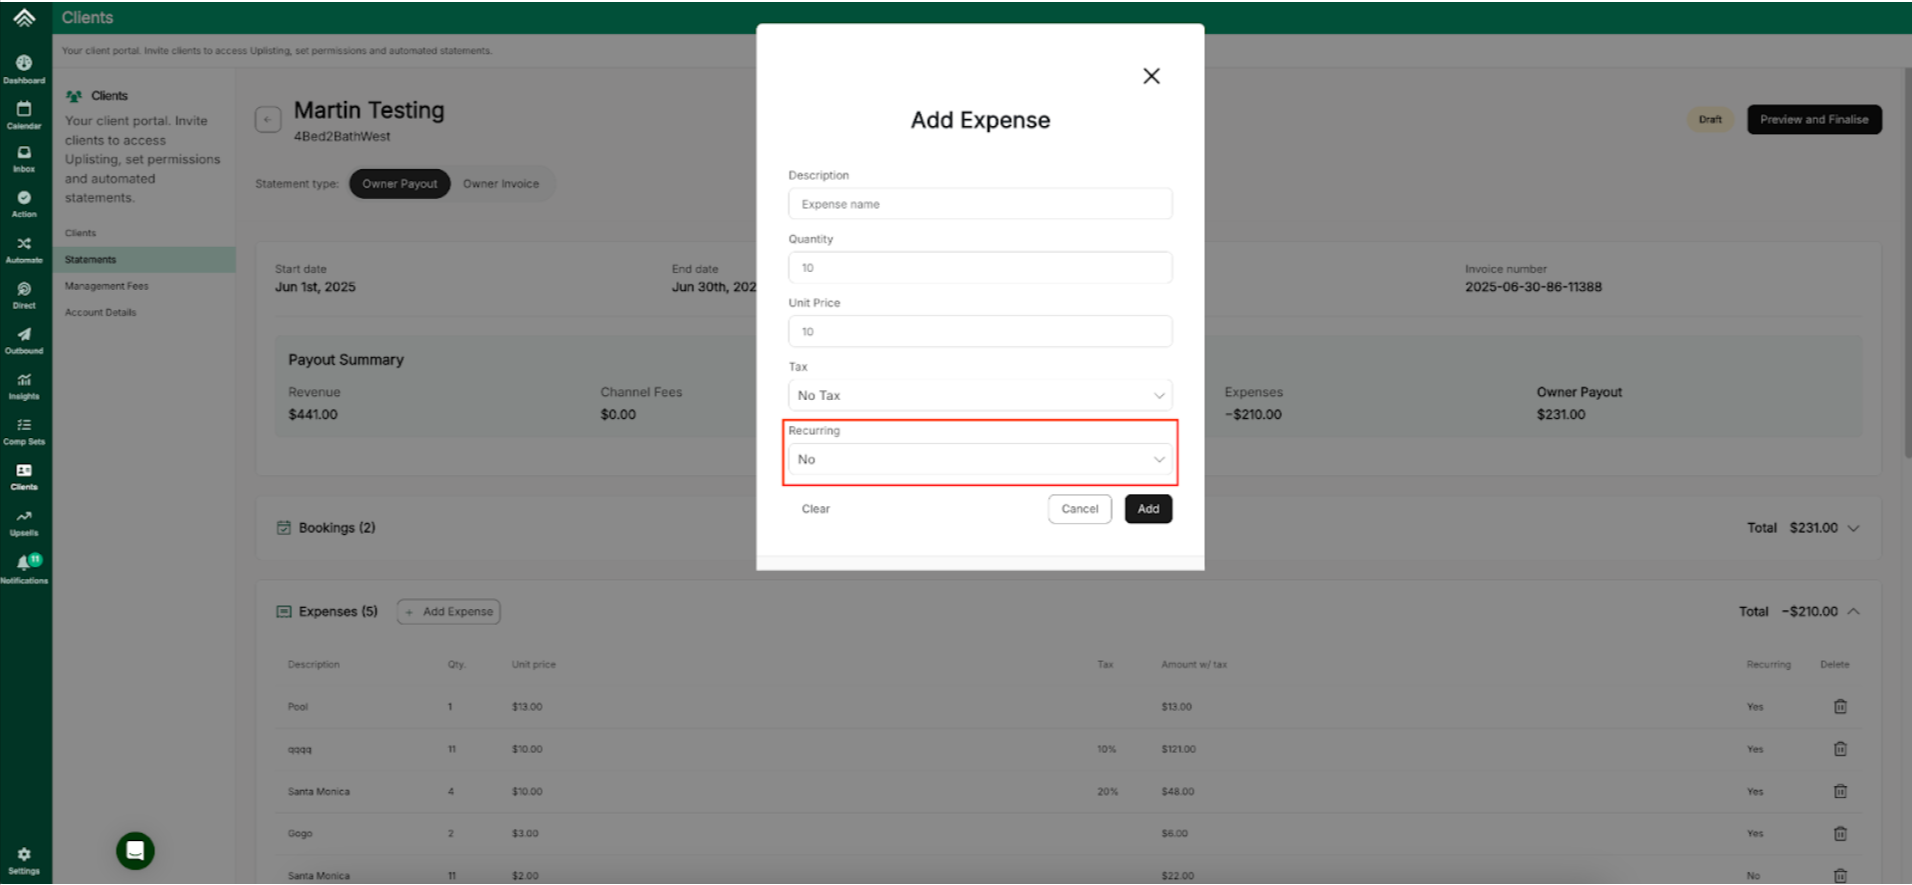
- Recurring Expenses:PMs can now save time by setting up recurring expenses, so they don’t have to manually add the same expense every month.
- Reset Statements to Draft Mode:Need to update a finalized statement? Now PMs can reset statements back to draft/edit mode, allowing them to make any changes (and/or update with any more recent booking data), and then finalize and generate a new PDF again.
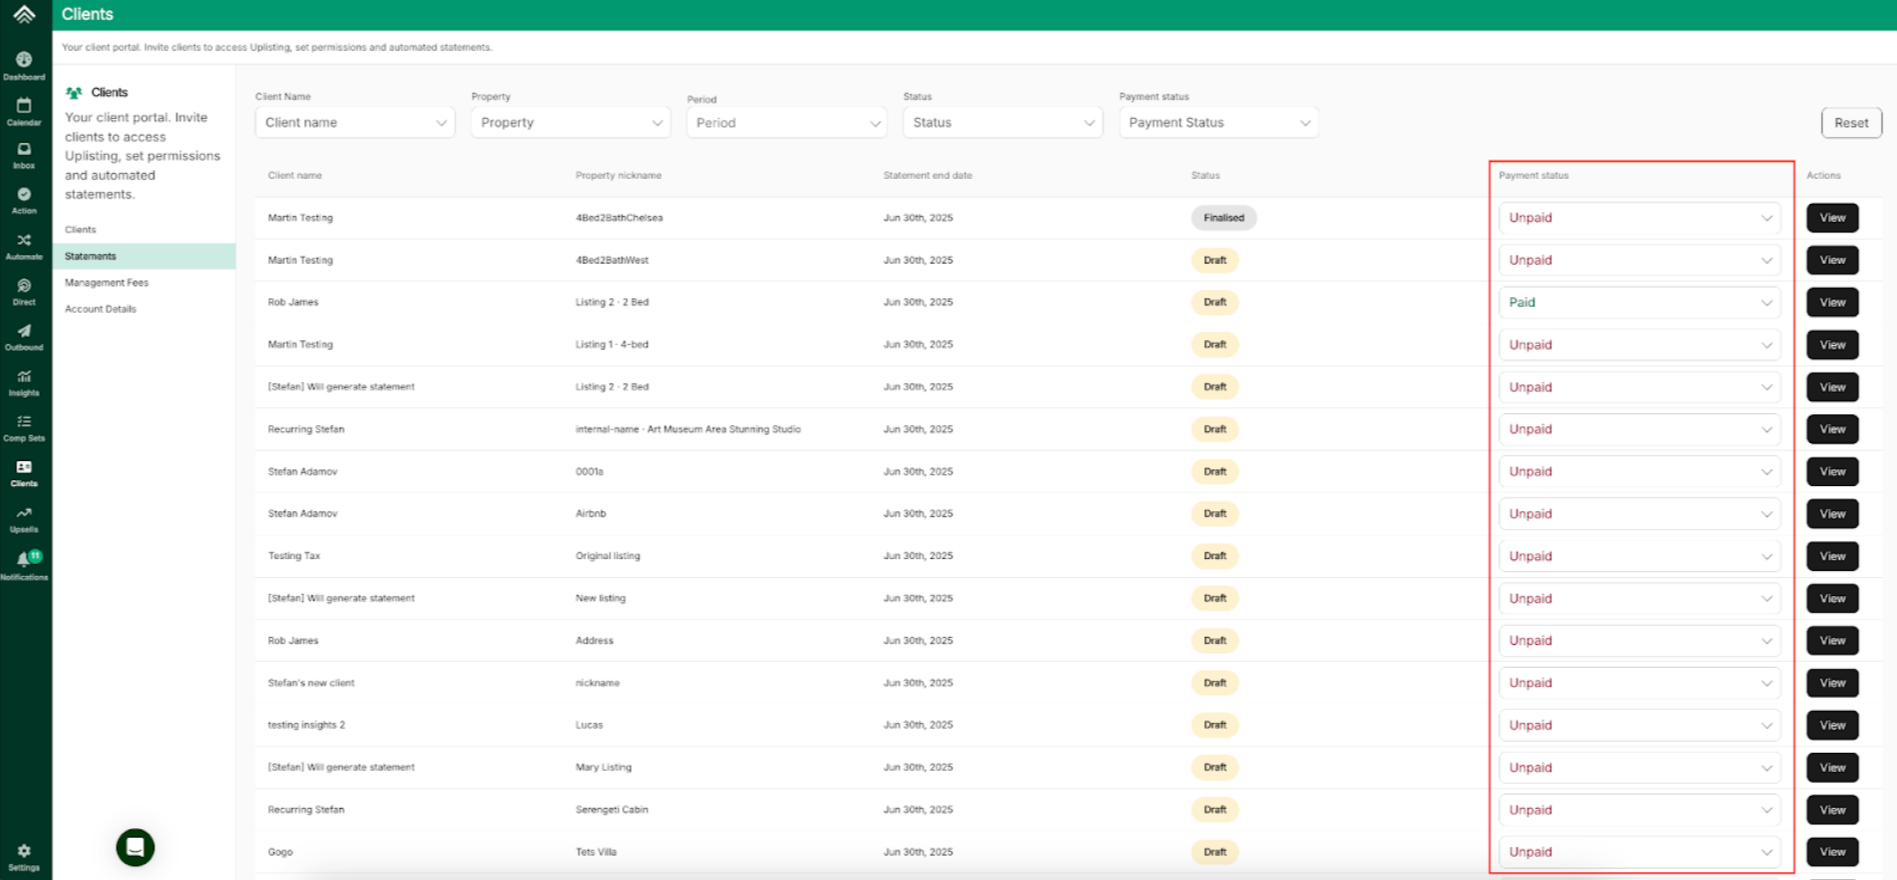
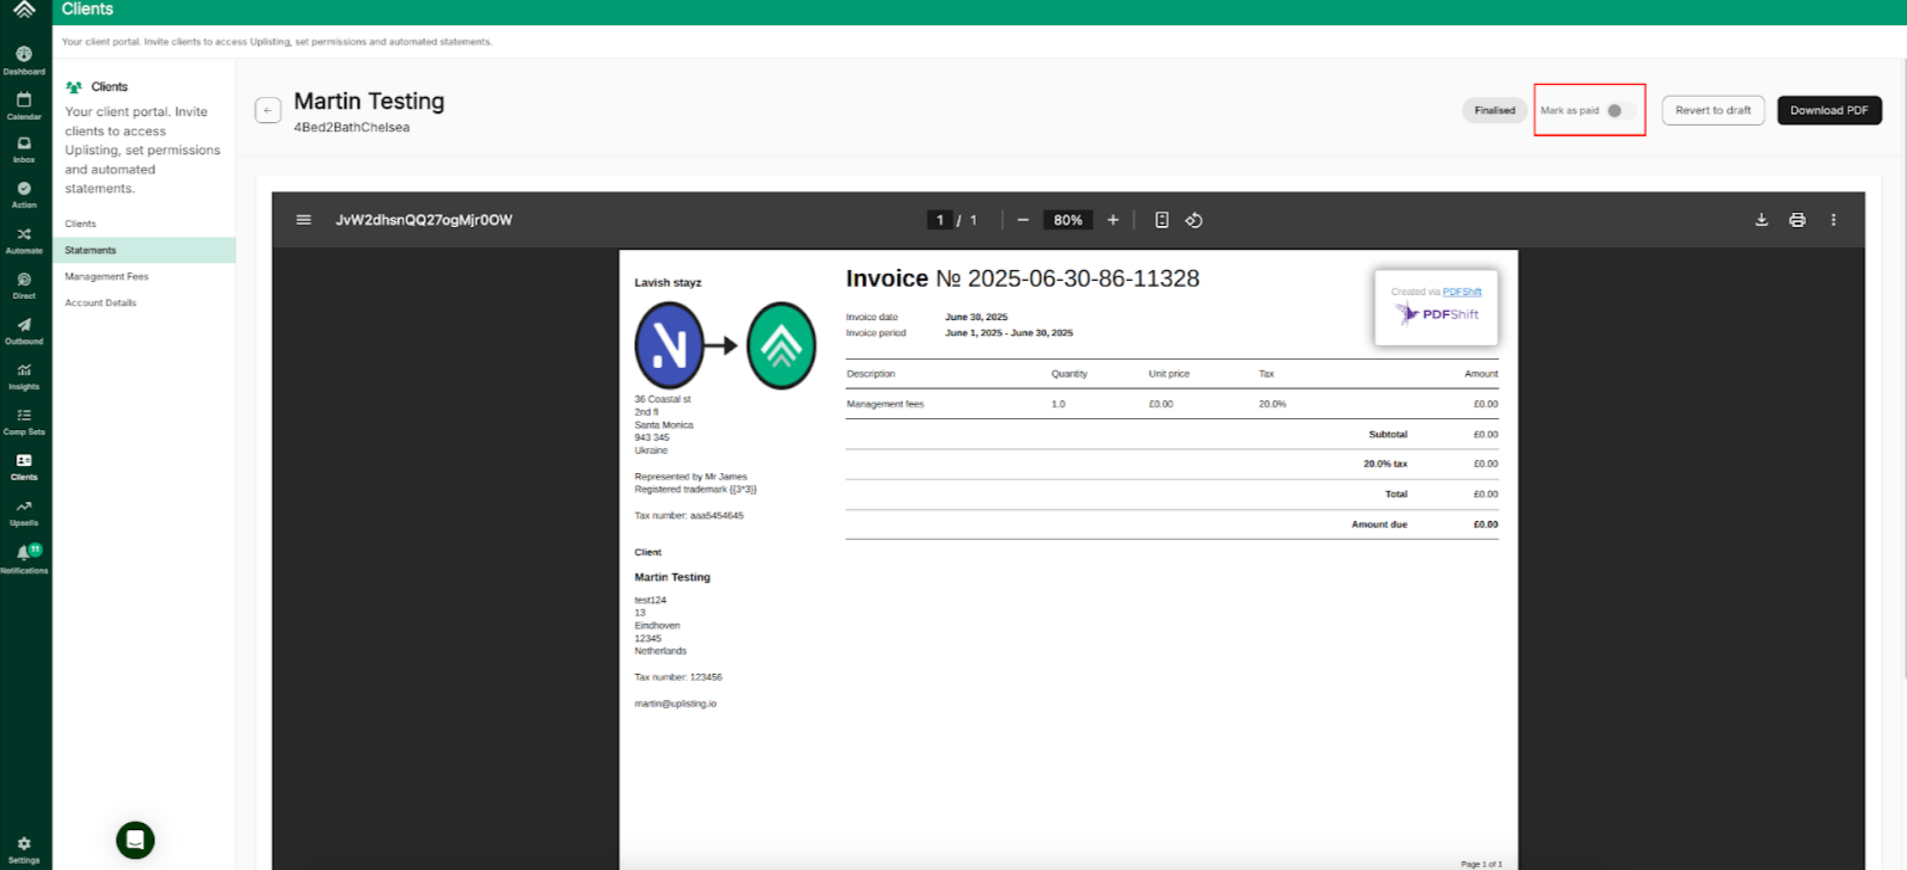
- Mark Statements as Paid/Unpaid:PMs can now easily keep track of payment status for each statement directly within Uplisting.
Video walkthrough
How it works
Client statements include several features. In order to explain how the functionality works, we’ll go through all those screens and explain how they work together.
Client management and statements
The ability to use statements starts with the configuration of clients within Uplisting. The client management functionality is core for the statements since you’ll be required to have configured clients in order for the statements to start generating.
With both add-ons enabled, statements start generating automatically for the current month after you configure clients and associate properties with them.
Uplisting will start generating statements in a draft status for the current month for all properties that are associated with a client.
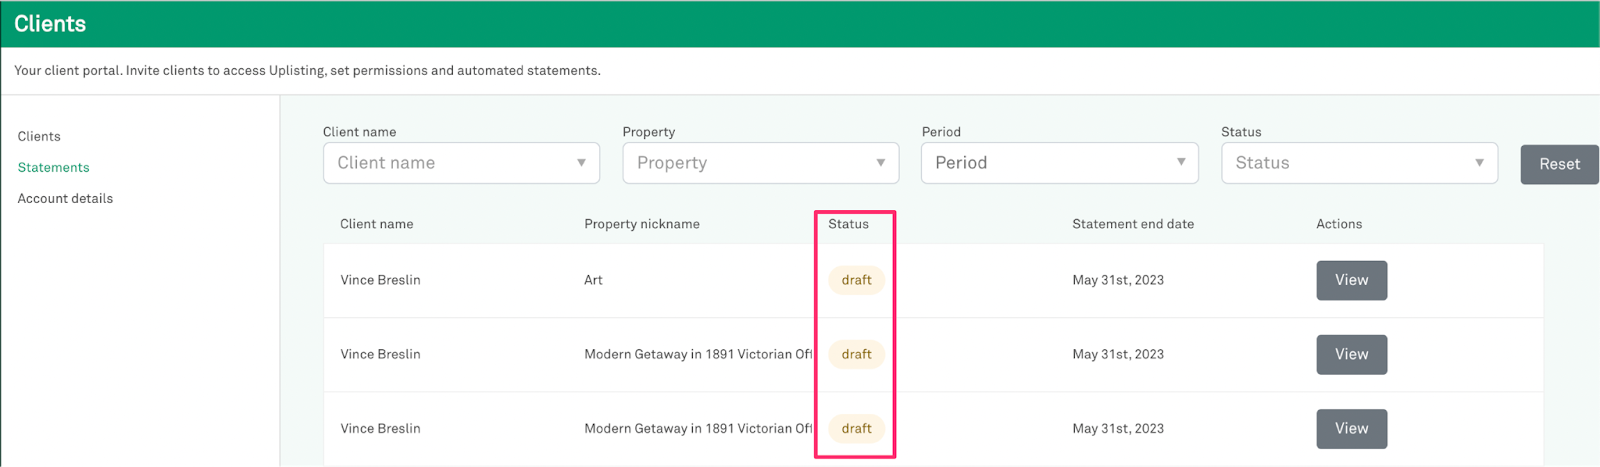
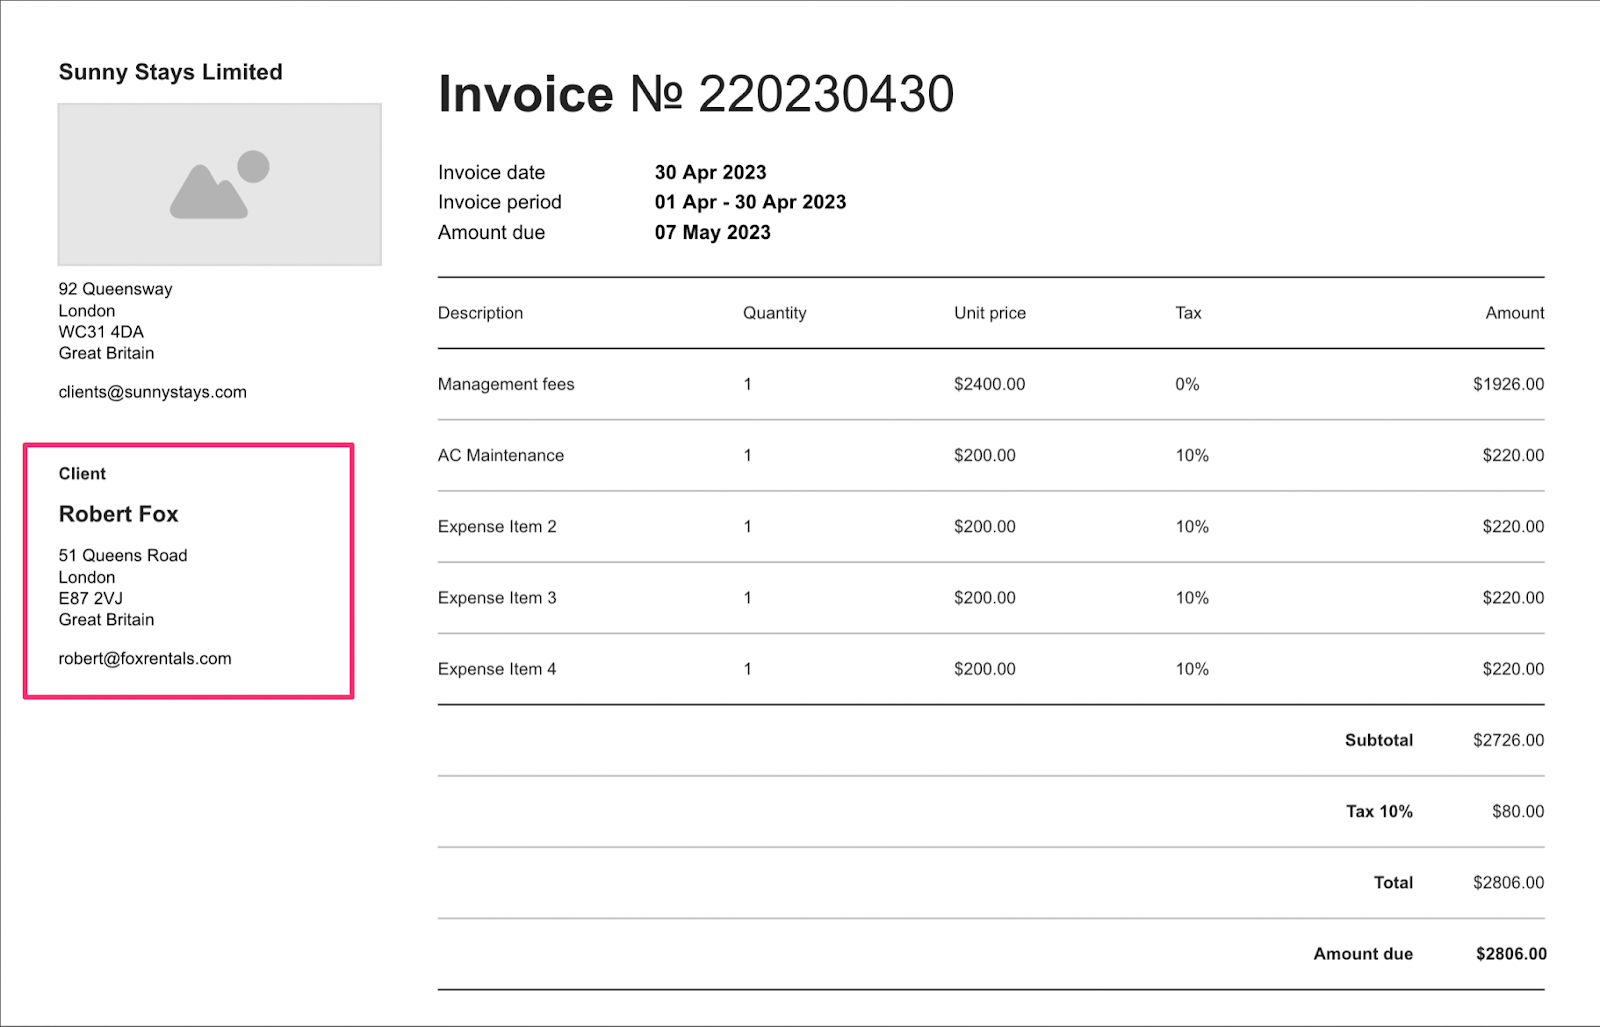
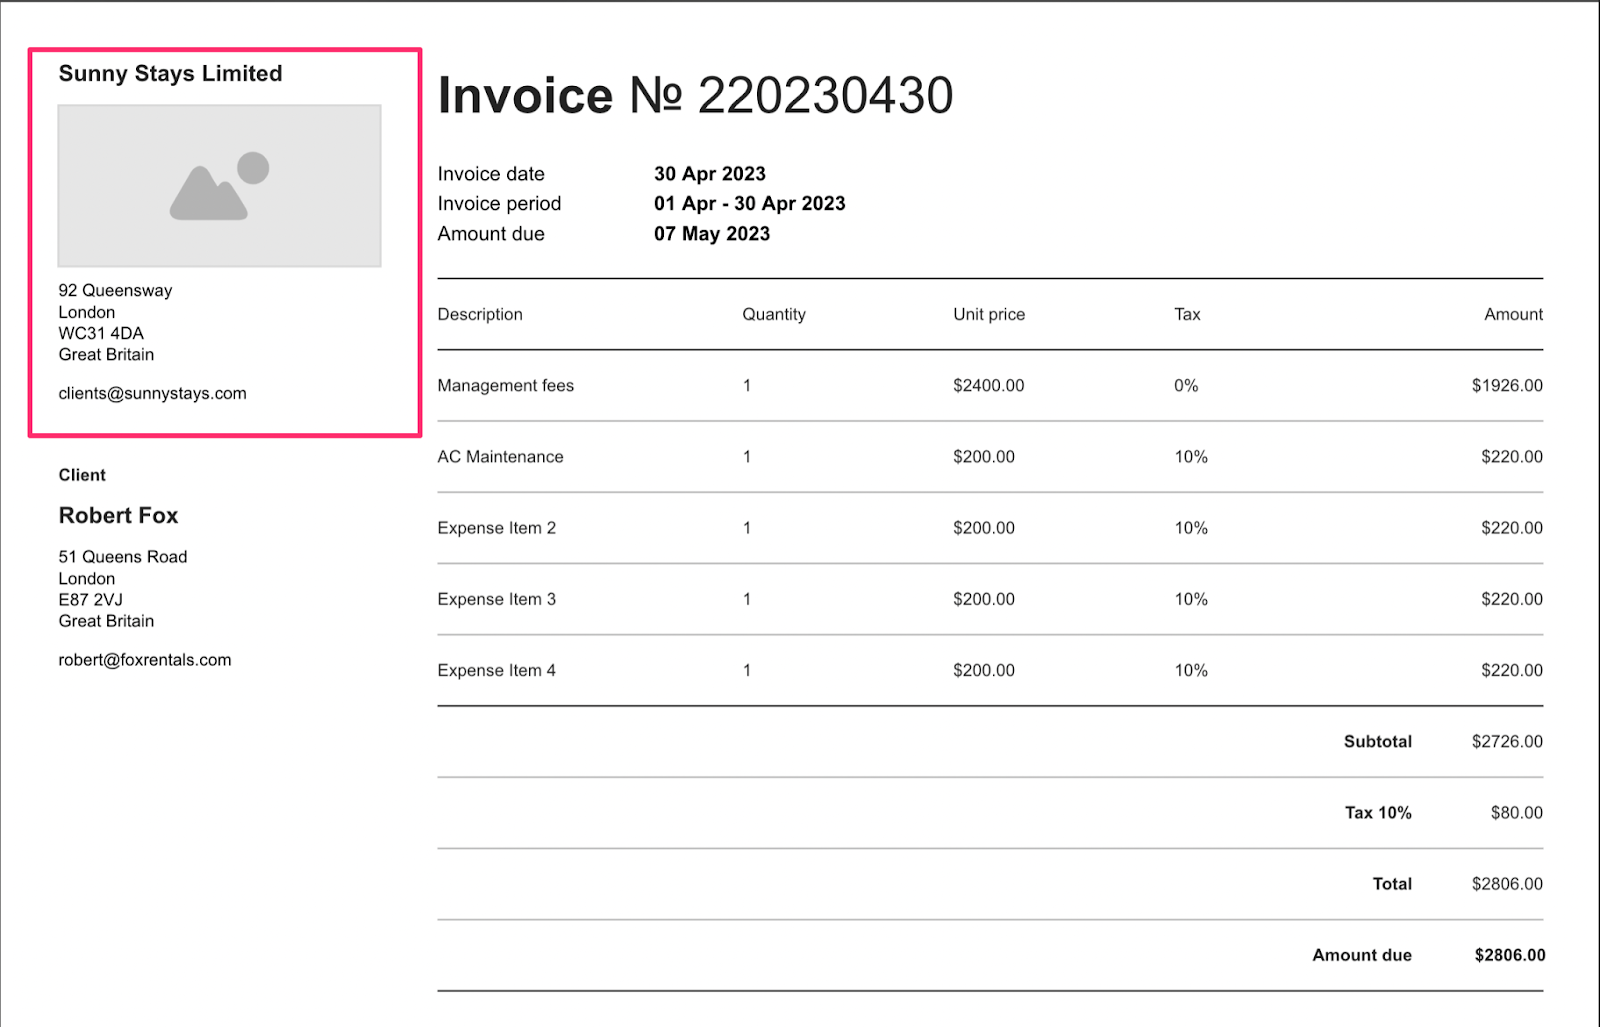
Key information within the statement comes from the client configuration during the second step called statement details. Since statements are generated for a particular client, the client information is what we display in the invoice section of the statement.
Account details
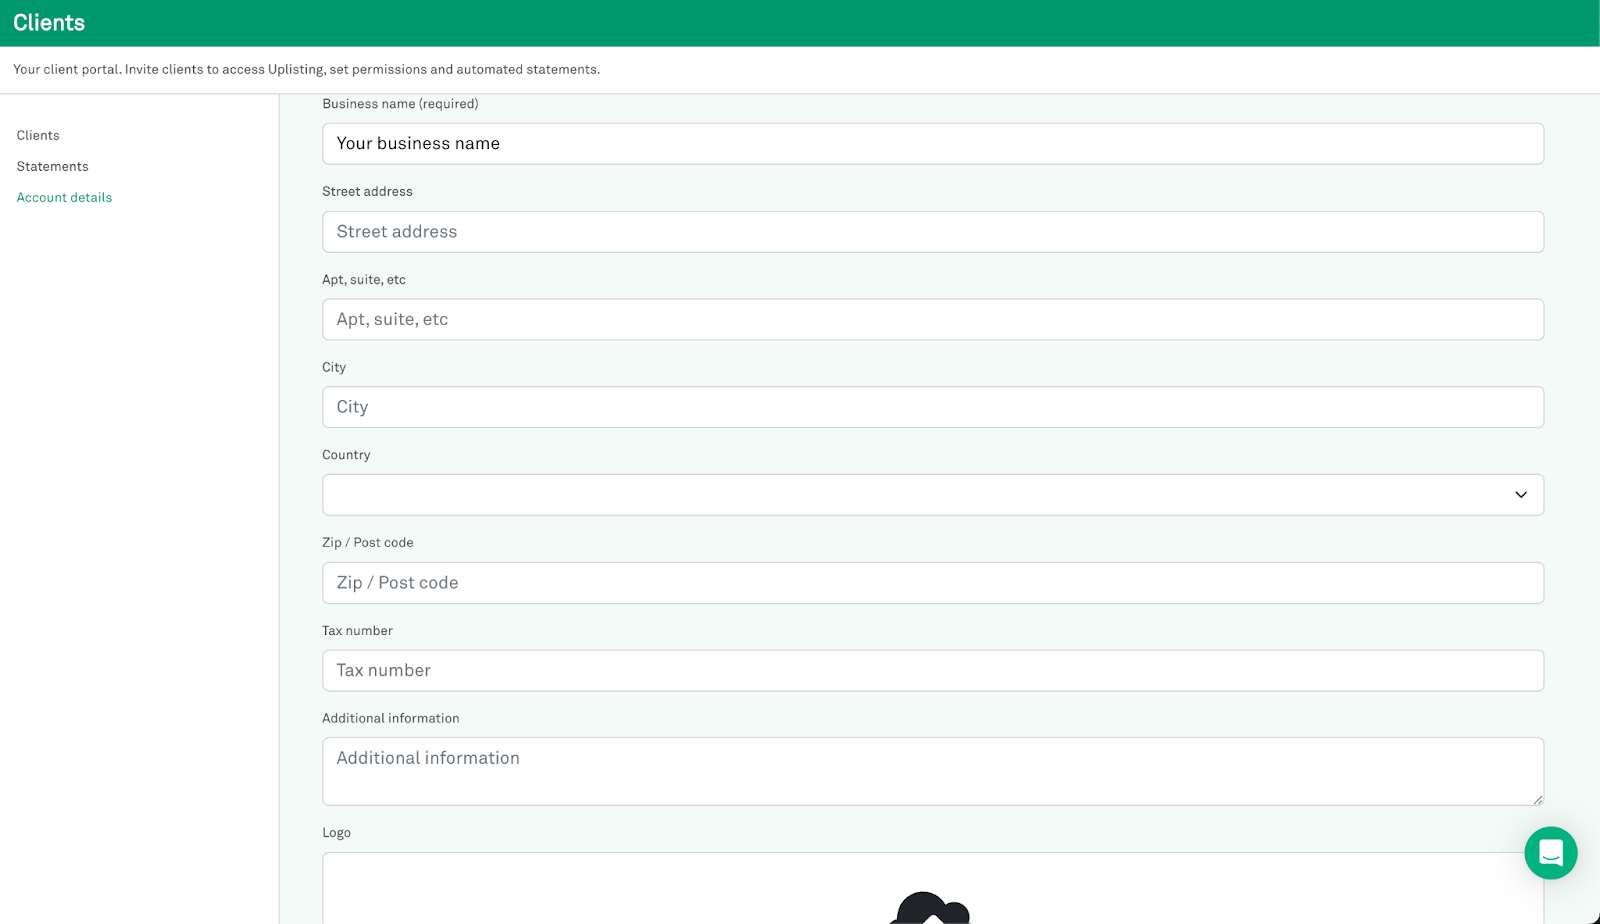
The account details page allows you to enter your business information which is, in turn, displayed on each statement's invoice section. This is how your company details are shown on the statement.
Account details are optional; you can choose which inputs make sense for your business to include in the statement.
Company details that you can add to the statements:
- Business name: Your company name
- Street address: The street address where your company is located
- Apt, suite, etc: The apt or suite number or where your company is located
- City: The city where your company is located
- Country: The country where your company is located
- Zip/Postcode: Your zip /postcode as per the company location
- Tax Number: Your company tax number
- Additional information: Additional information that might be needed as part of the company information in the invoice
- Logo: Your company logo as it will appear on every invoice. Recommended logo maximum aspect ratio 2:1 and 1000x500px size.
Custom management fee formula
See this guide to learn about custom management fees
Choosing Statement Type (Invoice vs. Payout)
- When editing a statement, within the “Single Statement” overview page, you can now select the statement type: Invoice or Payout.
- This selection determines how the statement’s financials will be presented in the PDF (with a summary of totals displayed directly in the same statements page).
Customizing Line Items
- Within the “Single Statement” overview page, use the toggles to show/hide revenue sources, fees, and expenses.
- This ensures that the final statement reflects exactly what you and the property owner agree on.
Modifying a draft client statement
As we previously explained, the client statement contains your account and client information. Both are configurable outside the statement itself so that you can set them up only once.
Your statement will stay in draft status until you finalise it, allowing you to insert all the expenses that occurred.
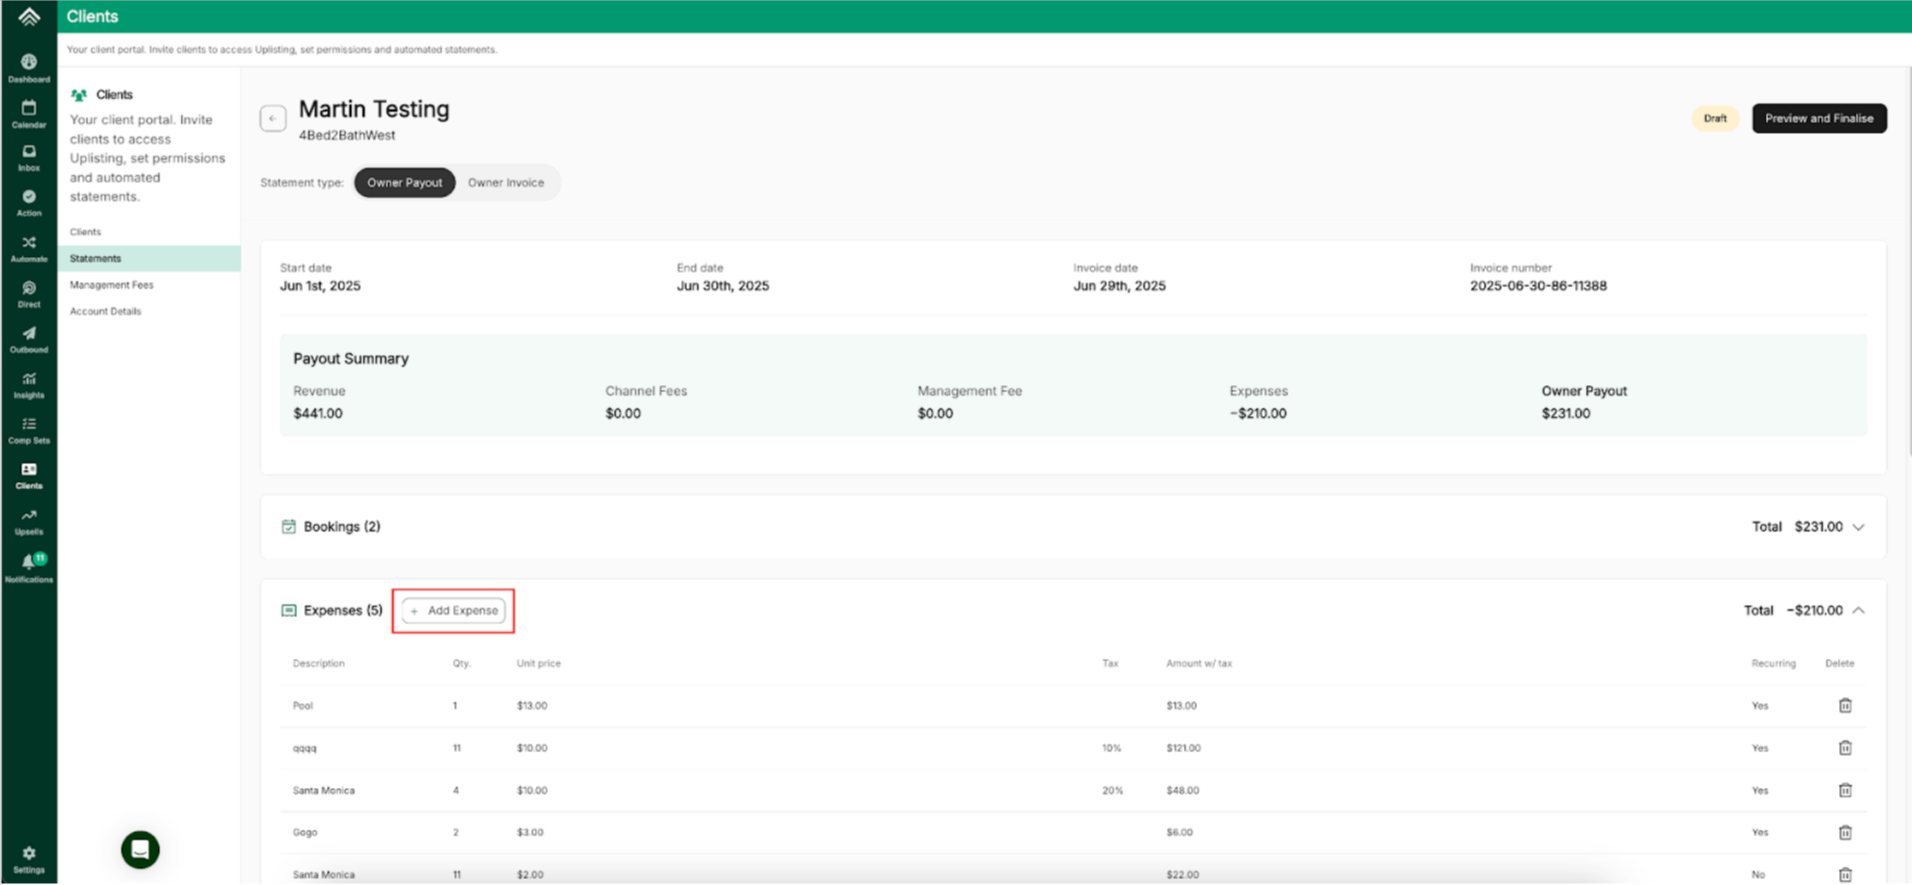
Adding an expense
Adding an expense starts through the “Add expense” button.

Clicking on it will expand a row with a few required properties:
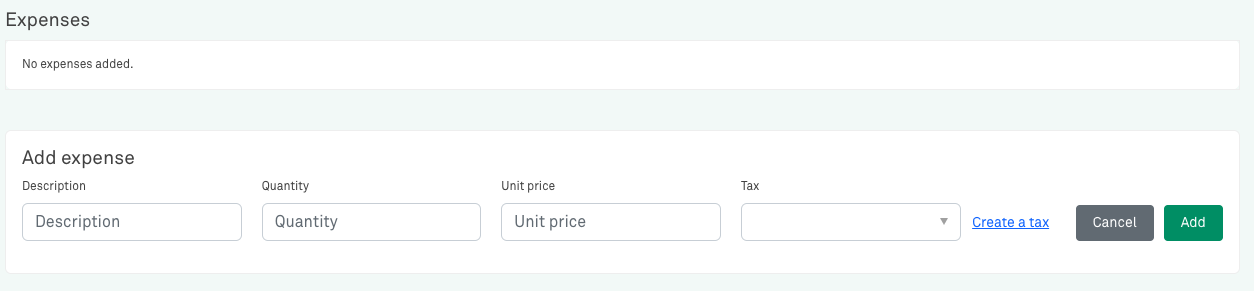
- Description field: This is where you describe your expense. The expense will appear in the statement with this description.
- Quantity: How many times this expense occurred.
- Unit price: The individual unit price
- Tax: Optional drop-down allowing you to select a tax from the ones already configured for your account. Here's how to configure a new tax.
Once added, the expense will instantly appear in the client statement under the “Expenses” table.
Adding or Managing Recurring Expenses
- Go to the Expenses section within the “Single Statement” overview page and set up recurring expenses for specific properties.
- These expenses will be automatically included in future statements.
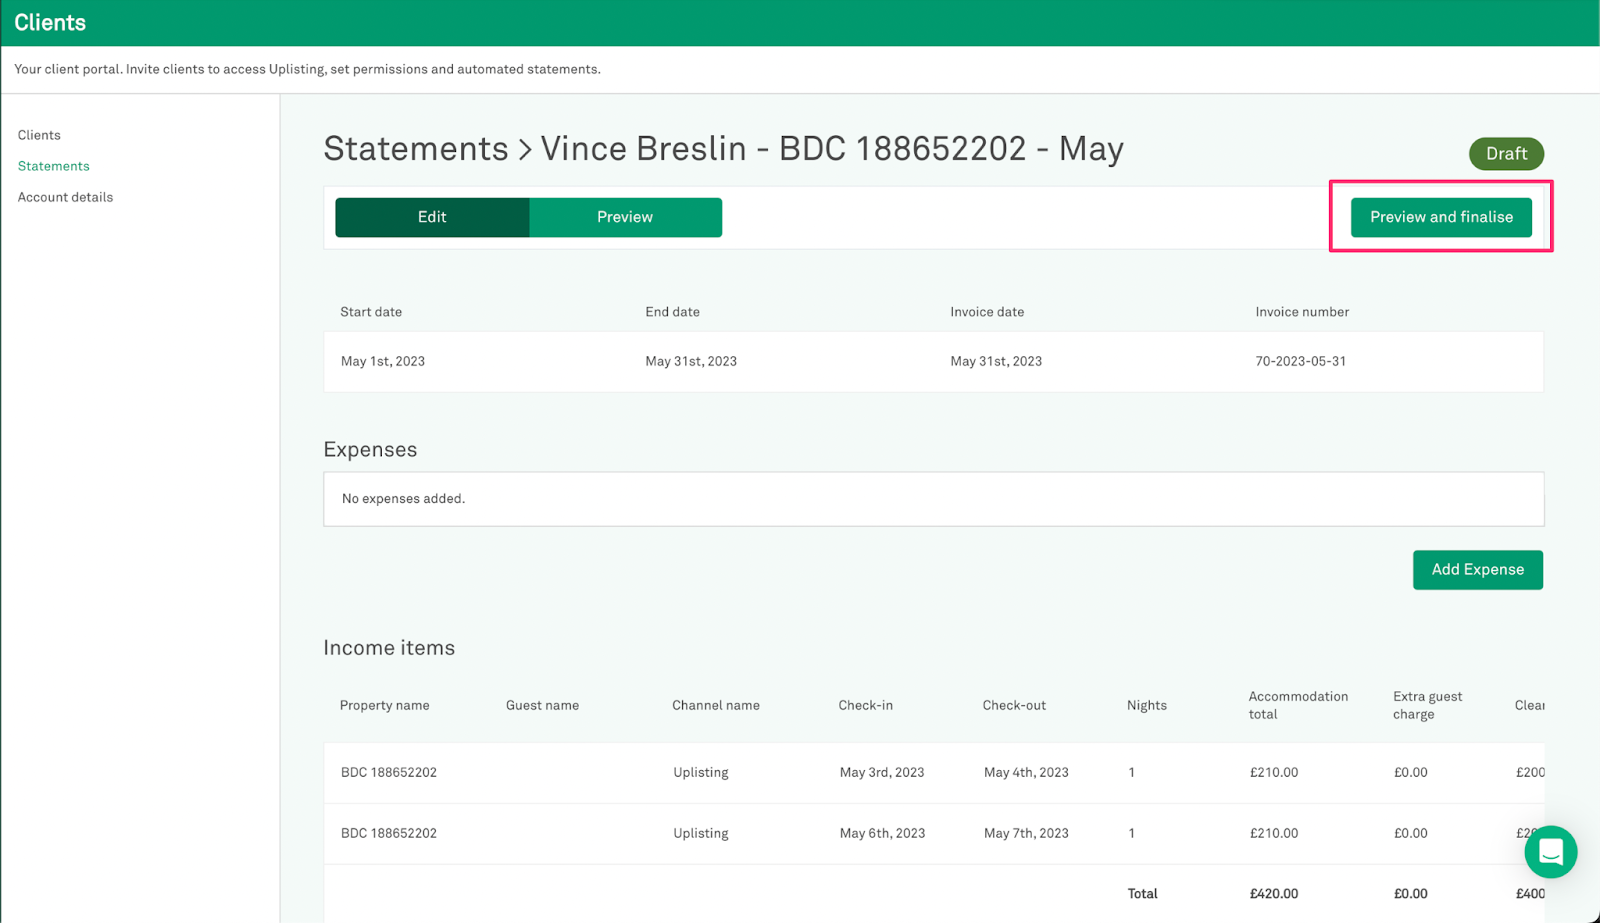
Finalising a draft statement
Once you’ve added all the expenses into the statement and you are sure there won’t be any bookings or expenses for the current month, you can proceed and finalise your statement.
To finalise a draft statement, click the “Preview and finalise” button, which leads you to the statement preview mode. In this mode, you are advised to review carefully all the data in the statement. Once happy with what’s present, you can finalise the statement.
Upon clicking “Finalise and generate PDF”, the system will ask you for confirmation of your action. Confirming the action will start the process of PDF generation. Keep in mind that this process can take up to a few minutes.
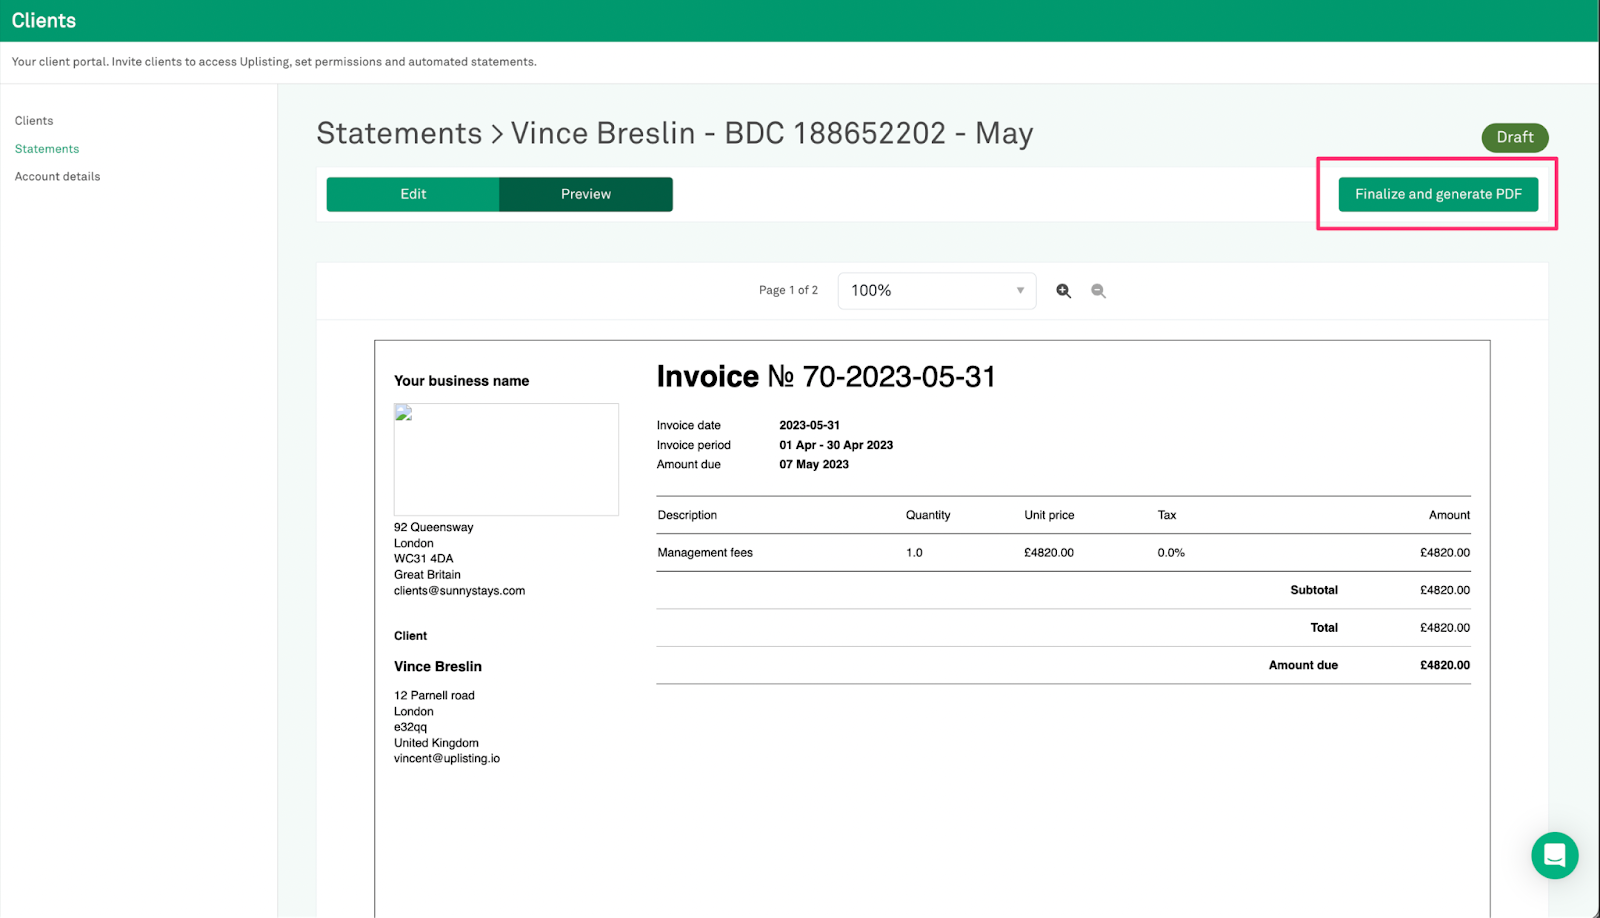
Once the statement is ready, the page will reload. You can download your document from there. Also, note that this statement status will no longer be “draft”. Opening the statements page, you will notice that this statement is now in “finalised” status.

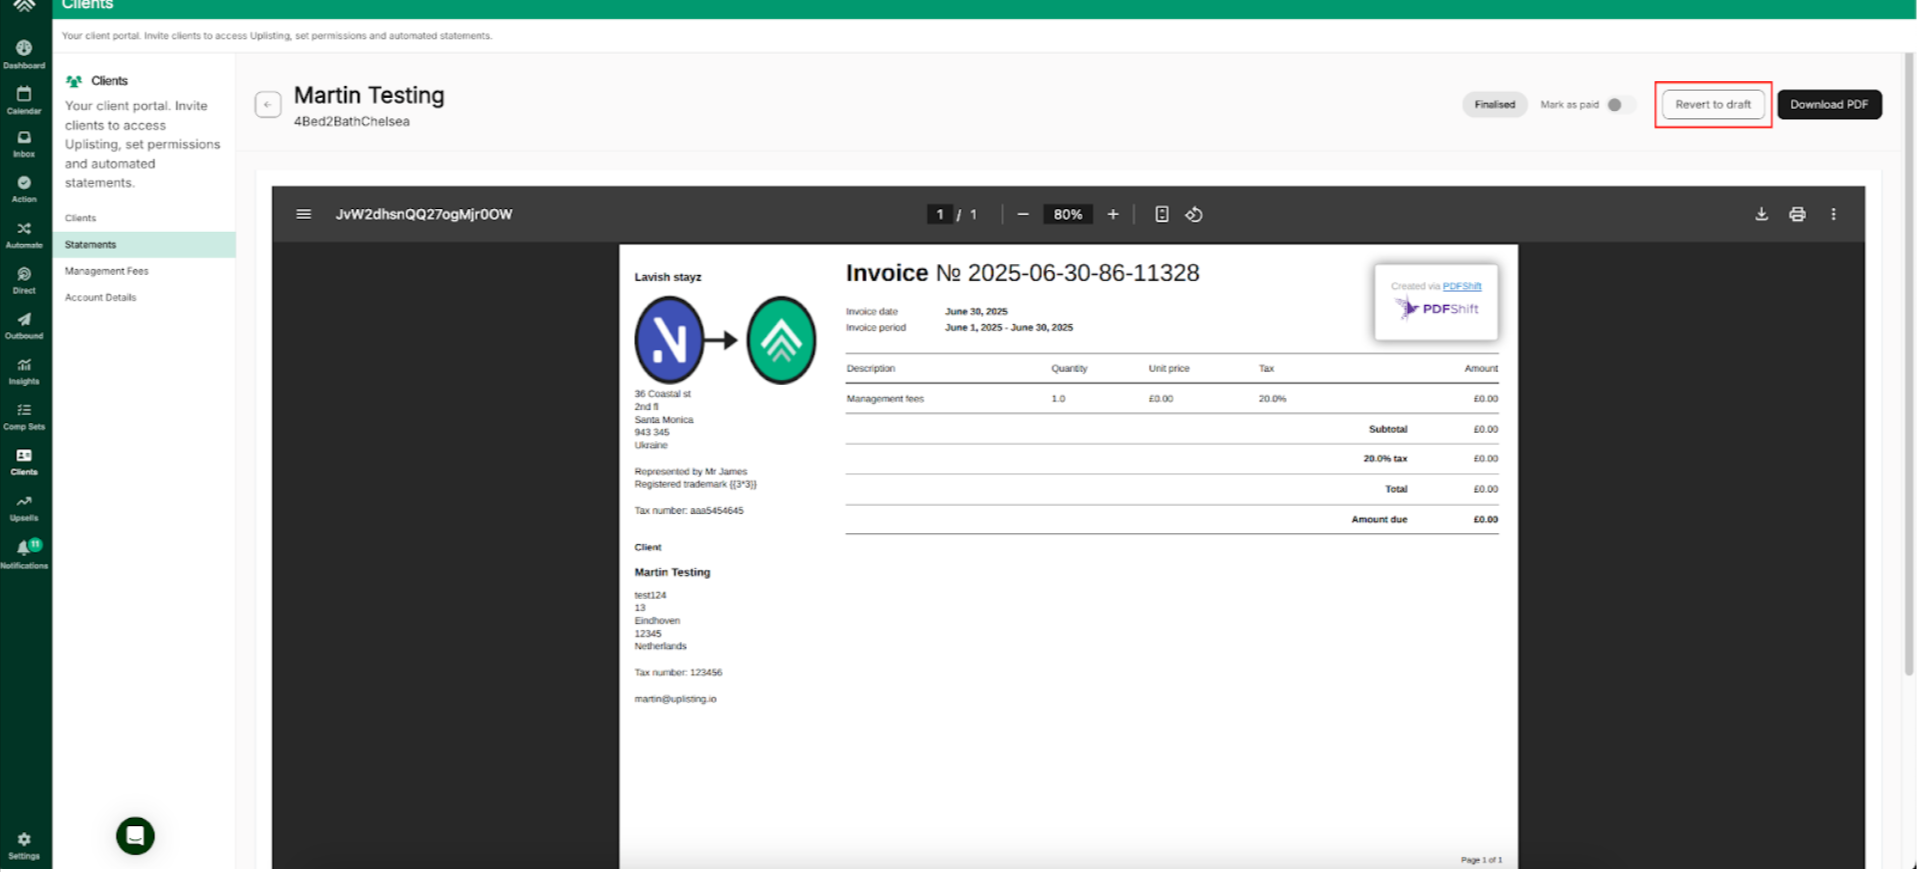
Resetting to Draft
- If you need to edit a finalized statement, click on the ‘Revert to Draft’ button, within the “Single Statement” overview page.
- Make your edits and finalize again.
Marking a Statement as Paid or Unpaid
- When a client pays (or you’re tracking payment status), simply mark the statement as Paid or Unpaid in the “All Statements” page or within the “Single Statement” overview page.
Conclusion
No more spreadsheets, manually entering data, keeping track of property expenses and calculating management fees. Uplisting saves you hours a month by automatically bookings and calculating your management fees. The statements are designed to help you look professional and transparent in front of your clients.
Most of the work requires a one-time set-up and from then on you’ll simply need to add to the statement the monthly expenses.
Current Limitations
This is our second iteration of Client Statements so there are some limitations.Please continue to provide feedback to our Support team which we can pass to our Product team for consideration in future releases.
- Invoices, once created, can't be Deleted or Archived - there will be a confirmation message prior to Finalising invoices, just to be sure.
- Invoice numbers are currently auto-generated and cannot be amended.
- If a Custom Management fee is added, this will only be applied to new bookings and not applied retrospectively to bookings with a management fee already calculated. For bookings that didn't contain management fee calculation, the system will recalculate those as soon as the formula is attached to the listing.
- Account Details (your details), if amended, will be applied to all draft client statements.
- Statements are not yet displayed to your clients on their Uplisting client portal
Updated 7 months ago