Widgets: Audio, Before & After, Image
Widgets: Audio
Widget Categories: Media
Share songs, podcasts, concerts, audio tutorials and other audio files on your site with the audio widget, which enables you to embed any SoundCloud or Mixcloud audio file or playlist directly to your site. Upload your audio file to one of these services, or use an existing public file, copy the link, and add it to your site via the audio widget.
For information on adding widgets, see Add Widgets
TIP For more information on widgets and the widgets library, see Widgets: Library and Overview
Content Editor
To access the content editor, the option to access the content editor is available in the floating menu. Click the element to open the floating menu, then click the option for the content editor. Click Select Audio to select an existing file or to upload one or paste the SoundCloud or Mixcloud URL in the field provided.
Design Editor
To access the design editor, right-click the element, and click Edit Design. Or if you are in flex mode or Editor 2.0, select Edit Design from the floating menu to open the design panel. Click the element to open the floating menu, then click the option to edit design.
Some of the available design options are dependent on the audio's source:
- Mixcloud: Layout, thumbnail display, light/dark color scheme, and sizing options (width only) are available (options vary depending on layout).
- SoundCloud: Layout, play icon color, and sizing options (width only) are available.
- Uploaded to the site (site files): With uploaded audio, the design is not editable, only the width can be adjusted.
Layout options are different for SoundCloud and Mixcloud files. If you want to keep the designs consistent between all instances of audio widgets on your site, make sure to load all audio files on the same platform.
For information about design options that are not specific to this widget (for example, layout, style, or spacing), see Widget Design
Widgets: Before & After
Widget Categories: Media
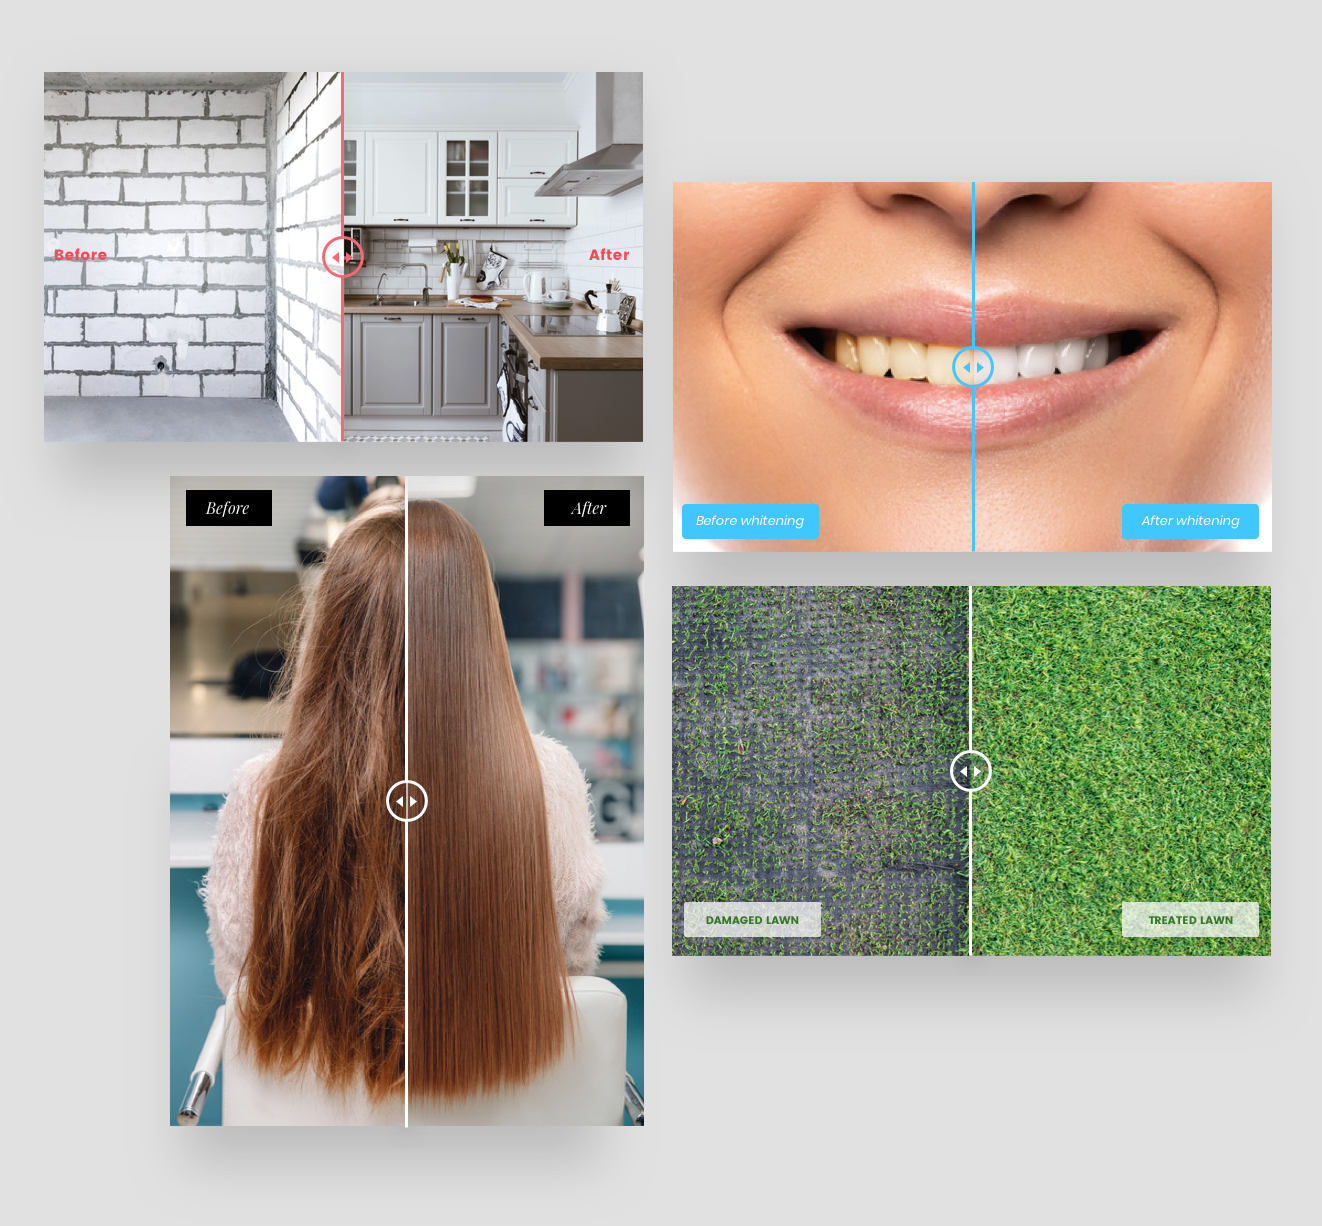
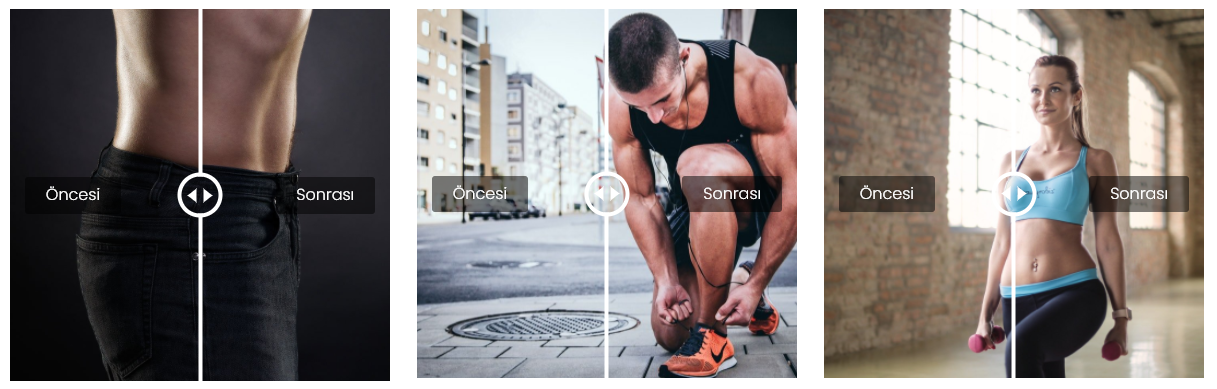
The Before & After widget enables you to show two images, side by side, for an eye-catching and engaging visual comparison. The widget includes a customizable slider to move between the two images.
TIP For more information on widgets and the widgets library, see Widgets: Library and Overview
For information on adding widgets, see Add Widgets
Content Editor
The option to access the content editor is available in the floating menu. Click the element to open the floating menu, then click the option for the content editor.
- Click + Image to add the before and after images.
- (Optional) Customize the labels for the images. To hide the labels, click the eye icon.
- Type Alt text for the images. Type your own alt text or click the Sparkle icon to use the AI Assistant to generate alt text. Repeat for each individual image in the Photo Gallery or click All Alt Text to view and manage alt text for all site images. The Sparkle icon will be disabled if an image is not selected.
NOTE
Alt text generated by the AI Assistant is in the same language as the page’s current language.
Design Editor
To access the design editor, right-click the element, and click Edit Design. Or if you are in flex mode or Editor 2.0, select Edit Design from the floating menu to open the design panel. Click the element to open the floating menu, then click the option to edit design.
- To customize the images and slider, click Images & Slider.
- To customize the label style and text, click Labels.
Make sure the design settings you define are correct per device. Settings such as spacing, image size and more are defined per device. For more information, see Screen Sizes and Devices.
For information about design options that are not specific to this widget (for example, layout, style, or spacing), see Widget Design
- Example
Widgets: Image
Use the image widget to insert an image into your site. You can customize images to act as buttons and navigate to other pages or sites, download files, or activate popups. Images are a great way to decorate sites, show off products or storefronts, and create an additional way to communicate with visitors.
The following image file types are supported: png, jpg, jpeg, gif, svg, svg+xml, ico, x-icon, webp
NOTE
- Each site can contain up to 15,000 media files, including images, audio, and files. Additional files result in an error message. The size limit per file is 50MB.
- File names cannot contain spaces or special characters.
For information on adding widgets, see Add Widgets
TIP
For more information on widgets and the widgets library, see Widgets: Library and Overview [7].
Add Image Widget from the Media Panel (Editor 2.0)
The Media Panel allows you to add an image and an image widget to the canvas at the same time. Or, you can replace existing images.
To add an image widget from the Media Panel:
- In the side panel, click Add, then click Media.
- (Optional) Use the filters to help locate the desired image. Or, click Upload Media to add a new image.
- Click and drag the desired image onto the canvas. Note that images cannot be placed in the Store Catalog or Product Gallery widgets or in widgets connected to dynamic pages.
Content Editor
To access the content editor, right click the widget and select Edit Content. Or, if you are in flex mode or Editor 2.0, the option to access the content editor is available in the floating menu. Click the element to open the floating menu, then click the option for the content editor.
-
Once an image widget has been added to a site, click the + Image to select an image.
-
Choose between the existing stock photos in the gallery or click +Upload to add your own image. For more image choice options, click Full View. The following options are available, once an image is selected:
- Edit. Change image properties by using the Image Editor.
- Replace. Select a different image.
-
The following options are available in the content editor:
- Link Image. Images can be linked to other pages and URLs, popups, anchors, email addresses, and downloadable files. When a visitor clicks on the image, they will be taken to the link.
- Alt text. Enables search engines to recognize image content. Write text to describe the image, or click the Sparkle icon to use the AI Assistant to generate alt text. The Sparkle icon will be disabled if an image is not selected.
- Click All Alt Text to view and manage alt text for all site images.
- Tooltip. Text shown when a visitor hovers over an image.
- Caption. Type a caption for the image.
- Alternate image on-hover.
NOTE
Alt text generated by the AI Assistant is in the same language as the page’s current language.
Design Editor
To access the design editor, select Edit Design from the floating menu to open the design panel. Click the element to open the floating menu, then click the option to edit design.
The toggle to turn image optimization off can be found in the Style tab.
WARNING
Disabling image optimization could impact page speed and or performance.
For information about design options that are not specific to this widget (for example, layout, style, or spacing), see Widget Design
FAQs and Troubleshooting
Images are blurry, how do I fix them? Blurry images can sometimes result from the optimization process. If this occurs, you can disable optimization, though this may affect site speed.
To disable optimization:
- To access the design editor, select Edit Design from the floating menu to open the design panel. Click the element to open the floating menu, then click the option to edit design.
- Navigate to the Style area.
- Click the toggle for Do not optimize this image.
I received the error "Name already in use" but I have no files with the name File names can remain cached for a while. If a file with the same name was recently deleted, it is likely still cached, and you will need to use a different name.
Why is the content of my uploaded file incorrect? A file with the same name may have recently been deleted. File names can remain cached for a while. The file would need to be renamed.
To rename a file, open the Media Manager, select the file and click Rename. If using a library or picker, toggle on the Manage option for the library or picker.
Additional characters are being added to the file name This is likely due to an existing file with the same name or a recently deleted one. File names can remain cached for a while, so renaming the file may be the best option if you encounter this issue. To rename a file, open the Media Manager, select the file and click Rename. If using a library or picker, toggle on the Manage option for the library or picker.
How do I get an Image to Show up as the Right Size? To optimize image sizes for your site:
-
Only upload images as large as they are intended to be used (for example, if the image is going to appear as 300px by 300px on the site, do not upload it as a 4000px by 4000px image).
-
The maximum image size displayed on your site cannot exceed 3,145,728 pixels.
-
Be aware of aspect ratios, as 16:9 images look great on desktop but appear too small on mobile. In this case:
- Use the Hide on Device feature to create specific versions of the image for each device.
- Resize the image dimensions (aspect ratio) to fit - size changes are device independent.
An image is failing to upload There could be a few reasons that would cause a file to fail. A recommended first step in troubleshooting is testing to see if you're able to upload other images. If you are able to, this typically indicates the error is related to the file itself or the file size is too large (files can be a maximum of 200MB).
TIP
There are several potential causes that could prevent files from being uploaded, with a common one being that the file is locked. In such cases, the previous owner of the file needs to unlock it and may need to provide a new version.
If you aren't able to, it could be related to:
- The maximum file limit has been reached (up to 15,000 images, audio clips, and files can be uploaded per site).
- The browser or device you're using. In this case, clearing cache, trying a different browser or device, or restarting your device might fix it.
Updated 3 months ago