Dynamic Content: Airtable Collections
Airtable can serve as a collection, allowing you to create Dynamic Pages (Dynamic Content: Dynamic Pages as well as enhance regular pages. Using a collection on a regular page is similar to how Connected Data is used with the site's Business Info (Dynamic Content: Collections for Regular Pages. For more information on Connected Data with Business Info, Dynamic Content: Business Info, Text, and Images
For an overview on Collections and formatting guidelines, Dynamic Content: Collections. Dynamic Content: Collections.
WARNING
Effective February 1st, 2024, API keys will be completely phased out. At this time, collections that have not had the API key switched to a personal access token may encounter disruptions (for instructions, see the section Update an Existing Collection's API Key with a Personal Access Token in this article).
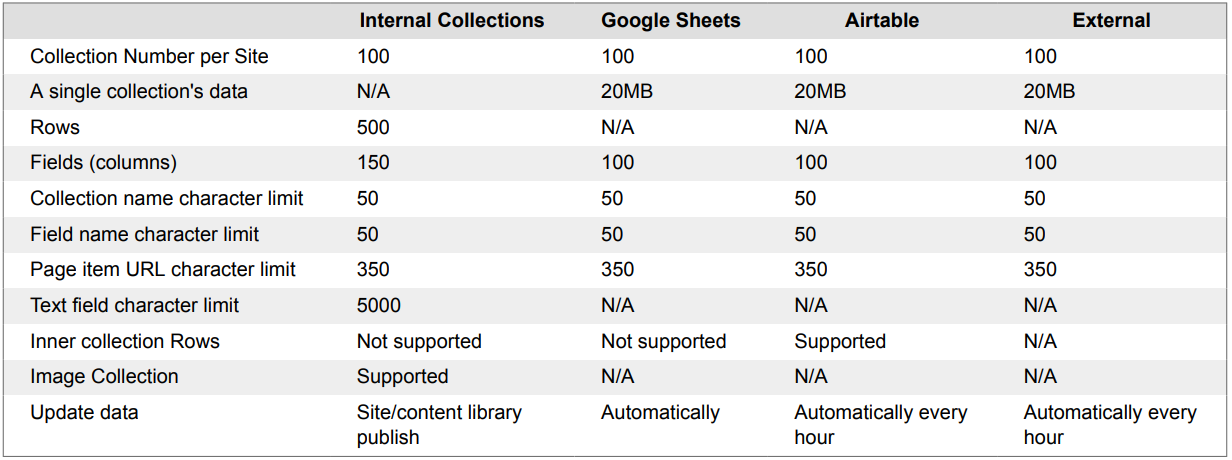
Limitations and Specifications per Collection Type
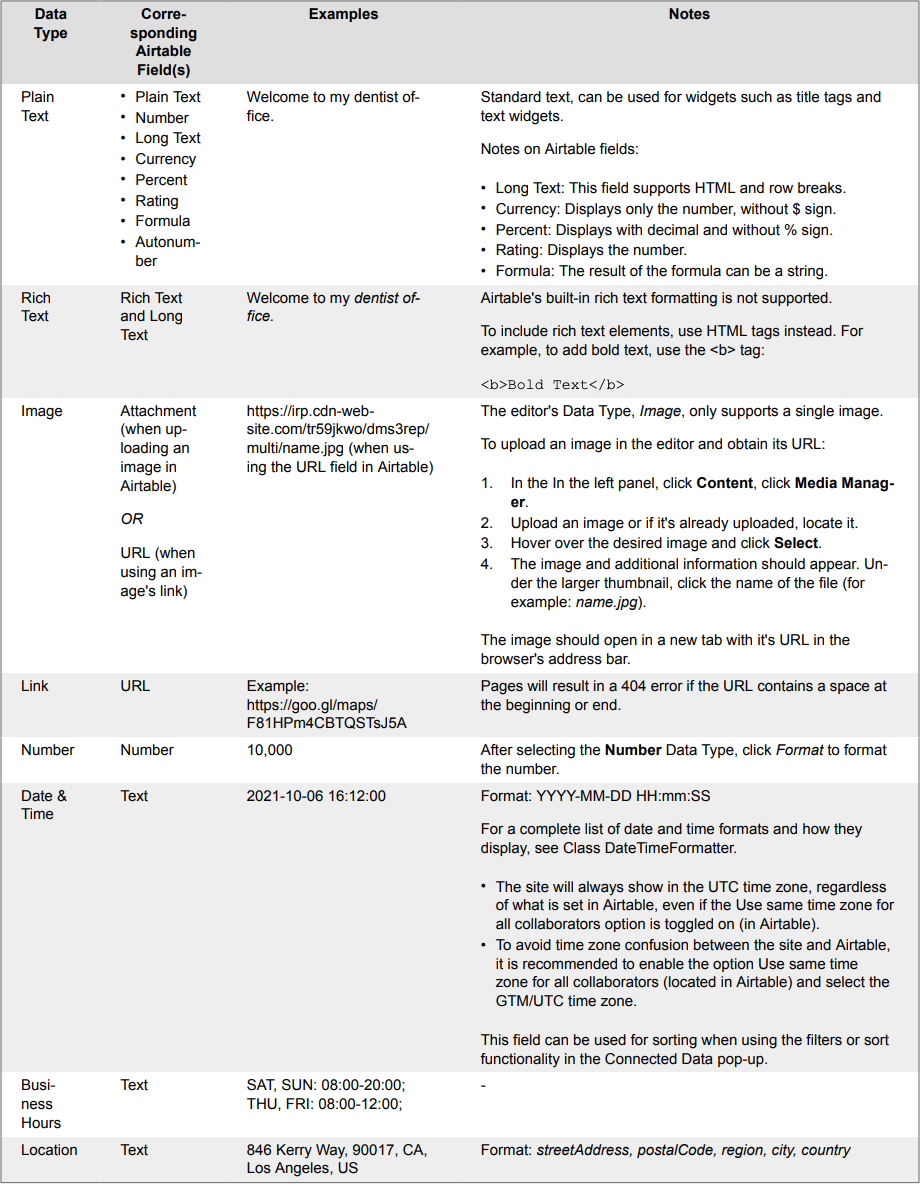
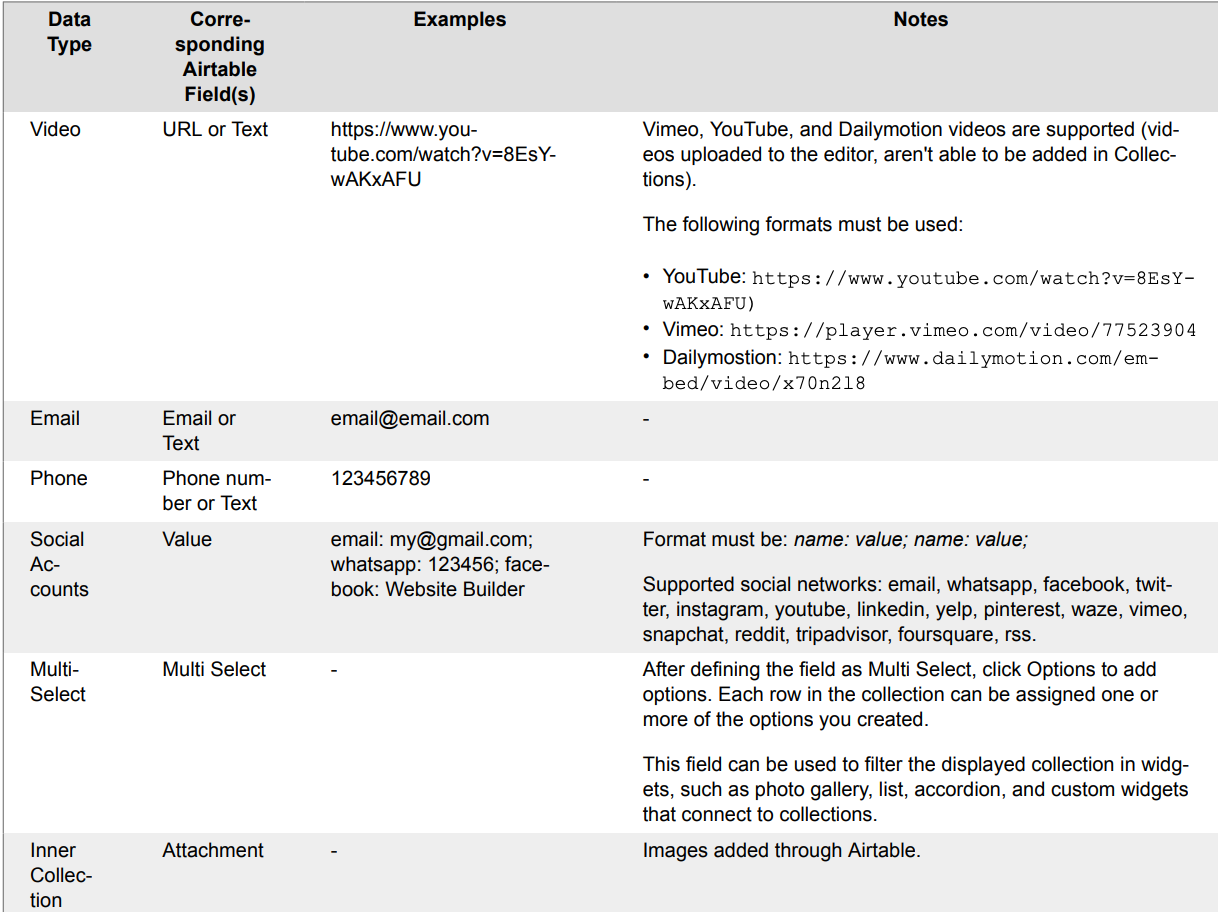
Available Fields and Airtable's Corresponding Fields
NOTE
Airtable made changes to their attachment URL (URLs for images uploaded directly in Airtable) causing them to expire after two hours. Website Builder is not affected by this change since it pulls data from Airtable on an hourly basis
Connect an Airtable Collection
To connect an Airtable collection:
- In the side panel, click Content.
- Click Collections, then click +New Collection.
- Click Airtable.
- Enter your Airtable Access Token and Example URL provided by Airtable.
- Click Import Fields.
- Define the correct data type for each field.
- Click Connect Spreadsheet.
- Define the correct data type for each field.
- Click Continue.
NOTE
Due to API limitations, Website Builder will not import fields that do not have content in the first 10 rows.
Personal Access Token
To obtain a Personal Access Token:
- Visit Airtable's page, Personal access token (if you are not already signed into Airtable, you will be prompted to do so).
- Once on the Personal access tokens page, click Create token.
- Enter in a name for the token.
- In the Scopes section, click + Add a scope and select data.records:read (See the data in records).
- In the Access section, click + Add a base and select the All current and future bases in all current and future workspaces option located under All Workspaces.
- Click Create token.
- Click the copy button located next to the token.
- Return to the editor and paste the token into the Access Token field.
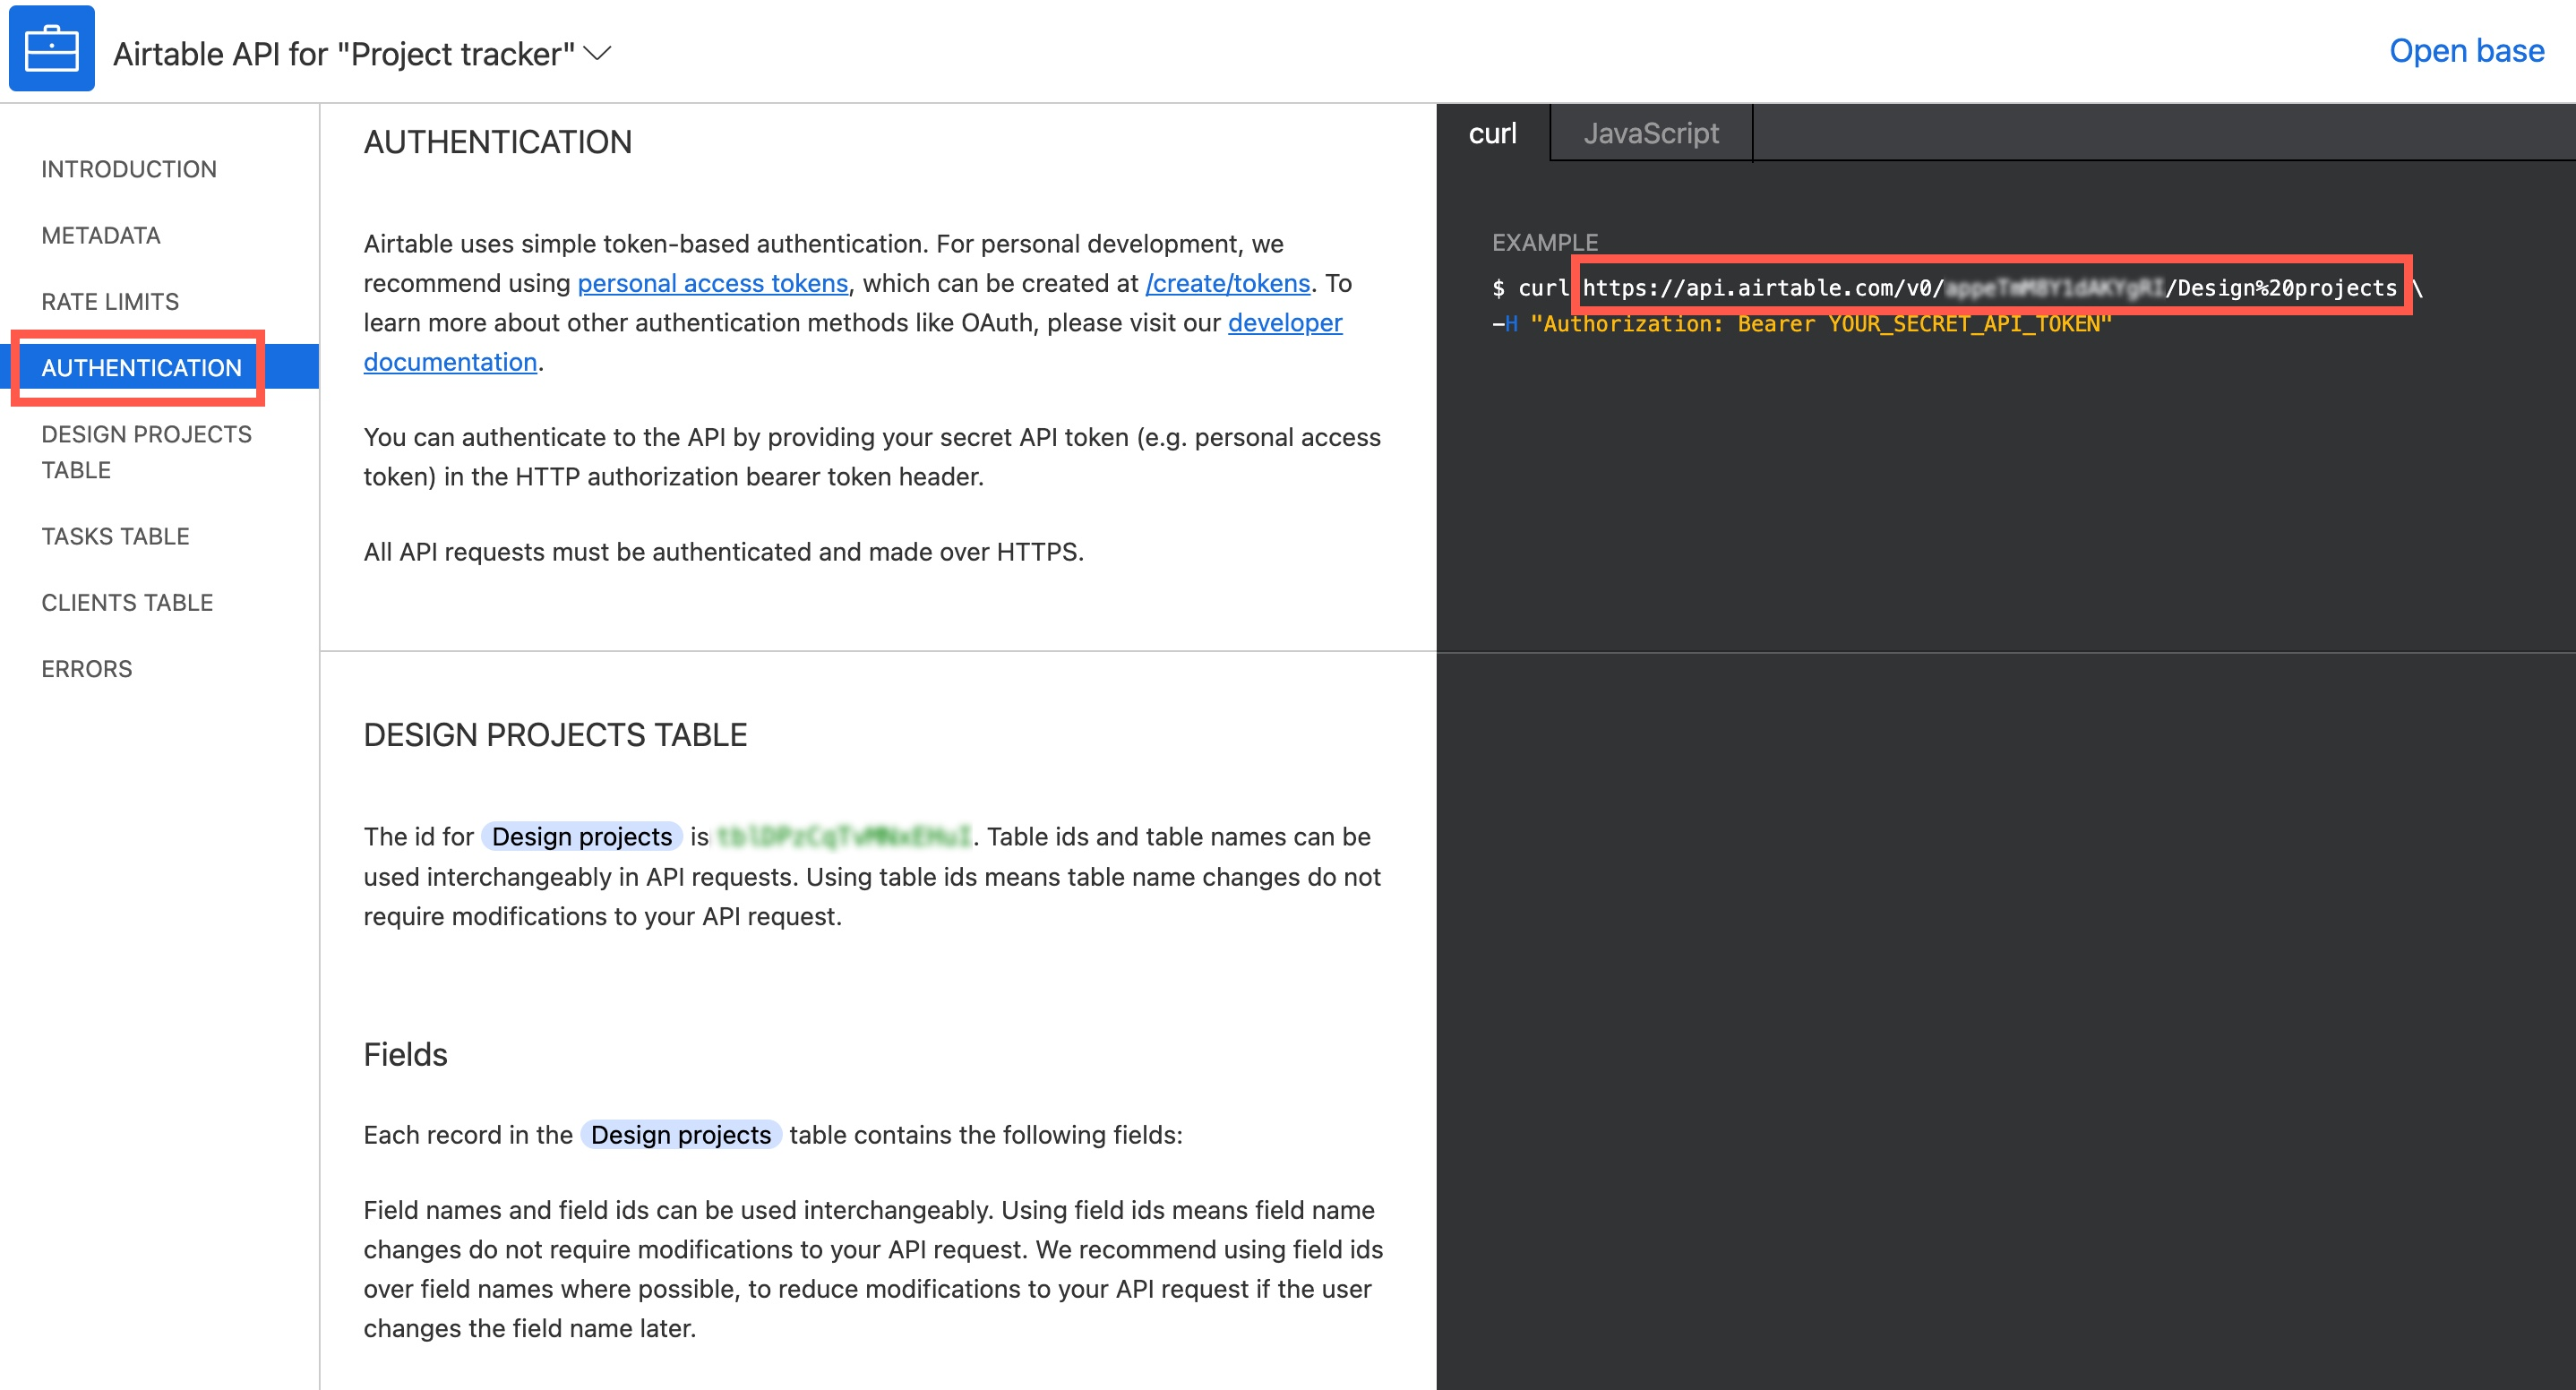
Example URL
To obtain the collection's Example URL:
- Visit Airtable's page, API Reference (if you are not already signed into Airtable, you will be prompted to do so).
- Once on the API Reference page, scroll down and select the desired collection.
- In the side panel, click Authentication.
- In the Curl tab, copy the link under EXAMPLE.
- Return to the editor and paste it in the Example URL field.
Add a New Column to an Airtable Collection
- In the side panel, click Content.
- Click Collections.
- Click to open the Airtable collection.
- Click +Add Field.
- Select the data type from the Data Type drop down menu and type the name of the field in the Field Name space.
- Click Refresh Data.
The new column appears in the available fields when connecting a widget.
Row Order
When using Airtable collections, the row order may appear random due to an API limitation on Airtable's side. Filters and sorting in Airtable are not recognized.
To manage the display order of collections in the editor, you can use the following methods:
• Filter & Sort Function: Utilize the Filter & Sort function within the Collection Display Widget (such as the Photo Gallery Widget or List Widget) to sort by Ascending or Descending order.
NOTE
Collections can only be sorted in Ascending or Descending order. For this method, the Airtable collection would need to have a column or field that can be sorted in this way. If it doesn’t, this method will not work, and adjusting the example URL will be necessary to maintain the desired order.
• Adjust the Example URL: If the records will be listed in the navigation, you can specify the Airtable View name in the example URL to maintain the desired order. This adjustment will also ensure the records are in the desired order for Collection Display Widgets. For more information, see Airtable Support or the section below, Adjust the Example URL
Filter & Sort Function
When connecting to a Collection Display Widget (such as the Photo Gallery Widget or List Widget; Collection Display Widgets for more information), you can sort the collection to display in Ascending or Descending order.
To sort:
- If the desired Collection Display Widget is not already placed on the site, add it to the page where you want it to exist.
- Right-click on the widget to open the settings menu, and click Connect to Data. • If the widget already exists: right-click on the widget, hover over Connected Data, and select Change Connection.
- If adding a new widget, select the collection from the Connect to drop-down menu. (Skip this step if the widget already exists.)
- To sort:
- a. Click +Add sort.
- b. Click into the Sort by drop down list to select the field/column to sort by.
- c. Click into the Order drop down list to select the order (Ascending or Descending)
The following are other options available as well:
• Display. Select the number of items you want to display (for example, All, or 2).
• Fixed Filters. The fixed filter will filter will display the records from the connected connection with the exact term entered.
• Dynamic Filters. The dynamic filter maps 2 fields from 2 different collections (Dynamic page & Widget) to dynamically present the widget content.
Adjust the Example URL
To add the view, after the example URL is added, add ?view=View Name. The view name is case sensitive and should be typed exactly how it's written in Airtable.
WARNING
Deleting or changing the view name after importing the collection will break the connection.
The following is an example of the URL before adding the view name:
https://api.airtable.com/v0/appbiL1pCyvFcW8WG/Feedback%20Session?view=Main%20View
The following is an example of the URL after adding the view name:
https://api.airtable.com/v0/appbiL1pCyvFcW8WG/Feedback%20Session?view=Main View
For more information on adding the view name to the URL, see the video below:
https://www.youtube.com/embed/GzDQjO8IQFM
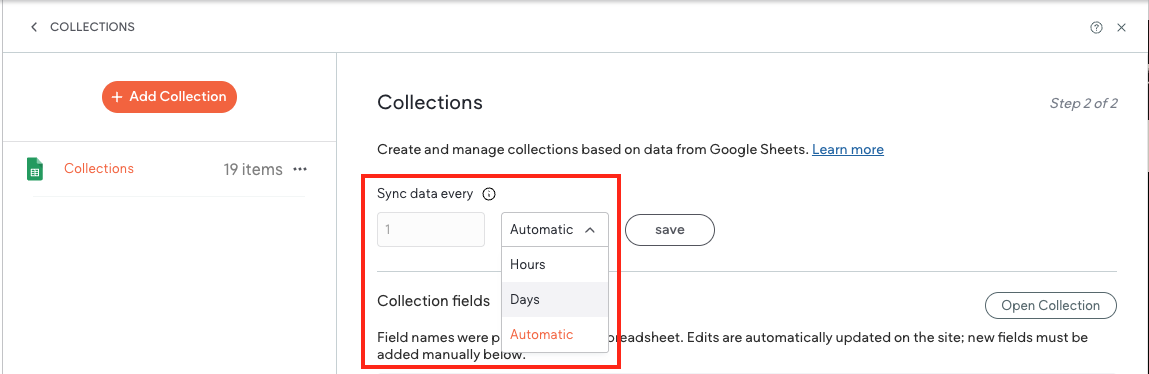
Set Airtable Collection Sync Frequency
By default, external collection data is synced every hour. However, due to API call limits on different platforms, this can quickly deplete available calls and lead to service disruptions. To prevent this, you can set how often your external collection data is synced. This allows you to ensure you do not exceed the amount of API calls your external collection platform allows.
To set how often external collection data is synced:
- In the side panel, click Content.
- Click Collections and open the desired external collection.
- At the top of the external collection under Sync data every, use the arrows to select a number, then use the dropdown menu to select either Hours or Days. By default, Automatic is selected. This is the default and means your collection data is synced every hour.
Note that the sync timing only applies to the current external collection. You must set each external collection sync timing individually.
- Click Save.
WARNING
Airtable attachment URLs expire every 2 hours. If you set the sync frequency to more than 2 hours, images added as attachments may not display on the live site.
Update an Existing Collection's API Key with a Personal Access Token
To update an existing collection’s API with a Personal Access Token:
- In the side panel, click Content.
- Click Collections, then click to open the desired Airtable collection.
- Click Collection Settings located towards the bottom.
- In the Access Token field, replace the API Key with a personal access token. The step can be found in the editor; for detailed instructions see the **Personal Access Token **section in this article.
- Select the data type from the Data Type drop down menu and type the name of the field in the Field Name space.
- Click Refetch Collection.
- Click Done.
Airtable Collection Troubleshooting
I received the error message ”We couldn’t connect. Please verify your details and try again.”
Possible causes for this error message include:
• You have reached your Airtable API limit. Check your plan and upgrade if necessary.
• You are using an outdated API key and need to update to a personal access token. See steps for how to update to a personal access token in Airtable
Images from my Airtable collection are displaying as broken in the editor.
Possible causes for broken images include:
• You have reached your Airtable API limit. Check your plan and upgrade if necessary.
• If you are trying to display images in the Media Slider widget, check that in Airtable the field is set to "Attachments". If it is not, the Media Slider will not be able to recognize the images.
My Airtable collection records are not updating in the editor even after clicking Refresh.
Possible causes for Airtable collection records not updating include:
• You have reached your Airtable API limit. Check your plan and upgrade if necessary.
• You are using an outdated API key and need to update to a personal access token.
• Check that any view names were not changed in Airtable, as this can break the connection between Airtable and Website Builder.
My Airtable rows are not creating new dynamic pages.
Check that any view names were not changed in Airtable, as this can break the connection between Airtable and Website Builder.
Updated 3 months ago